The first and most critical step in how to repair burst pipe damage is to shut off the main water supply to the house immediately. Once the water is off, assess how far the water traveled so you can decide whether this is a manageable plumbing fix or a larger loss that needs professional drying and restoration.
If you're reading this with wet socks, a dripping ceiling, or water running across hardwood floors, slow down and work the problem in order. A burst pipe is part plumbing emergency, part property-damage event. The plumbing repair stops the leak. The restoration work protects drywall, flooring, cabinets, insulation, and your insurance documentation.
In Los Angeles, that distinction matters more than many homeowners realize. Older homes in Sherman Oaks, Glendale, Burbank, and parts of North Hollywood often hide supply lines behind plaster, under raised floors, or in tight wall cavities. A pipe can fail in one spot while the unseen damage spreads far beyond it.
What to Do the Moment You Discover a Burst Pipe
A burst pipe usually announces itself fast. You hear rushing water in a wall, see a ceiling stain suddenly darken, or walk into a room with water pooling along the baseboards. Your first job isn't to diagnose the pipe material. It's to stop the water source.
Shut off the main water valve first
Go straight to the house main and close it fully. If you don't know where it is, use this guide to find your main water shut off. In many Los Angeles homes, the shutoff is near the meter, at the side yard, in a garage, or where the service line enters the structure.
If the broken line is on a hot-water system, turn off power to the water heater once the water is isolated. That prevents the heater from running under unsafe conditions while the system drains.
Practical rule: The leak doesn't become manageable until the water supply is fully isolated. Everything before that is panic. Everything after that is a plan.
Look at the damage, not just the break
Once the flow stops, check three things:
- Ceilings and walls: Look for bulging drywall, staining, peeling paint, or soft spots.
- Flooring: Check whether water ran under wood, laminate, tile edges, or carpet pad.
- Contents: Move rugs, boxes, electronics, and furniture legs out of wet areas.
This first scan tells you whether you're dealing with a simple exposed pipe repair or a broader water intrusion. A pinhole split under a sink is one kind of job. A line that sprayed inside a wall cavity or over a finished floor is another.
Decide what kind of emergency you actually have
If the pipe is exposed, the area is electrically safe, and the water stayed localized, you may be able to make a temporary repair and schedule the permanent plumbing work. If water ran behind finishes, seeped under flooring, or came through a ceiling, treat it like a restoration loss from the start.
That mindset protects property value. It also protects your claim file if you need one later.
Your First 15 Minutes Emergency Containment Plan
The first few minutes after shutdown matter because they determine whether the damage stays localized or spreads into adjoining rooms, wall cavities, and subfloors.

Relieve pressure and drain the system
After the main is off, open faucets so the plumbing system can drain and residual pressure can drop. This pressure reduction step is the highest-value technical control before repair because it stops ongoing discharge and gives you a stable line to work on, as explained in this burst pipe repair guidance.
If the failure involves a hot-water line, shut off the water-heater power before draining. That's a safety step, not an extra.
Make the area safe before cleanup
Water and electricity don't negotiate. If water is near outlets, appliances, or extension cords, don't step into it until power to the affected area is safely shut off. If the panel area is wet, leave it alone and call for electrical help.
Then contain what you can.
- Use buckets and containers: Catch active drips from ceilings or open pipe ends.
- Lay down towels and absorbents: Focus on thresholds, floor transitions, and doorways where water keeps spreading.
- Lift or move contents: Put foil, blocks, or plastic under furniture legs if you can't move larger pieces right away.
- Protect documentation: Grab receipts, file boxes, photos, and anything paper-based near the wet zone.
In older Glendale and Sherman Oaks homes, I often see water travel farther than the visible wet area suggests. Hardwood and plaster can hide migration surprisingly well.
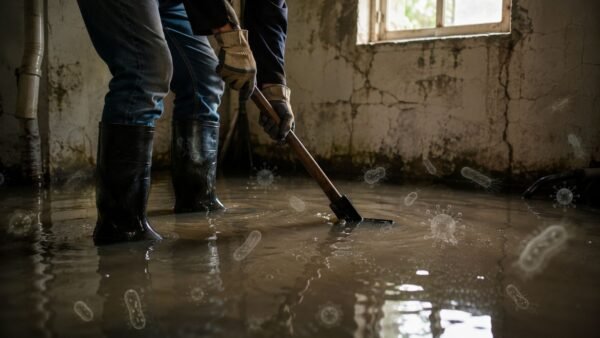
Start removal and drying fast
Visible water should come out first. Mop, blot, and extract what you can with safe equipment. If the affected area is larger than what household towels can realistically manage, bring in help for emergency water cleanup.
Water that sits in place rarely stays in place. It wicks into baseboards, drywall bottoms, cabinet toe-kicks, and flooring seams.
A simple homeowner triage sequence looks like this:
- Stop spread: Block water from reaching adjacent rooms.
- Remove standing water: Towels, mops, or wet-rated extraction if safe.
- Increase airflow: Open cabinet doors and interior doors where damp air is trapped.
- Document before disposal: Photograph damaged finishes and the burst location before tearing anything out.
A short visual walkthrough can help if you're under stress and need to see the sequence.
What usually goes wrong in these first minutes
Homeowners lose time in three predictable ways:
- They chase the leak instead of the shutoff.
- They patch a wet pipe without draining it first.
- They clean up before taking photos and video.
That last mistake hurts later. If drywall swells, baseboards separate, or engineered wood cups after the visible leak is stopped, your documentation should show the condition early.
Choosing the Right Temporary Pipe Repair
Temporary repair is about buying time safely. It isn't about pretending the problem is solved. Some products hold well enough for a short window. Others fail because the pipe is still wet, the split is longer than it looks, or the surrounding pipe wall is already weak.
Match the repair method to the failure
A clamp or sleeve works best when the pipe is accessible and the damaged area is limited. Tape and putty are more situational. They can help with very small leaks, but they often disappoint on active splits, wet surfaces, or irregular corrosion.
Here's the practical comparison.
| Temporary Burst Pipe Repair Options | Best For | Pros | Cons |
|---|---|---|---|
| Pipe clamp or repair sleeve | Straight, accessible pipe with a localized split | Fast to install, strong mechanical hold, useful on pressurized lines once drained | Needs access around the pipe, poor fit on irregular damage or fittings |
| Silicone repair tape | Very minor seepage after the line is drained | Easy to buy, simple for homeowners, no cure mixing | Surface must be fairly dry, weak on larger cracks, not a true structural repair |
| Epoxy putty | Small holes or pitted areas on a dry pipe | Can conform to uneven areas, useful for odd shapes | Surface prep matters, cure time matters, unreliable on active water flow |
| Cut out and replace section with push-fit couplings | Burst copper section where damaged pipe can be removed cleanly | More reliable than surface patching, code-oriented temporary approach when done correctly | Requires cutting tools, clean square cuts, enough working room |
The most dependable temporary fix for burst copper
For a code-compliant temporary repair on a burst copper line, the standard practice is to cut out the damaged section entirely, about 10 inches total, then install push-fit couplings or replacement pipe. Leave 2 to 3 inches of space between existing fittings and the new coupling, mark the pipe to the fitting's insertion-depth line, and then restore water slowly while checking for leaks, based on SharkBite's burst pipe repair guidance.
That detail matters. Incomplete insertion is a common field mistake. If the depth mark disappears unevenly or doesn't line up, the fitting may not be fully seated.
A temporary repair fails most often because the pipe wasn't cut back far enough. The weak metal next to the split is usually part of the problem.
What works and what doesn't
What works:
- Dry pipe surfaces: Even mechanical repairs hold better when the line is drained and wiped down.
- Square cuts: Crooked cuts create bad seating surfaces.
- Real access: If you're forcing tools in a tight cavity, the repair quality drops fast.
What doesn't:
- Wrapping over active spray
- Ignoring corrosion around the burst
- Treating tape as a long-term answer
- Re-pressurizing the house too fast
If you're standing in a Burbank hardware aisle trying to choose one item, a clamp or a cut-and-replace approach is usually more trustworthy than tape for a true burst.
Permanent Pipe Repair and Replacement Options
Once the emergency is contained, the permanent fix depends on the pipe material, access, and why the line failed in the first place. A clean puncture in an exposed run is straightforward. A burst caused by age, movement, corrosion, or repeated stress may point to a larger replacement decision.

Copper, PEX, and PVC need different repair logic
Copper is often repaired by cutting out the failed section and installing new pipe with soldered fittings or approved mechanical connectors. The work must be clean, dry, and properly supported. If the copper is thinned or pitted beyond the burst area, replacing only the visible split may be shortsighted.
PEX usually involves removing the damaged segment and reconnecting with compatible fittings. The key is using the right system components and making sure the tubing isn't kinked, stretched, or nicked near the repair.
PVC repair generally requires cutting out the bad section and solvent-welding new pipe and fittings. Surface prep and cure conditions matter. A rushed PVC repair can leak later even if it looks fine at first.
Repair the cause, not just the opening
Homeowners often focus on the exact spot that leaked. Plumbers look wider.
Ask these questions:
- Was the pipe damaged by age or corrosion?
- Did movement or poor support stress the line?
- Is the pipe inside a wall or ceiling where more moisture damage may still be hidden?
- Have there been previous leaks on the same run?
If the answer points to a systemic issue, a spot repair may only delay the next failure. Understanding the likely cost path helps in these situations. This breakdown of the cost of burst pipe repair gives homeowners a realistic frame for access, labor, and damage-related expense.
Buried line failures are different
For underground service lines or sewer laterals, the modern solution may not involve trenching the whole yard. The EPA describes trenchless pipe bursting as a process where a new pipe is pulled through the old one while the old line is shattered underground. The method can proceed at 100 feet per hour, which helps reduce surface disruption compared with full excavation, according to the EPA pipe bursting fact sheet.
That matters on Los Angeles properties with mature landscaping, hardscape, patios, and tight side yards. Traditional excavation can repair the pipe. It can also create a second project in the yard.
When a buried line fails, the best repair isn't always the one that exposes the most pipe. It's the one that fixes the line while preserving as much of the property as possible.
When to Call a Professional Restoration Expert
A burst pipe becomes a restoration job when water moves beyond the pipe itself and into building materials. That's the line many homeowners miss.

The repair may be small, but the loss may not be
Industry cost data puts the average burst pipe repair around $500, with typical totals from $200 to $3,000. Labor can account for 80% of the bill, and professional water-damage cleanup can average an additional $3,500, which is why secondary damage often becomes the expensive part of the event, as noted in this HomeAdvisor burst pipe cost guide.
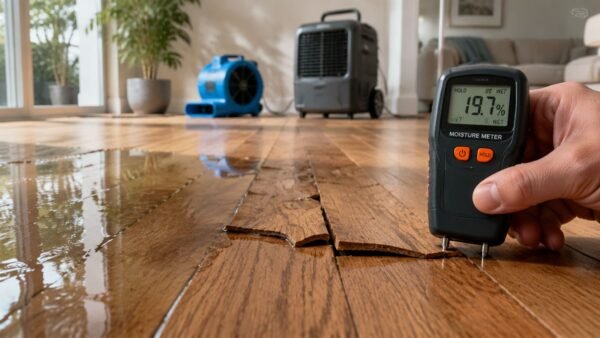
In our experience dealing with water damage in Los Angeles homes, the hidden damage is what changes the job. Water under floating floors, behind vanity backs, inside insulation, and beneath cabinet bases doesn't dry well with a box fan and hope.
Signs the job has crossed into restoration
Call a pro when you see any of these conditions:
- Wet drywall or insulation: Especially when the pipe burst inside a wall or ceiling.
- Water under finished flooring: Cupping, soft spots, swelling, or separation at seams.
- Cabinet or baseboard saturation: Water collects at low points and stays there.
- Multiple rooms affected: Migration often follows framing, slab edges, or floor level changes.
- You need claim-ready documentation: Moisture readings, photo logs, and drying records matter.
If floors took the hit, this homeowner's guide to floor damage is a useful companion read because flooring failures often appear after the plumbing side seems resolved.
Why restoration standards matter
A good restoration company doesn't just remove visible water. It maps the moisture, sets drying equipment based on material behavior, and documents the process. If you need that level of help, this overview of a restoration professional explains what qualified emergency response should include.
The goal isn't to make the house look dry. The goal is to return the structure to a dry, stable condition and preserve the record of what happened.
Frequently Asked Questions About Burst Pipes
Will homeowners insurance cover a burst pipe?
Coverage depends on the policy and the cause of loss. Many homeowners start with this guide on whether homeowners insurance covers burst pipes because the important distinction is often between sudden damage and longer-term maintenance issues. Document the burst location, affected rooms, damaged materials, and every emergency expense.
How long can I trust a temporary repair?
Treat temporary repairs as short-term stabilization only. A clamp or cut-and-couple repair may hold better than tape or putty, but the right answer is permanent replacement as soon as possible. If the pipe is hidden, corroded, or part of an older run, don't stretch the timeline.
Can I repair a burst pipe myself?
Sometimes, yes. If the line is exposed, the area is safe, you can fully isolate and drain the system, and the damage is localized, a homeowner with the right tools can manage a temporary fix. If the pipe is behind walls, near electrical hazards, or tied to visible water damage, bring in licensed plumbing and restoration help.
What's the biggest mistake after the water is off?
Many individuals underestimate the moisture that traveled beyond the break. They fix the pipe, wipe the floor, and assume they're done. Then trim swells, paint blisters, flooring lifts, or odor develops because trapped moisture was left in place.
Is burst pipe repair always expensive in Los Angeles?
Not always. A simple exposed repair can stay relatively contained. Costs rise when access is difficult, when labor dominates the job, and when the leak affects finishes or contents. Homes with older construction in areas like Glendale, West Hollywood, and Sherman Oaks often need a closer moisture inspection because hidden cavities and layered remodels can trap water.
Should I wait and see if the wet area dries on its own?
That's a gamble. If water touched drywall, flooring systems, trim, cabinetry, or insulation, active drying and inspection are the safer course. Waiting usually makes the scope less predictable, not more.
If you're dealing with a burst pipe in Los Angeles, Burbank, Glendale, Sherman Oaks, or nearby neighborhoods, call Onsite Pro Restoration at 818-336-1800 for a free inspection. We provide emergency water extraction, structural drying, documentation for insurance claims, and practical guidance on what needs repair now versus what can wait.