Hardwood floor water damage is a time-sensitive emergency. If water has been on your floor for more than 24 to 48 hours, the risk of permanent warping and mold rises fast, so the first move is to call a professional to assess it.
If you're standing in a Los Angeles kitchen right now staring at a dishwasher leak spreading into oak planks, don't wait to see if the floor “dries on its own.” Wood absorbs water quickly, damage often starts below the surface, and the floor can look better before it gets worse. That false calm is what traps a lot of homeowners in Sherman Oaks, Burbank, and Glendale.
This guide covers what to do first, what damage looks like, where DIY drying goes wrong, and when a floor can be saved versus when replacement makes more sense. For hardwood floor water damage help, the answer usually comes down to speed, moisture readings, and whether water reached the subfloor.
SEO title tag: Hardwood Floor Water Damage Repair Guide 2026
Meta description: Hardwood floor water damage needs fast action in Los Angeles. Learn signs, drying steps, repair options, and when to call a pro.
Your First Steps with Hardwood Floor Water Damage
You walk into the kitchen, feel a board flex under your foot, and notice a faint ripple near the dishwasher. The surface may only look damp, but the underlying problem is usually below the finish. Water slips through board seams, reaches the subfloor, and keeps spreading after the top looks dry.
That is the DIY timeline trap. Homeowners mop, run a few fans, and feel relieved when the floor looks normal by evening. A day or two later, the boards start to cup, the finish turns cloudy, or the floor develops a hollow sound because moisture stayed trapped underneath.
What to do in the first minutes
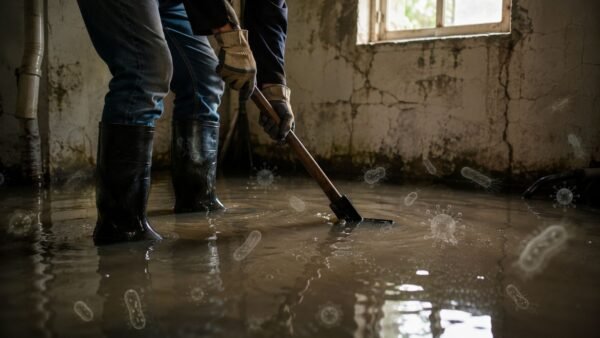
Start by stopping the water source if you can do it safely. Shut off the appliance, supply valve, or main line tied to the leak.
Then act in this order:
- Pull up standing water fast: Use towels or a wet-dry vacuum so less water enters seams, board ends, and floor penetrations.
- Remove anything holding moisture in place: Take up rugs, mats, pet beds, and any furniture sitting on the wet area.
- Lower indoor humidity: Turn on air conditioning if available. If outdoor air is humid, keep windows closed.
- Arrange emergency water extraction services if the water spread beyond a small surface spill: Extraction and moisture mapping matter more than surface drying alone.
Field rule: If the water came from a dishwasher, refrigerator line, sink supply, or pipe leak, assume it reached places you cannot see until meter readings prove otherwise.
Skip one common mistake. Do not soak the floor with cleaners or keep rewetting it while trying to “wash out” the leak area. Extra water makes drying harder and can drive moisture deeper into plank joints.
Why the first response has to be precise
Speed matters, but method matters just as much. A box fan can dry the finish coat and still leave moisture in the underside of solid hardwood, the core of engineered planks, or the subfloor beneath them. That is why DIY efforts often seem faster at first and end up costing more time later.
In Los Angeles homes, I often find water that has traveled farther than the visible stain. It runs under toe kicks, behind baseboards, beneath underlayment, and into patched sections of older subfloor. Engineered flooring is especially deceptive because the top veneer can look stable while the inner layers and adhesive system are still wet.
The first goal is simple. Stop the source, remove surface water, clear the area, and get the floor checked before hidden moisture turns a salvageable drying job into a repair or replacement project.
How to Assess the Severity of Damage
Hardwood tells on itself if you know what to look for. The challenge is that visible damage and actual moisture depth aren't always the same thing.

The signs you can see and feel
The main surface signs of water intrusion include visible discoloration, blistered finishes, loose or uneven boards, and cupping or rippling where edges curve up, with discoloration often showing first (REM Group on what water-damaged hardwood floors look like).
Use this quick field checklist:
- Dark spots or white marks: These often show early moisture intrusion or finish failure.
- Bubbling or peeling finish: The coating has lost adhesion because water got under it.
- Raised edges: This is usually cupping, where the board edges sit higher than the center.
- Boards lifting off the floor plane: That's closer to buckling, which is more severe.
- Soft movement or squeaks: The plank or the subfloor may have weakened.
Cupping, crowning, and buckling
Think of the board like a sponge with a hard skin on top.
| Condition | What it looks like | What it usually means |
|---|---|---|
| Cupping | Edges rise, center dips | More moisture below than above |
| Crowning | Center rises higher than edges | The top dried or was sanded before the underside stabilized |
| Buckling | Boards lift or break free from the subfloor | Expansion pressure or severe moisture below the floor |
Cupping can sometimes reverse. Buckling is a different conversation.
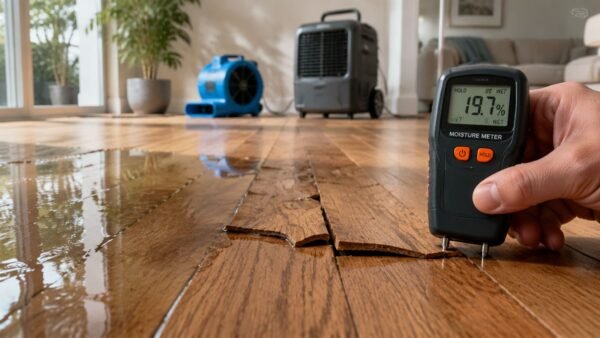
If you have a moisture meter, surface readings can help, but they don't tell the whole story. If you want to understand what those numbers mean before a technician arrives, this guide on how to read moisture meter readings is useful.
The water source changes the risk
Not all water events get treated the same.
- Clean water: Supply-line leaks or sink overflows from clean sources.
- Gray water: Dishwasher discharge or appliance leaks that may carry contaminants.
- Black water: Sewage or floodwater. This changes the repair plan fast.
Water from a dirty source can turn a repairable wood floor into a removal job, even when the visible damage looks limited.
If the leak came from a dishwasher, washing machine, drain backup, or anything unsanitary, don't assume sanding and refinishing will solve it.
Emergency Do's and Don'ts For Your Floors
Time matters here because moisture doesn't sit politely on top of the finish. Surface moisture can penetrate finish layers within 2 to 4 hours, and visible cupping or warping often appears within 24 to 48 hours of standing water exposure.
Do these things first
- Shut off the source fast: Stopping the leak prevents the damage area from expanding while you clean.
- Use a wet-dry vacuum if you have one: It removes standing water without creating the electrical risk of a household vacuum.
- Lift items off the floor: Furniture legs, rugs, and boxes trap moisture and leave pressure marks.
- Photograph everything: Capture the source, the floor, the room, and any spreading along walls or transitions.
- Increase airflow carefully: Ceiling fans, portable air circulation, and open pathways help, but they don't replace structural drying.
Don't make these common mistakes
- Don't use a regular household vacuum: Water and electricity don't mix. That's a shock hazard and a good way to ruin the machine.
- Don't blast the floor with high heat: Space heaters and aggressive heating dry the surface too fast. That can worsen shape changes.
- Don't start sanding: A floor that feels dry on top can still be wet below.
- Don't leave wet rugs in place: They hold moisture against the finish and the seams.
- Don't assume “no stain” means “no damage”: Some of the worst failures start under engineered planks where you can't see them.
The first-hour mindset
Think containment, not cosmetic cleanup.
If the water event is minor and limited to the surface, quick drying may be enough. But if water reached seams, baseboards, or ran under cabinets, the issue usually shifts from cleaning to controlled drying. In LA homes with mixed flooring transitions and older subfloors, hidden migration is common.
If you're deciding whether to “watch it overnight,” that's usually the point where homeowners lose repair options.
Professional Drying and Restoration Options
Professional drying is less about moving air across the top and more about getting the entire floor assembly back into balance. That includes the hardwood, the underside of the plank, the subfloor, and the room air.

Why DIY drying often falls short
Homeowners usually reach for box fans, towels, and open windows. That can help with visible moisture. It often misses trapped moisture below the plank.
Professional crews use penetrating moisture meters, commercial air movers, and dehumidifiers to control how the material dries. The goal isn't to force the top dry as fast as possible. It's to dry the assembly evenly enough that the floor doesn't trade cupping for crowning.
If you're comparing equipment and what each machine does, this breakdown of water damage restoration equipment gives a practical overview.
Three common repair paths
Once drying data comes in, the restoration path gets clearer.
Sanding and refinishing
This works when the boards are still stable, staining is limited, and moisture has normalized throughout the assembly. It is not the first step. It is the finish step.
Recent National Association of Home Builders data shows 52% of refinishing failures in humid regions are due to premature sanding before moisture content stabilizes to 8 to 12% uniformly. That is why experienced restorers don't start with the sander.
Partial board replacement
This makes sense when damage is localized. A few planks near a dishwasher leak may be beyond saving while the surrounding field survives.
The hard part isn't only installing new boards. It's matching species, width, wear, and finish so the repair doesn't telegraph across the room.
For homeowners trying to understand broader strategies for preventing costly wood water damage, that resource gives useful context on repair versus replacement thinking.
Full replacement
This becomes the practical choice when boards have buckled badly, contamination is involved, or the subfloor won't stabilize. It also happens when engineered flooring has delaminated or the material can't be matched.
In those cases, a company such as Onsite Pro Restoration can perform extraction, drying, documentation, and repair coordination based on moisture data rather than guesswork.
Here's a short look at the type of drying setup professionals use in the field:
What controlled drying looks like
A proper structural drying setup aims to lower ambient humidity into a controlled range, not create a heat blast. That slower, measured approach protects the boards from splitting and reduces the chance of uneven drying.
A few signs the plan is on track:
- Moisture readings trend down across multiple points
- Subfloor readings move toward equilibrium with the room
- Board shape improves instead of getting sharper
- Odor doesn't intensify as the room dries
The repair decision should always follow the readings, not the homeowner's hope and not the contractor's rush.
The Hidden Dangers of Mold and Subfloor Damage
The surface is only half the job. The risk often sits below it.
Healthy hardwood typically stays in a 5% to 10% moisture content range, while anything over 16% moves into the danger zone for mold growth and structural failure. If drying is incomplete, 70% of water-damaged properties develop mold within 72 hours.
Why the floor can look safe when it isn't
In our experience handling water damage in Burbank and Glendale homes, the most misleading situation is the “dry-looking” engineered floor. The top looks normal enough to calm everyone down. Underneath, the subfloor is still holding moisture.
That hidden moisture feeds:
- Mold growth below the plank
- Subfloor swelling
- Musty odors that appear days later
- Fastener failure and movement underfoot

Why probe testing matters
Surface meters are useful screening tools. They don't always catch the moisture trapped under the wear layer or sitting in the subfloor seam.
That is why inspection often includes invasive testing when the pattern of damage suggests water ran farther than the visible stain. If you suspect hidden growth or a musty smell is building after cleanup, this page on black mold under a hardwood floor explains the warning signs and remediation concerns.
A floor doesn't need to look rotten to be unsafe to keep.
For some homeowners, especially after repeated leaks, replacement decisions also open a design conversation. If you end up moving away from wood in a wet-prone area like a kitchen or laundry transition, the Tiles Mate Pty Ltd wood-look tile guide is a practical reference for alternatives that keep the wood appearance.
Mold guidance and health concerns
If you need public-health guidance on moisture and mold, the EPA mold resources are worth reviewing. The EPA's position is simple and useful: moisture control is the key to mold control.
That principle applies directly to hardwood floors. If the assembly isn't dry to the core, cosmetic repair won't solve the underlying problem.
Navigating Your Insurance Claim in Los Angeles
Insurance stress often hits right after the panic of the leak itself. Most homeowners want to know one thing. Will the policy help pay for this?
What usually helps your claim
Coverage often depends on the cause. Sudden and accidental events, such as a burst supply line or appliance failure, are generally treated differently from long-term neglect, ongoing seepage, or flood events.
Start with documentation:
- Take wide and close photos: Show the source, the affected rooms, and any visible floor movement.
- Record a short video walkthrough: Capture sounds, movement, and visible wet areas.
- Save damaged materials if told to do so: Adjusters sometimes want to inspect removed sections.
- Get professional moisture documentation: That record often matters as much as the photos.
If you want a more detailed breakdown of the process, this guide to an insurance claim for water damage can help you prepare.
Why local documentation matters
Los Angeles claims can get complicated because homes vary so much. A newer condo in West Hollywood, a mid-century home in Sherman Oaks, and an older Glendale property may have very different flooring systems and prior repairs. The more clearly the drying scope is documented, the easier it is to explain why the issue went beyond a surface cleanup.
If you're a landlord or property manager, policy structure matters too. This comparison on how to protect your rental with proper insurance gives useful context on why homeowner and landlord coverage don't operate the same way.
Good claim support starts on day one. Late photos and vague notes don't help when the floor has to be opened later.
For contamination and post-loss health guidance, the CDC cleanup and safety resources can also be useful, especially when occupants are sensitive to mold or wastewater exposure.
Why a Professional Is Your Best First Call
DIY drying fails for one reason more than any other. It solves the part you can see and misses the part that decides whether the floor survives.
Data on engineered floors is especially blunt. 68% of DIY drying attempts fail because hidden moisture beneath the plank gets missed, and that creates false “safe” readings while mold starts in the subfloor. That's the timeline paradox. The floor looks better while the actual risk gets worse.
What a professional changes
A trained restoration team doesn't just dry the room. They verify the moisture path, test the subfloor, monitor the drying curve, and decide whether the floor is a candidate for refinishing, partial replacement, or removal.
That matters in Los Angeles because construction types vary so much from neighborhood to neighborhood. In North Hollywood and Burbank, older homes often hide prior repairs and uneven subfloors. In newer buildings, engineered products can conceal trapped moisture longer than homeowners expect.

The real trade-off
The trade-off isn't “save money with DIY” versus “pay more for help.” The actual trade-off is early professional assessment versus delayed repair, hidden mold, and a floor that has to be removed later.
If water got under your hardwood, the safest move is to get the floor assessed immediately, especially if you're in Los Angeles, CA and the leak involved a kitchen appliance, old plumbing, or a slow overnight event. If you need help now, call 818-336-1800.
Frequently Asked Questions About Water Damaged Floors
Can cupped hardwood floors go back to normal
Sometimes, yes. Hardwood floors exposed to water for 48 to 72 hours can have an 85 to 90% success rate of complete reversal of cupping without replacement if dried professionally within that window and if moisture content reads 16 to 18% (Miracle Construction on cupping, crowning, and buckling). That doesn't mean every cupped floor is safe to sand. It means drying data determines the next step.
Can I sand and refinish a water-damaged hardwood floor right away
No. Premature sanding is one of the most expensive mistakes homeowners make. If the top dries faster than the underside, a cupped floor can later crown, and then you've lost material thickness without solving the moisture problem.
How do I know if the subfloor is wet
You usually won't know by sight alone. Clues include recurring odor, squeaks, soft movement, returning cupping, or moisture concentrated near walls and appliance lines. Confirming it takes proper moisture testing, often with penetrating probes.
Will homeowners insurance cover hardwood floor water damage
It often depends on the cause. Sudden, accidental leaks are commonly handled differently than gradual leaks, maintenance issues, or floodwater. The strongest claim file includes photos, a record of the source, and professional moisture documentation.
Is engineered hardwood harder to save than solid hardwood
Often, yes. Engineered products can trap moisture in layers and below the visible wear surface. Some can be restored. Others delaminate or hold hidden moisture long enough that replacement becomes the smarter path.
Schema opportunity: FAQ schema, LocalBusiness schema, and HowTo schema all fit this page.
If you're dealing with hardwood floor water damage in Los Angeles, don't wait for visible warping to get worse. Onsite Pro Restoration provides emergency assessment, structural drying, moisture documentation, and support for the insurance process. Call 818-336-1800 for immediate help.