Dealing with mold remediation in your crawl space isn't just about cleaning up a mess; it's about protecting the very structure of your home and the health of everyone inside it. This process involves a professional team containing, killing, and removing mold while—most importantly—fixing the moisture problem that let it grow in the first place. If you ignore this hidden threat, you’re looking at serious health issues, like those found in Sherman Oaks homes with flat-roof leaks, and expensive structural repairs down the line.
Why Your Crawl Space Is Ground Zero for Mold Growth
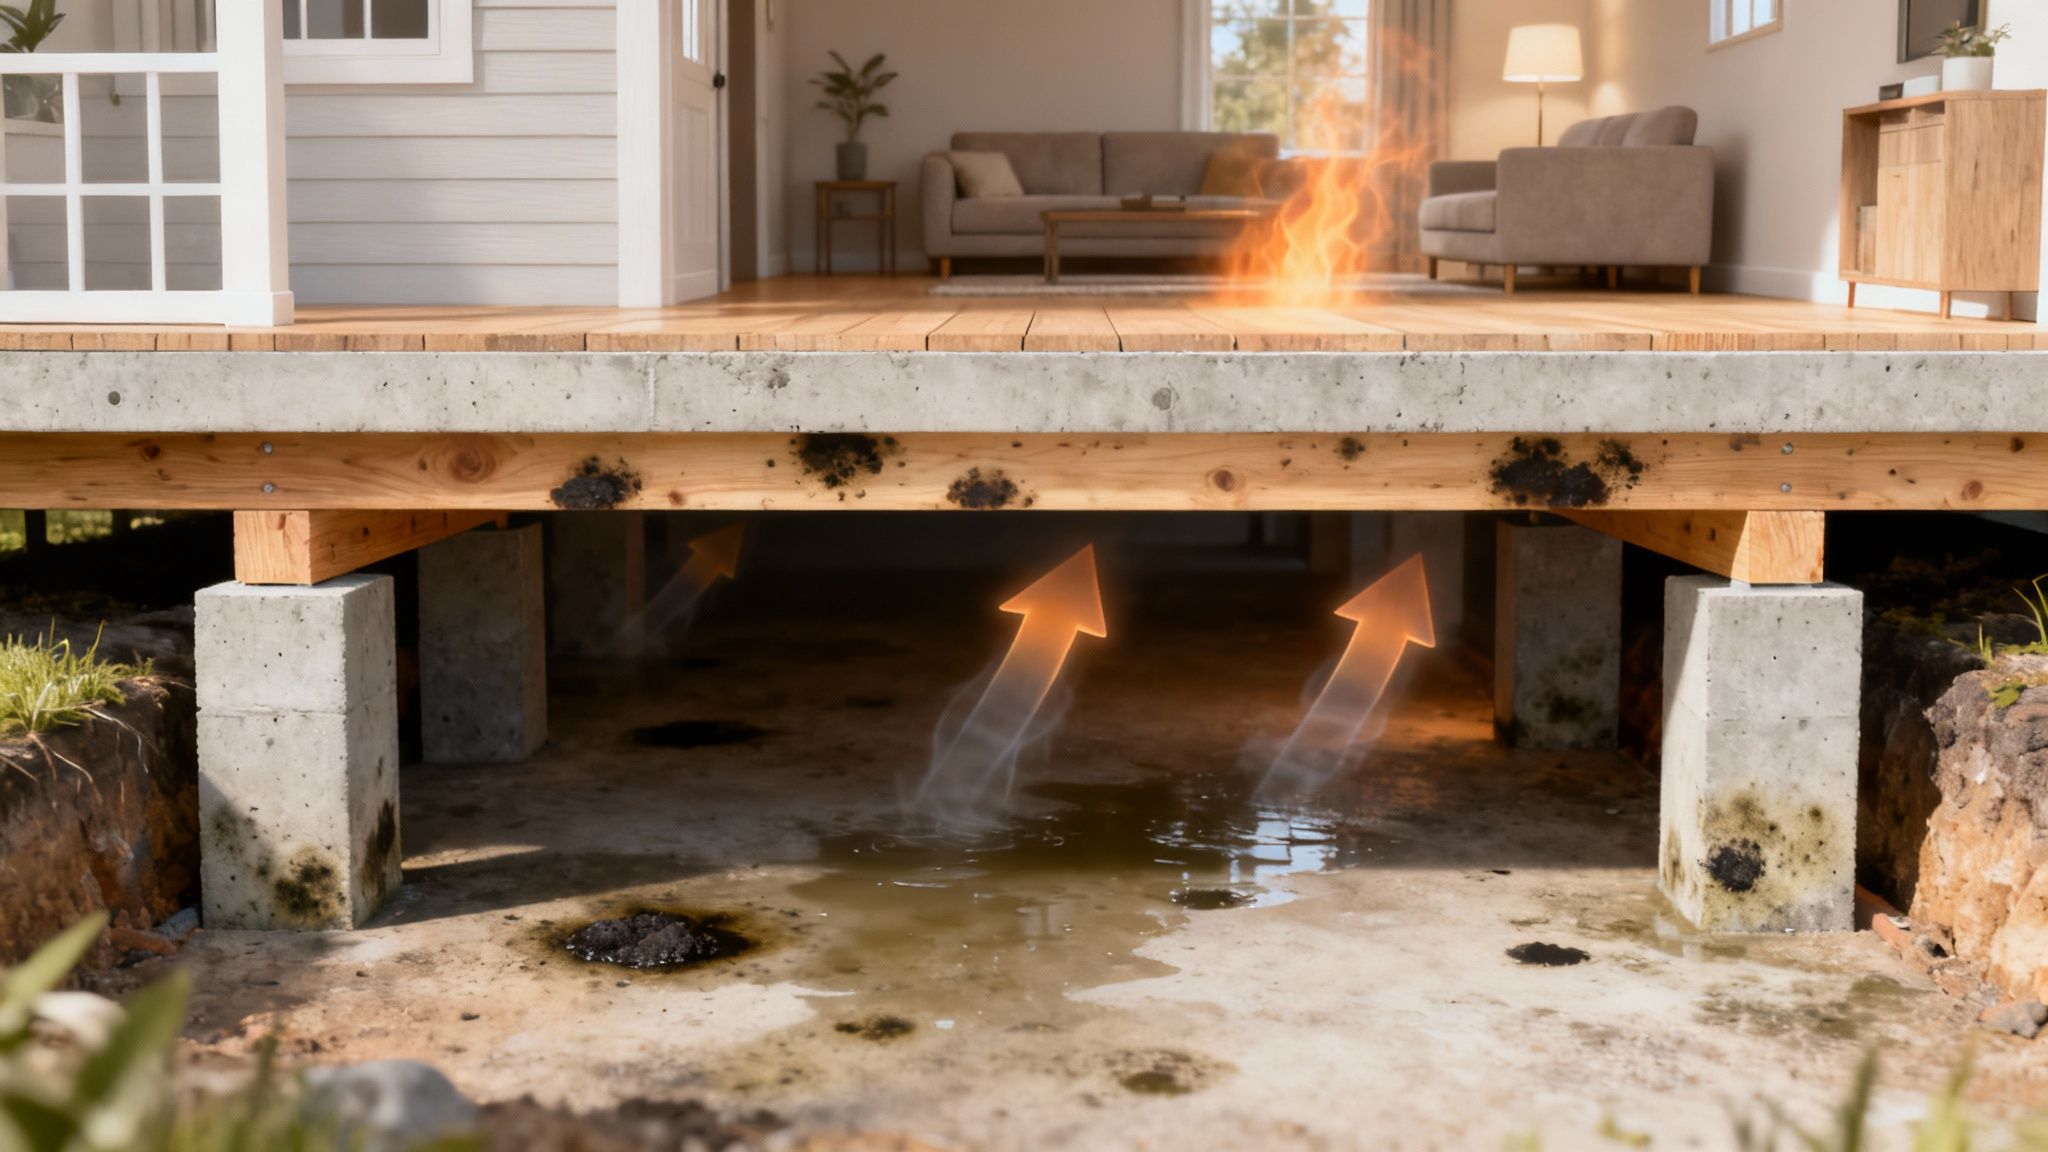
Think of your home's crawl space as its lungs. It’s out of sight and out of mind for most people, but what happens down there has a direct impact on the air you breathe every single day in your kitchen, living room, and bedrooms. This is all thanks to a natural process called the "stack effect."
It works just like a chimney. Hot air rises, and as the air in your home warms and moves upward, it creates a subtle vacuum that pulls air up from the lowest point—your crawl space. This means a huge chunk of the air on your first floor actually started its journey from right underneath your feet.
The Unseen Threat Below
When your crawl space is damp, dark, and has poor airflow, it’s basically the perfect incubator for mold. Because of the stack effect, those mold spores, musty smells, and damp air don't just stay put. They get pulled up and circulated throughout your living areas, silently contaminating your home. This is exactly why mold remediation in a crawl space is so much more than a property issue; it's a critical health and safety measure.
A damp, moldy crawl space acts like a contaminated filter for your home's air supply. Every breath you take can carry microscopic mold spores, allergens, and volatile organic compounds (VOCs) that originate from below.
The consequences of breathing this air day in and day out can be serious. The U.S. Centers for Disease Control and Prevention (CDC) links mold exposure to a whole list of symptoms, from nasal congestion and wheezing to skin irritation. For anyone with allergies, asthma, or a weaker immune system, the reactions can be much more severe.
From Musty Odors to Structural Rot
The problems brewing in a contaminated crawl space don't stop with your air quality. The same moisture that feeds mold growth also rolls out the welcome mat for other destructive forces.
- Structural Damage: Constant dampness is the enemy of wood. It weakens support beams and floor joists, leading to wood rot that can compromise your home’s entire structure. The first signs are often sagging floors, but the damage underneath is far more serious.
- Pest Infestations: Termites, carpenter ants, and other wood-destroying pests love dark, damp environments. A wet crawl space is an open invitation, adding another layer of potential damage.
- Energy Inefficiency: When your insulation gets wet, it’s useless. Your HVAC system has to work overtime to keep your home comfortable, which means your energy bills will start climbing.
Stopping water intrusion is the first and most important step to fixing these problems. At the end of the day, a clean and dry crawl space is absolutely fundamental to keeping your property safe and sound.
Decoding the Telltale Signs of Crawl Space Mold
Spotting mold in your crawl space isn't always as easy as finding a big, visible patch of black or green. The most serious problems often stay hidden, sending subtle but persistent clues up into your living areas. Learning how to read these signs is the first step in effective mold remediation in the crawl space.
Think of it as your home's early warning system. These clues alert you to a hidden moisture problem long before you see sagging floors or crumbling joists. The real key is connecting the dots between what you're experiencing upstairs and what's happening down below.
The Olfactory Alarm System
More often than not, your nose is the best tool you have for detecting a hidden crawl space issue. Active mold releases microbial volatile organic compounds (MVOCs), which create a very distinct and unpleasant smell.
- A Persistent Musty Odor: If your first floor always has that "damp basement" or "old wet laundry" smell that just won't go away, that's a huge red flag. This odor is the signature scent of active mold growth.
- Smell Worsens with Humidity: You might notice the smell gets much stronger on rainy days or during humid Southern California weather, especially with coastal fog in places like Santa Monica. That’s because the extra moisture in the air kicks mold activity into high gear.
A stubborn musty smell is almost always a sign of a hidden moisture source. Getting help from professional leak detection services can pinpoint the source before the mold gets out of hand. Ignoring this odor is like ignoring a smoke alarm—it’s signaling a problem that needs your immediate attention.
When Your Body Sounds the Alarm
Because of a phenomenon called the "stack effect," air from your crawl space is constantly being pulled up into your home. This means your family's health can be a surprisingly accurate indicator of a mold problem brewing below. If allergy-like symptoms seem to get worse indoors for no clear reason, it might be time to look down.
- Unexplained Allergy Flare-Ups: A sudden spike in sneezing, coughing, watery eyes, or a stuffy nose that gets better when you leave the house is a classic sign of indoor allergens, and mold spores are a major one.
- Worsening Asthma Symptoms: For anyone with asthma, a moldy environment can be especially dangerous. It can trigger more frequent or severe asthma attacks.
These physical reactions are your body’s way of telling you it's fighting off microscopic mold spores in the air you breathe. If you've already ruled out seasonal allergies, your home's air quality is the next logical suspect. A professional inspection is the only sure way to know if mold is the culprit.
Visual Clues Throughout Your Home
Finally, the same moisture that fuels crawl space mold often leaves a trail of secondary damage throughout the main level of your house. These signs might seem completely unrelated, but they frequently trace back to excessive humidity rising up from below.
The condition of your hardwood floors is often a direct reflection of your crawl space's health. Cupping, buckling, or separating floorboards are rarely a problem with the wood itself, but rather a symptom of too much moisture coming up from underneath.
Look out for these other common indicators:
- Peeling or Blistering Paint: Moisture vapor can literally push paint right off the walls, especially along the baseboards.
- High Indoor Humidity: If your home just feels damp and clammy all the time, or you notice condensation forming on your windows, it’s a good sign your crawl space is pumping excess moisture into your air.
- Visible Condensation on Ductwork: Take a look at the vents in your floor. If you see that the metal ductwork is "sweating," it's a clear signal of high humidity levels in the crawl space.
Connecting Crawl Space Symptoms to Their Source
It's easy to dismiss one of these signs, but when you see them together, they paint a clear picture. This table helps connect what you're noticing in your living space to the likely moisture problem lurking underneath.
| Symptom You Notice in Your Home | What It Could Mean for Your Crawl Space | Underlying Moisture Problem |
|---|---|---|
| Persistent musty or earthy odors | Active mold growth is releasing MVOCs | High humidity, a water leak, or poor ventilation |
| Cupping or buckling hardwood floors | Excess moisture is being absorbed by the wood | Ground moisture, leaky pipes, or lack of a vapor barrier |
| Worsening allergies or asthma | Mold spores are circulating through your HVAC system | Widespread mold colonization on surfaces or insulation |
| Condensation on windows or ductwork | The crawl space is raising your home's overall humidity | An open dirt floor or standing water |
| Peeling paint near the baseboards | Moisture vapor is pushing through the subfloor and walls | High relative humidity from inadequate ventilation |
Seeing any of these symptoms is a clear call to action. The sooner you investigate the source of the moisture, the better you can protect both your home's structure and your family's health.
The Professional Crawl Space Mold Remediation Process
Getting rid of mold in a crawl space for good is a lot more than just spraying some store-bought cleaner on the spots you can see. It's a precise, step-by-step process grounded in building science. The whole point isn’t just to kill the existing mold, but to fix the moisture problem that let it grow in the first place.
A true pro doesn't just treat the symptom; they solve the underlying issue.
This methodical approach is non-negotiable. Why? Because if you just start scrubbing or tearing things out, you can send billions of microscopic mold spores airborne. These spores can easily travel up into your living space through the natural "stack effect" of air movement in a home, starting new mold colonies and wrecking your indoor air quality.
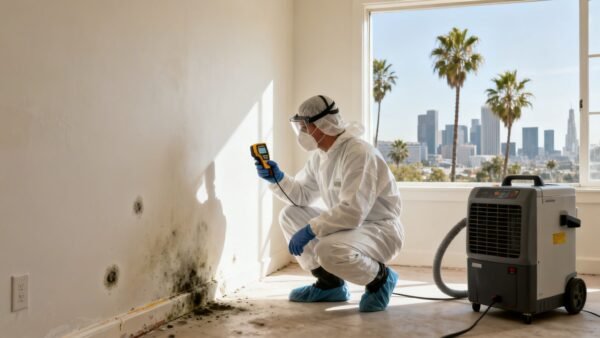
Step 1: Assessment and Work Plan Development
Before a single tool comes out, a certified technician will perform a deep-dive assessment. This isn’t a quick peek with a flashlight. They’ll use moisture meters, and sometimes even thermal imaging cameras, to map out the full extent of the problem—including the moisture hiding inside wooden joists or behind insulation.
From there, they build a detailed remediation plan. Think of this "scope of work" as a blueprint for the entire project. It outlines the exact steps, the containment measures needed, and the specific equipment they'll use, ensuring nothing gets missed.
The infographic below shows how your own senses—smell, sight, and feel—are often the first signs that a professional assessment is needed.
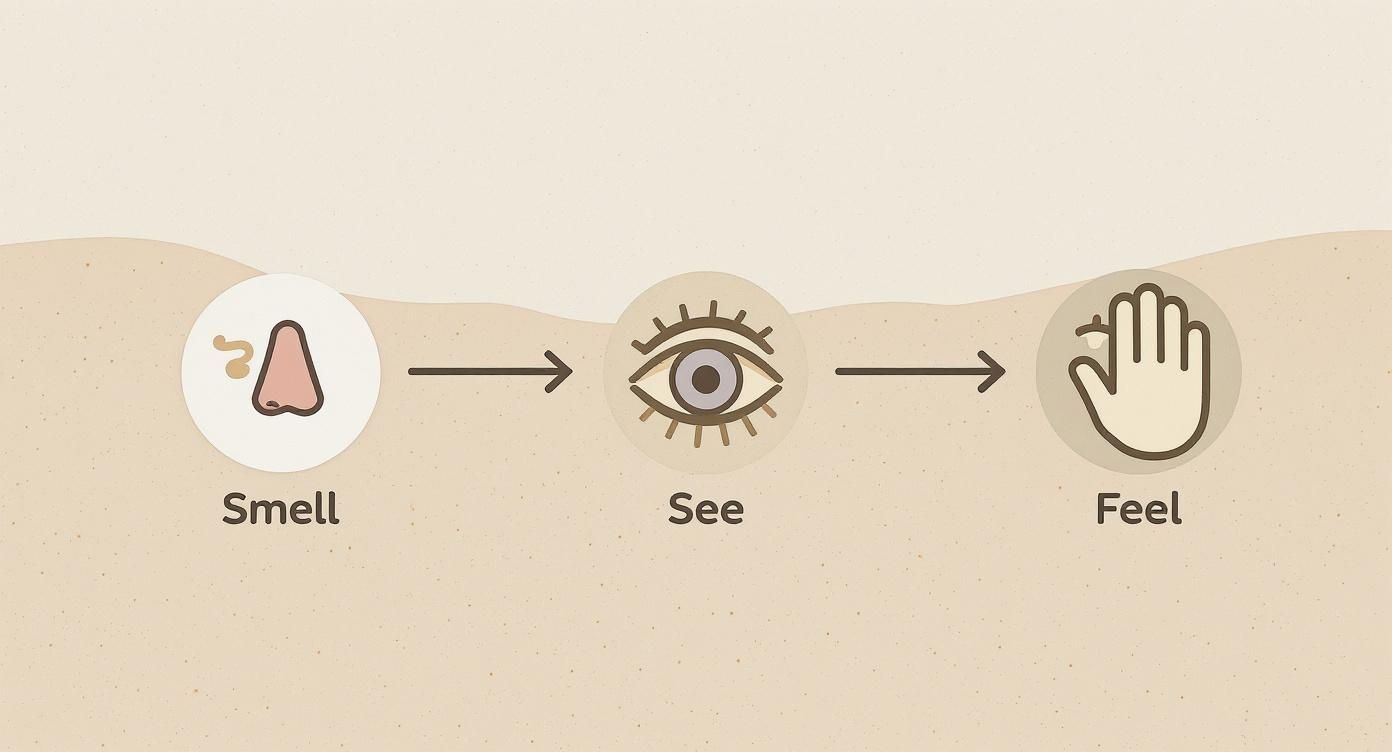
This just goes to show that a musty odor can be just as big a red flag as visible growth.
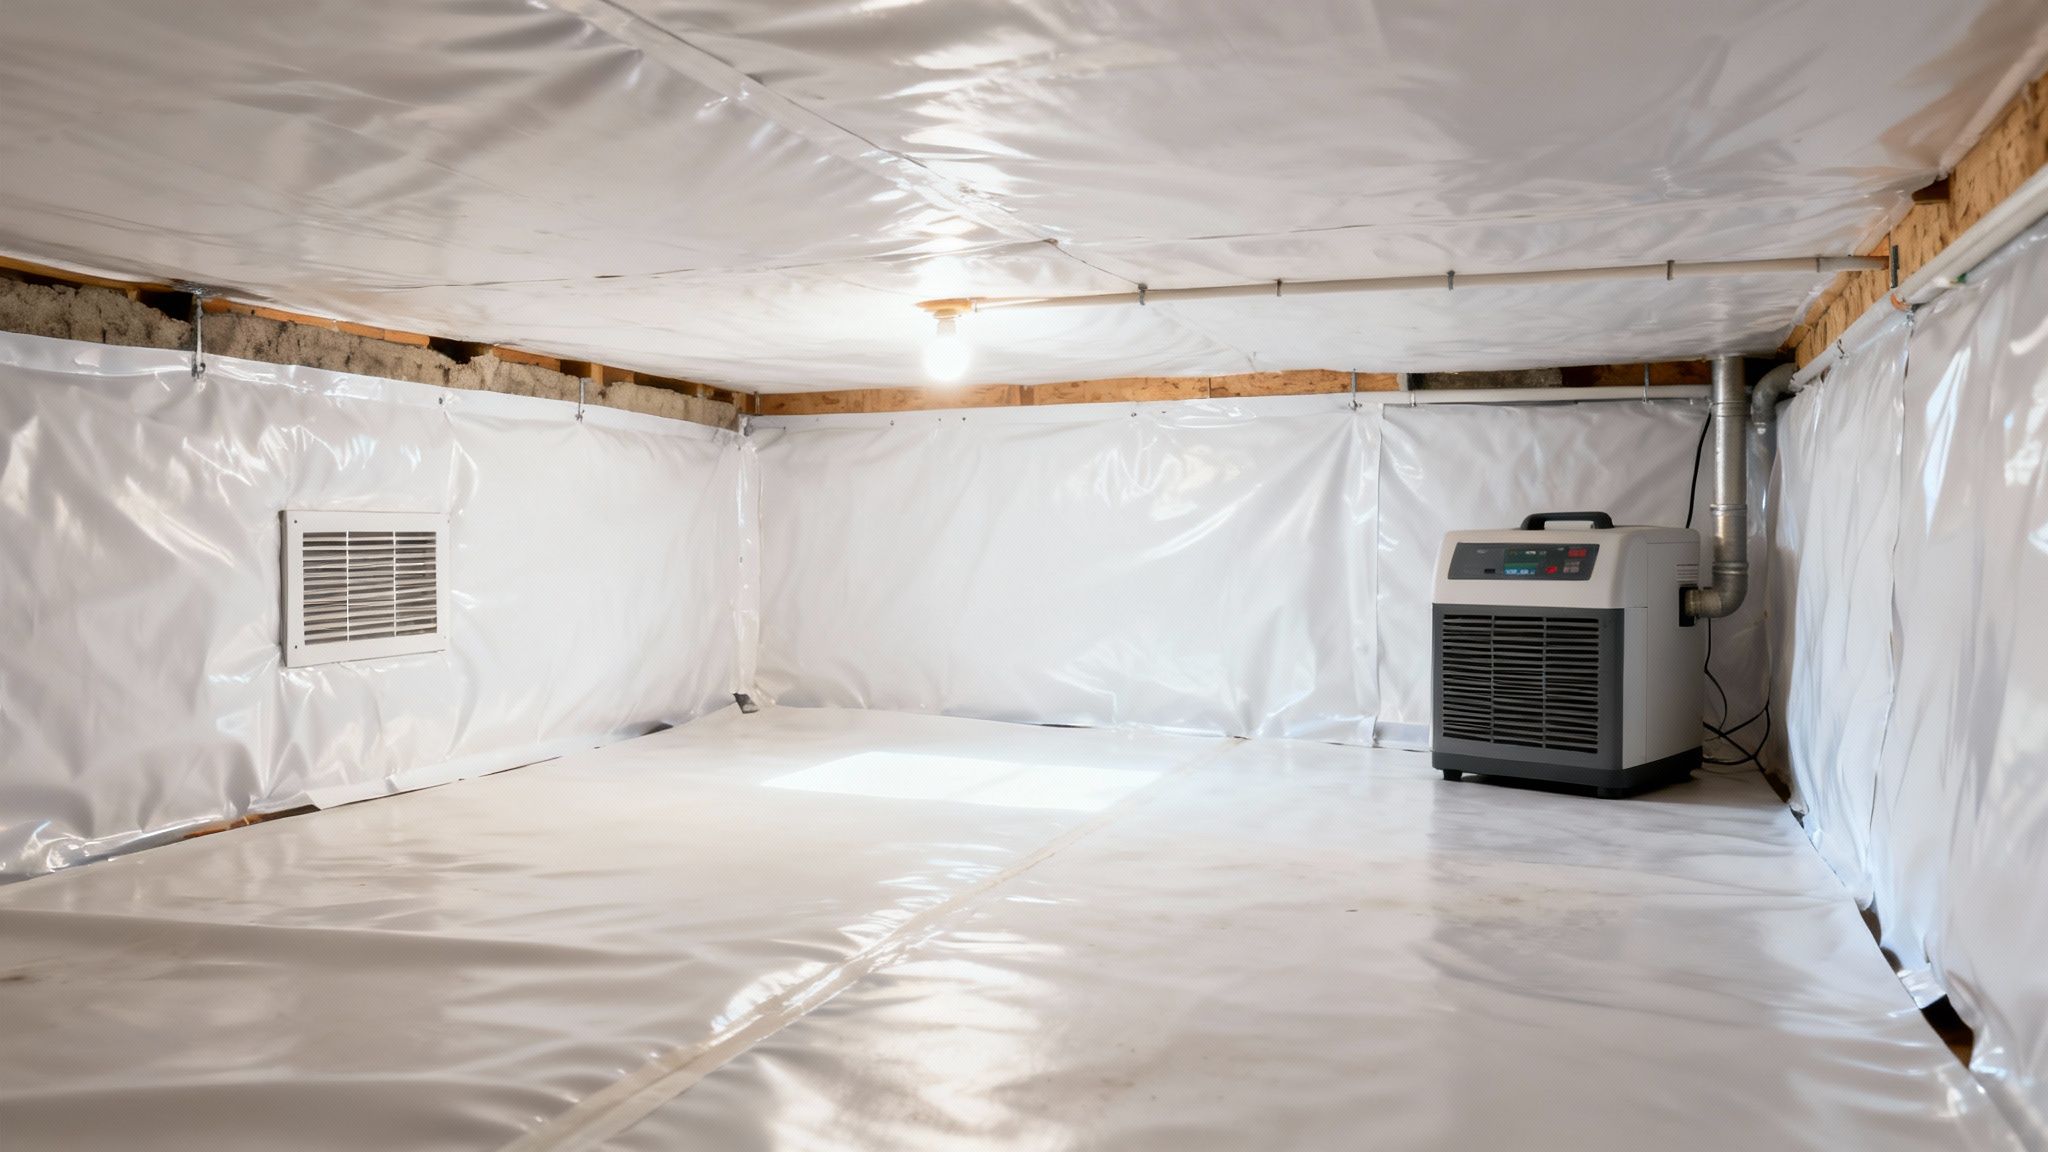
Step 2: Containment and Air Filtration
This is probably the most important step for protecting the rest of your home. The crew will completely seal off the crawl space from your house using thick plastic sheeting and specialized zipper systems. This containment barrier is critical for preventing cross-contamination.
Inside the sealed-off zone, they’ll set up powerful air scrubbers with HEPA filters. These machines run 24/7 during the job, creating negative air pressure. This clever trick ensures air can only flow into the crawl space, not out, trapping any airborne spores before they can escape into your home.
Step 3: Removal of Contaminated Materials
Mold isn't just a surface-level problem on porous stuff like wood, insulation, or drywall. It grows roots, called hyphae, deep into the material. Because of this, anything that’s heavily contaminated and can’t be completely cleaned has to go.
This usually includes:
- Contaminated Insulation: Moldy, damp insulation is a lost cause. It gets bagged and removed.
- Damaged Wood: Joists or subflooring with deep rot might need to be cut out and replaced.
- Vapor Barriers: The old plastic liner on the ground is often torn and moldy, so it gets removed to deal with the soil underneath.
Every piece of contaminated debris is carefully sealed in heavy-duty plastic bags before it leaves the crawl space to keep spores contained.
Step 4: Cleaning and Antimicrobial Treatment
With the contaminated materials out, the real cleaning begins. Technicians use a combination of wire brushing, sanding, and HEPA vacuuming to physically scrub the mold off surfaces like wood joists. A simple wipe-down just won't cut it.
Simply spraying bleach on wood is ineffective. Bleach's high water content can't penetrate the wood to kill the mold's roots and can even feed future growth. Professionals use EPA-registered antimicrobial agents specifically designed to eliminate mold colonies at their source.
After the physical removal, these professional-grade antimicrobials are applied to all surfaces. This kills any leftover spores and helps stop mold from coming back.
The risks mold poses to our homes and health are becoming more widely understood, and it's driving demand for expert help. The global mold remediation service market was valued at around $1.34 billion in 2025 and is expected to hit $1.75 billion by 2032. The remediation part of the market alone makes up over 60% of that. These numbers really highlight how critical professional work is for spaces like crawl spaces.
Step 5: Final Cleaning and Post-Remediation Verification
The last step is one more meticulous HEPA vacuuming of every single surface inside the containment area. This "final clean" catches any spores that may have settled during the process, leaving the space ready for any repairs or preventative measures.
For total peace of mind, many homeowners choose to get a post-remediation verification, also known as a clearance test. This is done by an independent industrial hygienist who takes air and surface samples to prove the mold count is back to a normal, safe level. It’s the ultimate confirmation that the job was done right. For a deeper dive into the specifics, check out our comprehensive guide on professional mold remediation services.
How Crawl Space Encapsulation Stops Mold for Good
Once the professional mold remediation is done, the immediate danger is gone. But here’s the hard truth: unless you fix the underlying conditions that let mold grow in the first place, you’ve only reset the clock. To truly win the war, you have to shift from defense to offense with a permanent fix: crawl space encapsulation.
Think of it like creating a sealed, protective bubble around your home's foundation. That's exactly what encapsulation does. It completely isolates your home from the damp earth and humid air, transforming that dark, musty crawl space into a clean, dry, and healthy part of your home.
This proactive move is the definitive answer to preventing future calls for mold remediation in the crawl space.
The Core Components of an Encapsulation System
A real encapsulation system is far more than just laying down a sheet of plastic from the hardware store. It's an engineered system where every single piece works together to create an unbreakable barrier against moisture.
- Heavy-Duty Vapor Barrier: This isn't your average flimsy plastic. We use a thick, tear-resistant liner (usually 12-20 mil) that covers the entire dirt floor and runs up the foundation walls. It's mechanically fastened and sealed tight to stop ground moisture from ever evaporating into your crawl space.
- Sealed Foundation Vents and Openings: Old building codes called for vents to let the crawl space "breathe." We now know this does more harm than good, especially in humid climates, as it just invites in damp, mold-friendly air. A proper encapsulation seals these vents and any other air leaks for good.
- A Specialized Crawl Space Dehumidifier: This is the heart of the entire operation. A powerful, energy-efficient dehumidifier is installed to constantly manage the air, keeping the relative humidity well below the 50% threshold that mold needs to grow. Our guide on crawl space dehumidification breaks down why this piece of equipment is so essential for long-term success.
Put these elements together, and you create a controlled environment where mold simply can't get the moisture it needs to survive.
Transforming Your Crawl Space from a Liability to an Asset
The benefits you get from encapsulation go way beyond just stopping mold. You’re fundamentally upgrading the health, efficiency, and durability of your whole home. It’s a key strategy for mold prevention, especially since so many crawl spaces are magnets for groundwater and poor ventilation—the perfect recipe for a mold disaster.
An encapsulated crawl space isn't just a clean storage area; it's a foundational upgrade that actively contributes to a healthier indoor environment and a more stable, energy-efficient home.
Benefits Beyond Mold Prevention
Investing in encapsulation pays you back in multiple ways, protecting your property and making your home a better place to live.
- Improved Indoor Air Quality: By cutting off moisture and mold at the source, you get rid of the musty smells and airborne spores that get pulled up into your living areas through the "stack effect."
- Enhanced Energy Efficiency: A dry, sealed crawl space allows your insulation to actually do its job. Your HVAC system won't have to battle damp, heavy air anymore, which can lead to real savings on your heating and cooling bills.
- Pest Control: Termites, cockroaches, rodents, and other pests love dark, damp places. A clean, dry, and sealed crawl space is the last place they want to be, helping keep unwanted visitors out.
- Structural Protection: Keeping moisture away from your floor joists and support beams is one of the best things you can do to stop wood rot. Encapsulation preserves the structural integrity of your home for decades to come.
Ultimately, encapsulation is the final, critical step after mold remediation in a crawl space. It's the long-term solution that protects the investment you made in cleanup and finally gives you permanent peace of mind.
Navigating the Costs of Mold Remediation
Let's talk about the number one question homeowners ask: "What's this going to cost?" When it comes to professional mold remediation in a crawl space, there’s no simple price tag. The cost is a direct reflection of the scope and complexity of your specific problem.
Think of it less like buying an appliance and more like commissioning a custom repair job. Your neighbor might have had mold removed for one price, but your situation could be entirely different based on what a professional finds under your home.
Key Factors That Influence Remediation Costs
A final estimate for crawl space mold removal is built on a few core variables. Any reputable pro will walk you through how each of these impacts the bottom line.
- Size of the Crawl Space: This is the most straightforward factor. A larger square footage simply requires more time, more cleaning agents, and more labor to treat properly.
- Severity of the Mold Growth: A few small, isolated patches of surface mold are one thing. Widespread, thick mold that has penetrated deep into the wood joists is a much bigger—and more expensive—job.
- Extent of Contaminated Materials: The price jumps significantly if we have to tear things out. This often includes soggy, mold-infested insulation, rotted subflooring, or even damaged support beams that need structural repairs.
- Accessibility: Is your crawl space a tight squeeze? Is it cluttered with ductwork, plumbing lines, and other obstacles? A difficult-to-access area increases labor time, which naturally drives up the cost.
Breaking Down the Cost Scenarios
To give you a clearer picture, let's look at a few examples. A basic remediation for a small, easy-to-access crawl space with just a bit of surface mold will be on the lower end of the price spectrum. That job usually involves setting up containment, HEPA vacuuming, and applying an antimicrobial treatment.
A far more common scenario, however, involves widespread mold that has ruined the insulation and started to cause wood rot. This project requires the full remediation process plus the labor-intensive work of removing contaminated materials and possibly making structural repairs. This is where you see the costs climb.
The most significant long-term investment is a full mold remediation in the crawl space combined with encapsulation. While this has the highest upfront cost, it's the only solution that addresses the root moisture problem, preventing the mold from ever returning and protecting your home's value.
An Investment in Your Home's Future Health
While the price of professional mold remediation can feel steep, you have to weigh it against the staggering cost of doing nothing. Delaying the work allows moisture and mold to cause irreversible structural damage, potentially leading to tens of thousands of dollars in repairs down the road.
Worse, ignoring a mold problem can contribute to chronic health issues and tank your property's value. If you're trying to get a handle on what your project might cost, you can use our interactive mold removal cost calculator for a ballpark estimate.
Ultimately, proper remediation isn't just another bill to pay. It's a critical investment in your home's structural integrity and your family's long-term health.
How to Choose the Right Mold Remediation Company
When it comes to mold remediation in the crawl space, the contractor you hire is the single most important decision you'll make. It’s a choice that determines whether the problem is gone for good or just temporarily hidden.
A bad hire can turn a contained issue into a whole-house nightmare by spreading spores everywhere. They might use cheap, ineffective chemicals or, even worse, fail to fix the moisture source that started the mold in the first place. This guarantees the fuzzy stuff will be back.
Finding a true professional is about more than just getting the lowest bid; it's about verifying their expertise. A trustworthy company will never rush you. They know this is a big deal and will walk you through the process, giving you the information you need to feel confident.
While it's written for a different trade, these general rules on how to choose a trustworthy home service contractor are a great starting point for what to look for.
Verify Credentials and Insurance
This is your first, non-negotiable step. Before you even get into the details of the job, ask to see their paperwork. A pro will have it ready and will be happy to share it.
-
Industry Certifications: The gold standard is certification from the Institute of Inspection, Cleaning and Restoration Certification (IICRC). This isn't just a piece of paper; it means their team has been formally trained in the proper, science-backed protocols for getting rid of mold safely.
-
Proper Insurance: They need more than just general liability. Make sure they carry pollution liability insurance. This specific coverage is crucial because it protects you financially if something goes wrong during the mold removal process. No pollution liability is a deal-breaker.
Demand a Detailed Scope of Work
Never, ever accept a handshake deal or a one-line estimate. A professional crew will give you a detailed, written scope of work that spells out their entire plan, from start to finish.
This document should clearly explain:
- How they will contain the work area.
- The exact methods for removing contaminated materials.
- Which specific antimicrobial agents they plan to use.
- Their strategy for fixing the moisture problem that caused the mold.
A vague proposal is a massive red flag. If a contractor can't put their process in writing, it often means they don't have a systematic approach. They're more likely to cut corners, leaving you right back where you started a few months down the road.
Ask the Right Questions
Once you've narrowed it down to a few qualified companies, it's time for a quick interview. The way they answer these questions will tell you everything you need to know about their experience and commitment to quality.
Critical Questions for Your Potential Contractor:
- What containment measures do you use to prevent spores from spreading? You want to hear them talk about using physical barriers and setting up negative air pressure.
- Do you recommend independent, third-party testing after the job is done? An honest, confident company will welcome this. It's proof they did the job right.
- How will you fix the moisture problem that caused the mold? Their plan must go beyond just cleaning. They need a permanent solution for the water issue.
Taking the time to choose your partner for mold remediation in a crawl space carefully is the best way to ensure the problem is solved for good.
Common Questions About Crawl Space Mold
Even after you understand the basics, a few questions always pop up when it comes to mold remediation in the crawl space. Getting straight answers is the best way to move forward confidently and sidestep any costly mistakes. Here are some of the most common things we hear from homeowners.
Q: Can I just use bleach to kill the mold?
A: It's a classic DIY myth, but the answer is a hard no. Bleach just doesn’t work on porous materials like the wood that makes up your crawl space structure—in fact, it often makes things worse. Sure, it might make the surface stain disappear for a bit, but bleach is mostly water. That water can't get deep enough to kill the mold's "roots" (the hyphae). Instead, it just soaks into the wood and feeds whatever mold is left behind. Professionals use EPA-registered antimicrobial treatments that are made to kill mold at the source without adding extra moisture.
Q: Is every type of mold found in a crawl space dangerous?
A: While some species like Stachybotrys chartarum (what most people call "black mold") get all the attention, the reality is that any type of mold can harm your home and your family's health. A significant mold colony, no matter the color, is constantly releasing spores into the air that can set off allergies and other respiratory problems. The most important thing to remember is that any visible mold growth is a smoke signal for a moisture problem that needs to be handled by a professional.
Q: How long does professional remediation take?
A: The timeline for mold remediation in a crawl space really comes down to two things: the size of the area and how bad the problem is. A simple remediation for a small crawl space with just surface mold might take 1-3 days. However, if the work involves tearing out contaminated insulation, replacing rotted wood, and then installing a full encapsulation system, you could be looking at a week or more. Any trustworthy contractor will give you a detailed, written timeline.
Q: Does homeowners insurance cover mold remediation?
A: This is a tricky one. Coverage really depends on your specific policy and what caused the water problem. If the mold grew because of something sudden and accidental that your policy already covers (like a pipe that bursts), there’s a good chance your insurance will step in. But if the mold is from a slow, gradual leak, poor maintenance, or chronic high humidity, it's almost always excluded. You must read your policy documents and talk directly to your agent to know for sure what your coverage limits are.
Don't let mold put your home's structure and your family's health at risk. The certified experts at Onsite Pro Restoration are here to give you a complete inspection and a solution that lasts. Contact us today to schedule your free, no-obligation assessment!