You walk a Los Angeles property after the renovation crew leaves, and the space looks finished until you get close. Fine white dust sits on the new counters. Window tracks are packed with grit. Cabinet interiors feel chalky. The HVAC kicks on, and that last layer of dust starts moving through the building.
That’s the point where many owners and property managers realize construction clean up isn’t a housekeeping task. It’s the last technical phase of the job. If the project included a leak, a burst pipe, smoke residue, or demo after mold work, the clean up has to do more than make the room presentable. It has to remove debris, control airborne particles, protect new finishes, and keep minor post-build contamination from turning into a larger loss.
In Los Angeles, that matters even more in mixed-use buildings, tenant improvements, and remodels where dust migrates fast and hidden moisture gets missed. If a project involved any prior intrusion, it’s smart to review the warning signs of concealed damage before turnover, especially signs of water damage in walls. Clean paint and new trim can hide a problem for a short time, not solve it.
Practical rule: If the space still feels dusty after the first wipe-down, the clean up phase hasn’t been completed properly.
If you need the site handed over without residue, odor, or loose ends, schedule a professional assessment before occupancy and before the final walkthrough locks in responsibility.
The Hidden Aftermath of Your LA Renovation
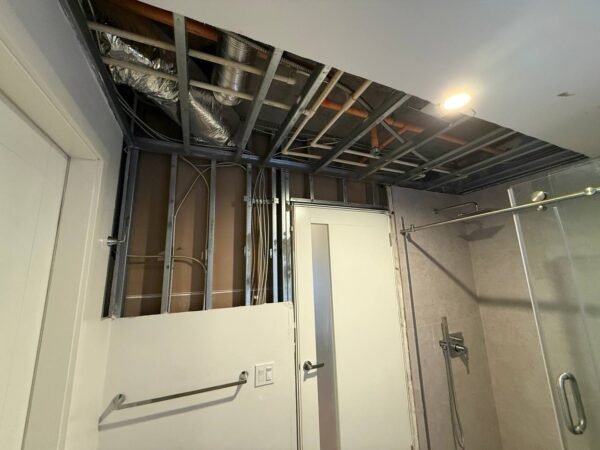
A clean-looking site can still be a dirty site. Post-renovation dust is usually the first issue people notice, but it’s rarely the only one. Drywall sanding dust settles inside drawers, behind outlet covers, on top of door casings, and inside return vents. Adhesive haze sticks to glass. Grout residue hardens on tile. Protective film gets left on fixtures too long and starts bonding to the finish.
In occupied LA properties, this gets more complicated. A multifamily turnover in Glendale or a retail buildout in West Hollywood often happens while adjacent spaces are still in use. That means the clean up has to protect tenants, preserve air quality, and avoid tracking debris into common areas. Standard janitorial crews can handle visible dirt. They usually aren’t set up for post-demo fine particulate, containment work, or moisture verification after restoration-related repairs.
Why this stage gets underestimated
Owners often assume the contractor’s broom clean is enough. It isn’t. Broom clean means the major scraps are gone. It doesn’t mean the site is safe for occupancy, ready for inspection, or suitable for a tenant handoff.
A proper construction clean up addresses problems that don’t show up in listing photos:
- Airborne dust control that keeps particles from recirculating through HVAC runs
- Residue removal from paint, caulk, grout, silicone, and label adhesive
- Detail cleaning inside cabinets, closets, vents, light trims, and window channels
- Damage screening for hidden moisture, smoke residue, or mold risk where the project overlapped with restoration
What makes LA projects different
Urban density changes the job. Dust moves into hallways, elevators, neighboring suites, and parked vehicles when crews don’t control it. On flat-roof commercial buildings and older residential stock, minor leaks during construction can also go unnoticed until after finishes are installed.
That’s why seasoned crews treat post-construction cleaning as quality control, not cosmetics. The final clean is often the first moment someone slows down enough to catch what the build phase missed.
What Professional Construction Clean Up Actually Includes
Professional construction clean up has a broader scope than most clients expect. It starts with debris and ends with a space that can be occupied without leaving tradespeople, tenants, or inspectors to discover leftovers.
It’s not the same as janitorial cleaning
Janitorial service maintains an already-finished space. Construction clean up corrects the aftermath of cutting, sanding, drilling, painting, demolition, and installation. The tools are different. The sequencing is different. The risk profile is different.
If a site has airborne particulates, crews may use HEPA vacuums and negative-air equipment instead of standard uprights. On jobs with lingering dust or odor after demolition or restoration, temporary filtration can matter more than extra mopping. In those cases, air scrubber rental options for containment and filtration become part of the clean up plan, not an add-on.
Core tasks in a professional scope
A complete scope usually includes:
- Debris haul-out: Removal of packaging, scrap material, tape, cardboard, loose fasteners, and leftover supplies.
- Fine dust removal: HEPA vacuuming and damp wiping of horizontal and vertical surfaces, not just visible counters and floors.
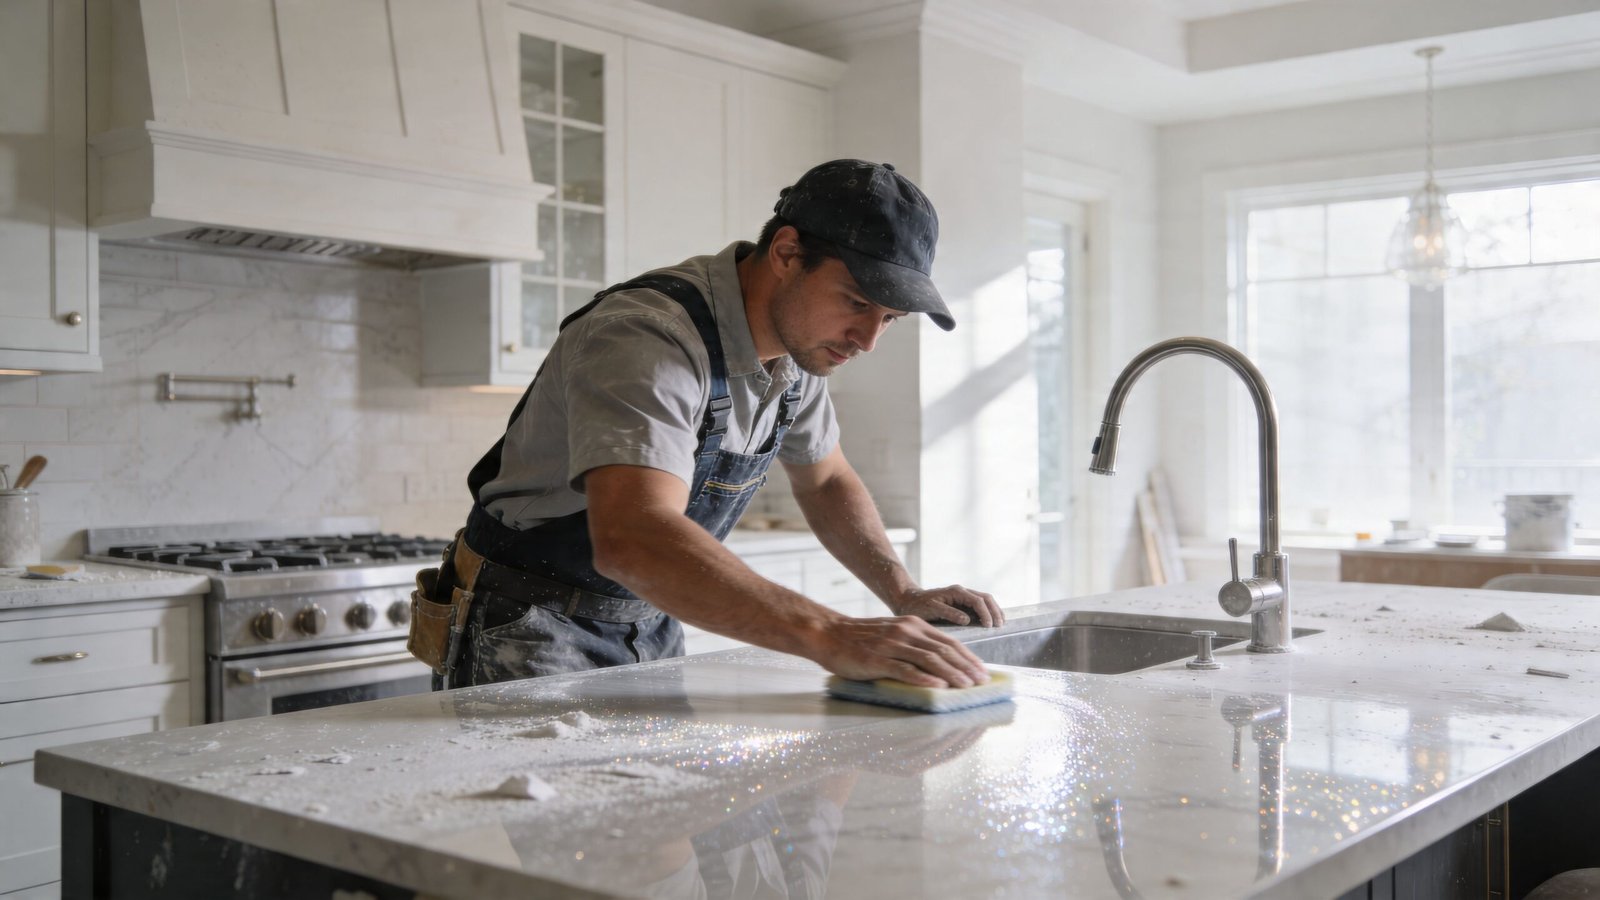
- Surface-safe detailing: Careful cleaning of stone, stainless, glass, anodized metal, finished wood, and new paint without scratching or dulling them.
- Film and sticker removal: Protective plastic, label residue, painter’s tape, and caulk smear removal from windows, appliances, and fixtures.
- Vent and register cleaning: Dust removal from grilles, returns, exhaust covers, and accessible vent areas.
- Interior cabinet cleaning: Shelves, drawers, vanities, closets, and millwork interiors get cleaned before stocking or tenant move-in.
- Floor-specific finishing: Tile haze removal, dust extraction from carpet, and finish-appropriate cleaning for hardwood, LVP, VCT, or sealed concrete.
- Restoration overlap work: If the project followed a leak, smoke event, or mold-related demo, clean up may also include controlled disposal and sanitation steps.
What good crews do that rushed crews don’t
The difference shows up in small places. Good crews remove dust from the top edge of doors, not just eye-level surfaces. They clean the hinge side of cabinet doors. They check recessed lights and sprinkler rings. They wipe wall plates after sanding dust settles on them. They know when aggressive solvents will damage a fresh finish and when mechanical removal is safer.
Good construction clean up protects the work that was just paid for. The wrong rag, blade, or chemical can damage a new surface faster than the original construction crew did.
Move-in ready means more than shiny
“Move-in ready” has a practical definition. The air shouldn’t blow dust when the system starts. Drawers shouldn’t transfer chalk to dishes or files. Floors shouldn’t leave grit on shoe soles. Bathrooms and kitchens should be usable without another contractor coming back to scrape, wipe, or explain.
That standard matters even more when construction clean up overlaps with restoration. At that point, appearance is only one part of the job.
The Three Phases of Post-Construction Cleaning
The cleanest projects are usually the ones cleaned in stages. Trying to do everything at the end creates missed details, recontamination, and extra labor. A three-phase approach keeps the site usable for trades and prevents the final clean from becoming a second rough clean.
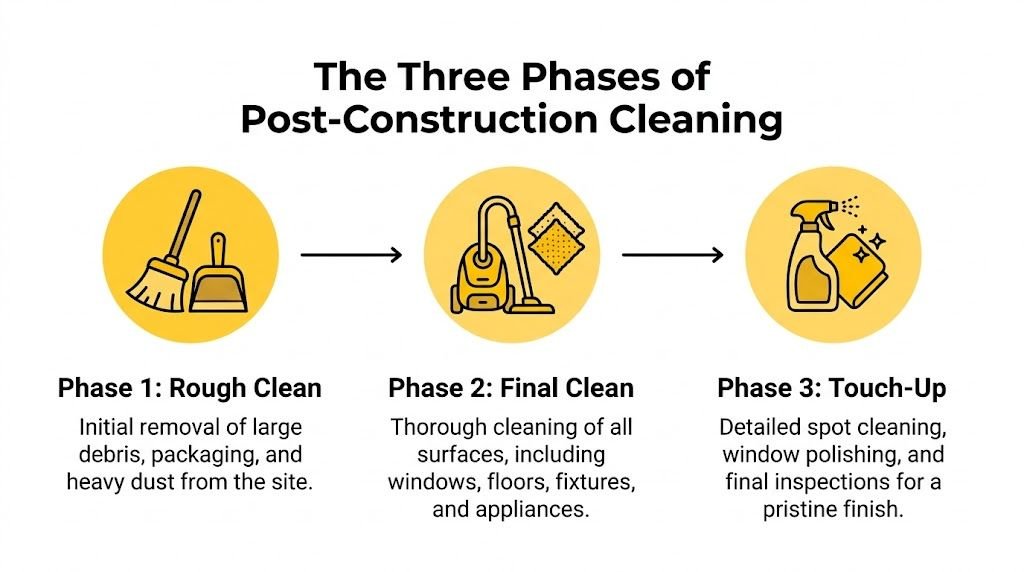
Phase 1 Rough clean
Rough clean happens while work is still active or just before the last trades finish. The goal is simple. Get rid of what blocks access, creates hazards, or interferes with punch work.
This phase usually includes scrap removal, sweeping, vacuuming heavy dust, clearing packaging, and knocking down the first wave of residue. On larger jobs, rough clean also means separating debris that needs special disposal and keeping traffic paths open.
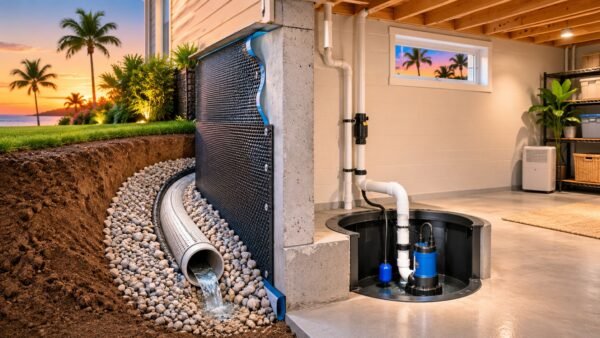
For restoration-related work, rough clean can be more technical. If water affected concrete, underlayment, framing, or wall cavities, crews may still be tracking moisture instead of just tidying. The IICRC classifies water losses by category and class, and that affects the clean up method. In deep saturation conditions, Class 4 losses require advanced psychrometric calculations and specialized equipment to reach moisture content below 15%, verified by moisture meters, before materials can be considered dry enough for turnover, according to ATI Restoration’s overview of the water damage restoration process. Mold can begin within 24 to 48 hours on damp surfaces, so rough clean can’t be separated from drying decisions when moisture is still present.
What rough clean should accomplish
A solid rough clean does three things well:
- Removes hazards: Nails, shards, cutoffs, and loose debris shouldn’t be left for painters, electricians, or inspectors.
- Improves access: Trades can finish without working around trash piles, blocked windows, or cluttered floors.
- Reduces contamination spread: The first removal of dust and debris keeps later detail cleaning from becoming harder and more expensive.
A weak rough clean creates a domino effect. Dust gets ground into flooring. Trades lean ladders against dirty walls. Adhesives cure over construction dust. Then the final clean crew has to undo more than they should.
Phase 2 Final clean
Final clean happens after installation is complete and the site is ready for detailed work. At this stage, real finish protection matters. Every surface gets inspected and cleaned with the right method for that material.
On this pass, crews clean:
- windows, tracks, and frames
- cabinet interiors and shelving
- counters, ledges, trim, and baseboards
- appliances and plumbing fixtures
- light fixtures, switch plates, and outlet covers
- floor surfaces with the right process for each finish
The work is slower because detail matters more than speed. A rushed final clean leaves swirl marks on stainless, scratches on glass, and haze on dark flooring. Those problems often get blamed on the cleaner, but they’re usually caused by using the wrong blade, pad, or chemical under time pressure.
Moisture checks belong here too
On projects tied to prior water damage, final clean should include moisture confirmation before enclosed finishes are signed off. That matters in LA remodels where slab moisture, shower leaks, or wall cavity moisture can hide behind fresh paint.
A meter reading only helps if someone knows how to interpret it by material type and context. If you’re reviewing contractor notes or doing a turnover inspection, it helps to understand how to read moisture meter readings so you can tell the difference between a dry structure and a cosmetic cover-up.
Field note: If drywall has been patched, painted, and textured over a previously wet area, final clean is often the first and last chance to ask for verification before furniture hides the wall.
Phase 3 Turnover clean
Turnover clean is the shortest phase, but it protects the impression of the entire project. It happens after punch work, right before occupancy, photography, staging, or final walkthrough.
This pass handles fingerprints on glass, smudges on walls, fresh shoe prints, re-dusted surfaces, and small debris that appeared after the final clean. It’s also where crews catch practical misses such as unremoved labels, dusty closet shelves, or construction dust that fell from an access panel after HVAC startup.
Why turnover clean saves arguments
A lot of disputes happen because everyone assumes someone else handled the final touch. The GC thinks the cleaner got it. The cleaner thinks the last trade dirtied it. The owner sees residue and assumes the whole project was sloppy.
Turnover clean narrows that gap. It creates a clean handoff moment with fewer excuses and fewer callbacks.
Here’s how the phases differ in practice:
| Phase | Main objective | Typical timing | What gets removed |
|---|---|---|---|
| Rough clean | Clear debris and make the site workable | Before all trades are fully done | Scrap, packaging, heavy dust, loose hazards |
| Final clean | Detail every finish and surface | After construction is complete | Fine dust, film, adhesive, residue, smudges |
| Turnover clean | Correct re-soiling before handoff | Right before occupancy or walkthrough | Fingerprints, fresh dust, touch-up debris |
Crews that skip a defined phase usually make the next phase more expensive. On straightforward projects, that means extra labor. On restoration-linked projects, it can mean missing wet materials, contaminated debris, or surfaces that need another level of treatment before the building is safe to use.
Hidden Hazards and Critical Compliance Standards
The biggest post-construction risks are often the ones people can’t see. Fine dust, residual moisture, smoke particles, and demolition debris don’t always look dramatic, but they affect occupant health, finish performance, and liability.
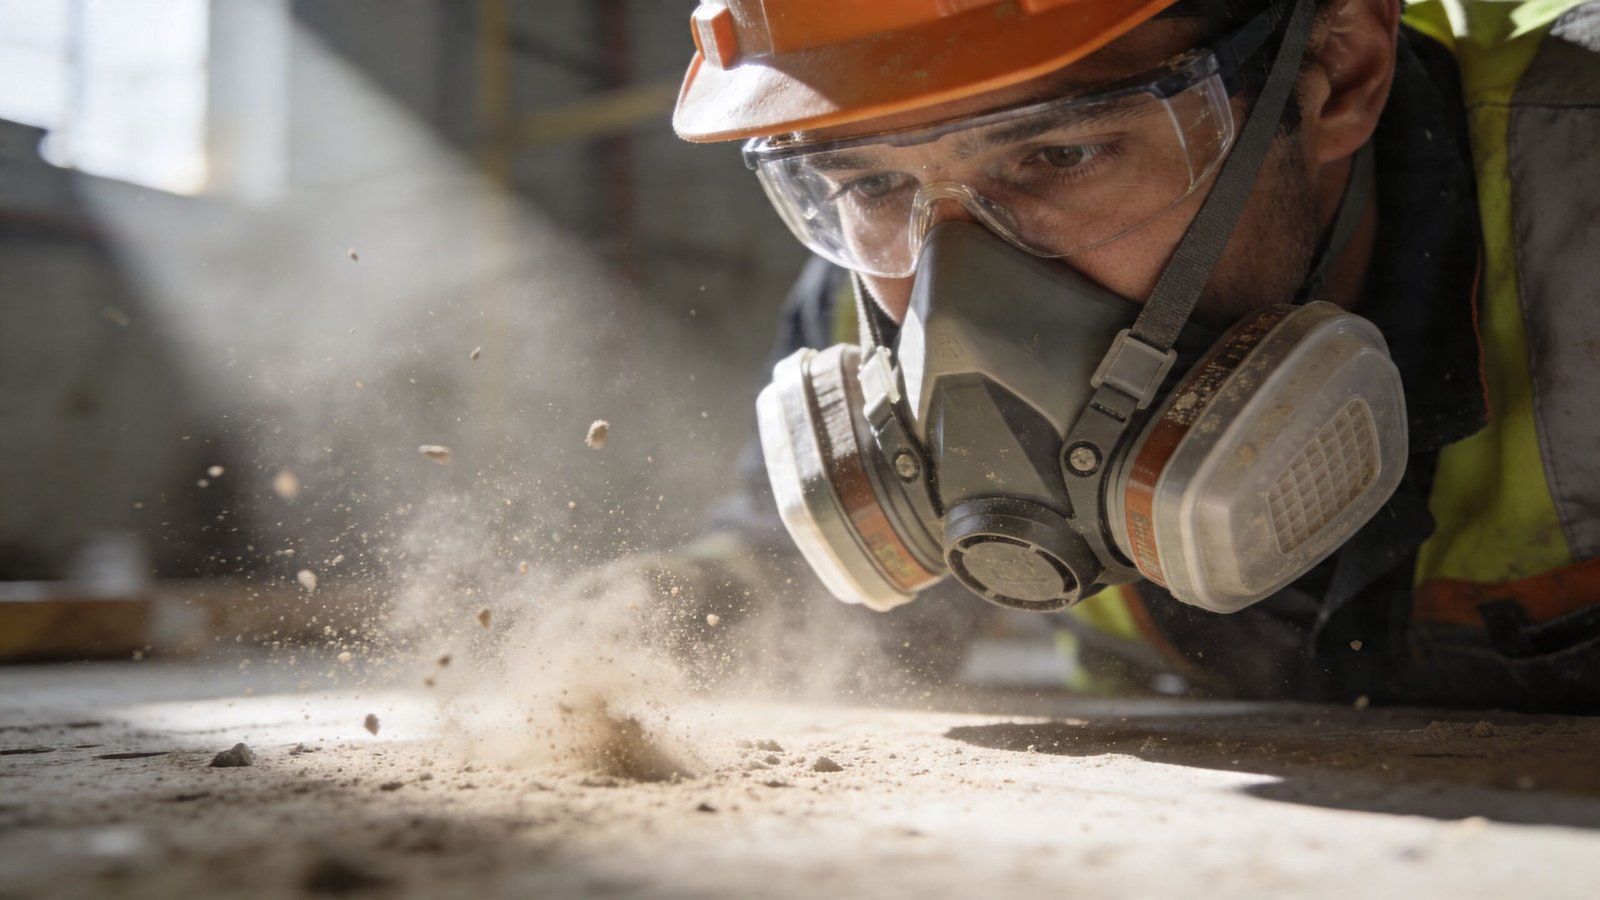
Silica dust is not a housekeeping issue
Respirable crystalline silica is one of the most overlooked hazards after cutting concrete, mortar, tile, and some drywall materials. It doesn’t take a dramatic demo scene to create an exposure problem. A small renovation can spread fine dust into adjacent occupied areas if crews don’t control it.
According to Augie’s discussion of post-construction site challenges, respirable crystalline silica causes over 1,000 U.S. deaths annually, and 30% of construction sites in Los Angeles exceed safe dust levels. That’s why a basic sweep-and-vacuum approach is the wrong response after dust-heavy work. It stirs particles back into the air.
Compliance protects the owner too
OSHA and EPA requirements aren’t paperwork for its own sake. They shape how debris gets contained, how workers protect themselves, and how contaminants stay out of occupied areas. In practical terms, that means proper PPE, controlled bagging, containment barriers, and negative air when needed.
If the site is active between phases, building security matters too. Open access points, unsecured materials, and off-hours traffic can undo containment and create another layer of risk. Property teams managing larger remodels should coordinate clean up with comprehensive security for your construction site so the site stays controlled after hours, not just during the workday.
Where standards separate pros from basic cleaners
Controlled demolition clean up is a good example. In restoration settings, a professional crew doesn’t just remove visibly damaged material and hope for the best. According to RestoreMasters’ water damage restoration guidance, porous materials such as drywall saturated beyond 17% moisture content should be removed 12 to 24 inches beyond visible damage. The same source notes that incomplete debris removal can leave 20% to 40% residual moisture in subfloors, which can lead to secondary damage and push repair costs up by 300%.
That isn’t a cosmetic issue. It’s a building performance issue.
Common hidden hazards after renovation
- Residual silica and drywall dust: Often settles inside vents, tracks, and soft goods.
- VOC odors from finishes: Paints, adhesives, and sealants can linger if the site isn’t ventilated correctly.
- Moisture trapped behind finishes: Especially common after leak repairs or rushed rebuilds.
- Category 2 or 3 debris from restoration work: Requires different handling than ordinary construction trash.
- Cross-contamination: Dust and debris move from work zones into occupied suites when containment fails.
If the project involved demo after a leak, sewer backup, fire, or suspected mold, treat the debris stream as a restoration issue first and a cleaning issue second.
For mixed-scope jobs, crews may need specialized hazardous materials cleanup procedures rather than ordinary post-build cleaning. That distinction matters when the waste includes contaminated porous material, sewage-affected debris, or residues that can’t be bagged and hauled as standard trash.
Understanding Construction Clean Up Costs in Los Angeles
Construction clean up pricing in Los Angeles is rarely a flat formula. The cost depends on what happened before the cleaning crew arrived. A light cosmetic remodel with protected floors and disciplined trades costs less to finish than a dust-heavy gut renovation, a fire-damaged rebuild, or a water-loss reconstruction with multiple containment areas.
The cost drivers that matter most
Property managers usually get the clearest pricing when they look at these variables first:
- Project condition: New build, tenant improvement, partial demo, or restoration-related rebuild
- Level of dust and debris: Fine drywall dust behaves very differently from ordinary sweep-up debris
- Material sensitivity: Stone, stainless, hardwood, polished concrete, and premium fixtures require slower methods
- Access issues: Stairs, elevators, parking limits, tight corridors, and occupied neighboring units all add labor
- Scope overlap: If the clean up includes post-water, smoke, or mold-related tasks, the pricing changes because the risk and documentation burden change
Why restoration overlap changes the budget
A straightforward clean up focuses on surfaces. A restoration-related clean up often includes moisture verification, containment, debris segregation, odor treatment, and insurer-ready documentation. That’s a different level of work.
The larger market numbers make the point clearly. The U.S. disaster restoration market was valued at $210 billion in 2023, and average water damage restoration costs are $3,869 per incident, while cleanup can range from $3.50 per square foot for clean water to over $7.50 per square foot for contaminated water, according to PuroClean’s restoration industry statistics. Those figures are about restoration, not standard post-build cleaning, but they show why delaying proper clean up gets expensive quickly once moisture or contamination is involved.
A practical way to budget
Instead of chasing a generic price, ask for a scope-based estimate that breaks out:
| Cost factor | What it affects |
|---|---|
| Square footage | Labor hours, equipment time, and supply volume |
| Debris level | Whether the job starts with haul-out or detail cleaning |
| Cleaning phase count | Rough, final, and turnover visits versus one compressed visit |
| Special handling | Containment, HEPA filtration, odor control, or hazardous disposal |
| Documentation needs | Photo logs, moisture logs, and insurance support |
That structure gives owners something usable. It also makes change orders easier to understand when the site condition isn’t what the bid assumed.
Cheap bids usually hide one of two problems
Either the crew is pricing for a light janitorial pass, or they’re assuming the trades did more prep than was done. Both scenarios create friction at handoff.
Budget rule: The lower the bid, the more carefully you should define what “clean” means. If cabinet interiors, vents, adhesive removal, or post-restoration documentation aren’t listed, assume they are not included.
If your project followed a leak or another covered loss, compare the cleaning scope against water damage cleanup cost factors and restoration pricing before approving a proposal. The cheapest route on paper often becomes the most expensive route after rework, claim disputes, or delayed occupancy.
If you need pricing that matches the actual site condition, request a written scope before the final week of construction. That’s where most surprise costs start.
Your Ultimate Post-Construction Clean Up Checklist
A final walkthrough should catch what the eye misses on a casual visit. Use this checklist like a turnover tool, not a wish list. If an item fails, it should go back on the punch.
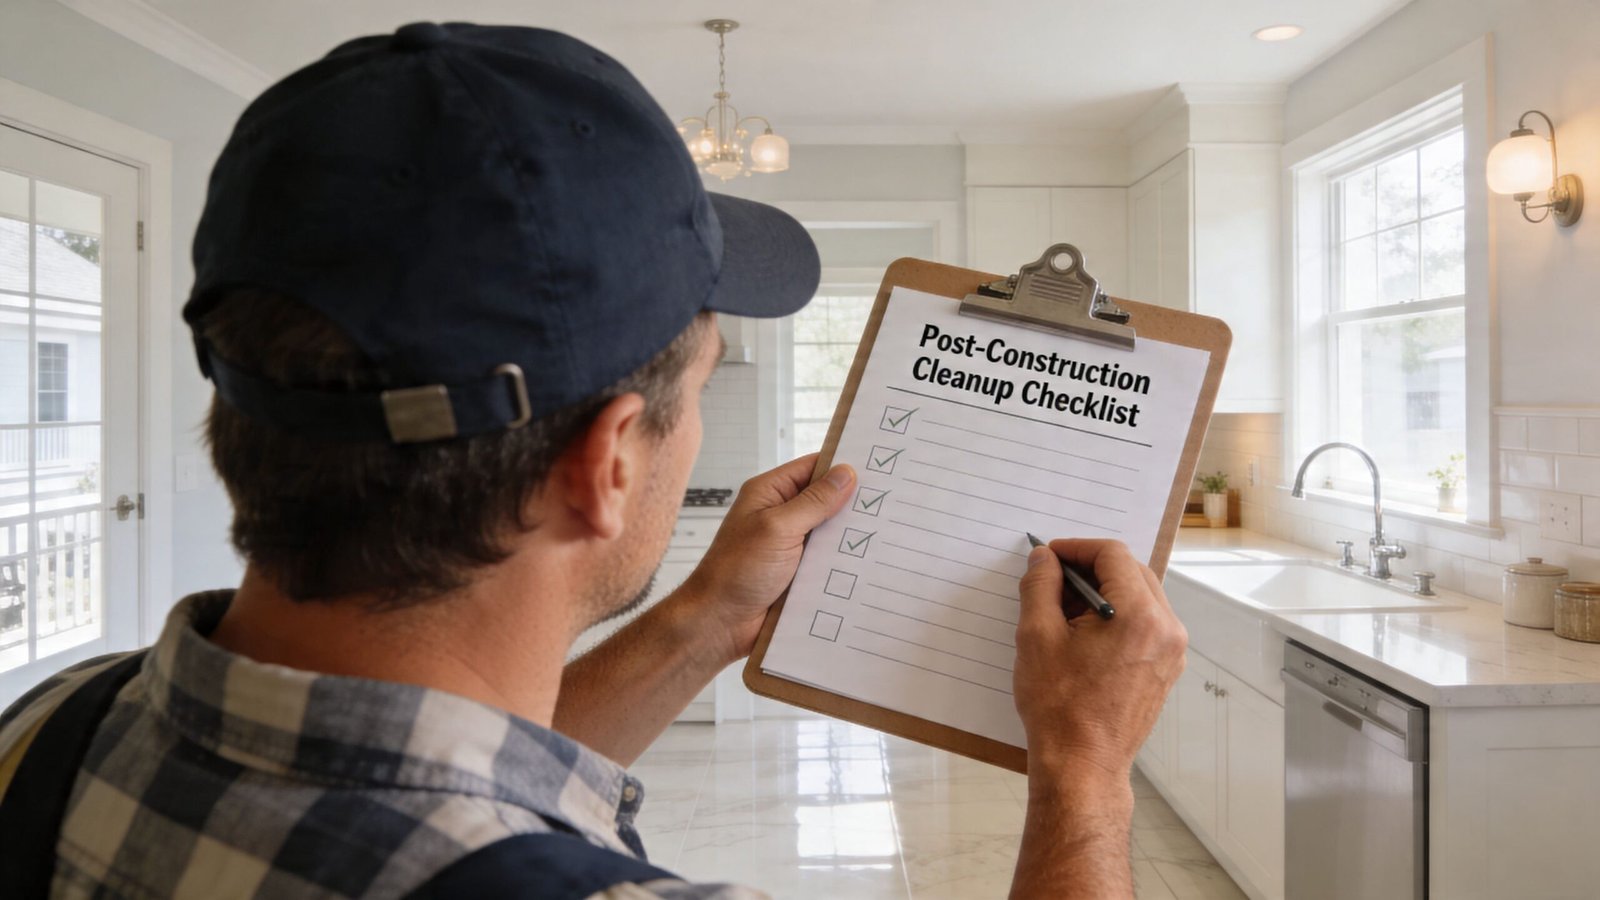
Interior living areas and bedrooms
- Check high dust points: Tops of doors, window casings, ceiling fan housings, recessed light trims, and closet shelves should be dust-free.
- Inspect walls closely: Look for sanding dust, fingerprints, patch residue, and paint splatter near baseboards and switches.
- Test floor feel: Walk the room in socks or smooth soles. Grit usually shows up before it’s visible.
- Confirm vent cleanliness: Supply and return grilles shouldn’t blow visible dust when the system starts.
Kitchen and break areas
- Open every cabinet and drawer: Interiors should be wiped clean, including corners and hardware edges.
- Remove all film and labels: Protective plastic on appliances, trim, and fixtures shouldn’t be left behind.
- Inspect stone and counters under side light: Haze, caulk smears, and polishing residue often show at an angle.
- Check backsplash and sink lines: Look for grout haze, silicone smudges, and dust in faucet bases.
Bathrooms and utility spaces
- Verify fixture detailing: Toilets, tubs, shower pans, drains, and vanity hardware should be free of dust and adhesive residue.
- Inspect tile finish: No grout haze, dried caulk, or debris in corners.
- Look behind doors and under vanities: These are common miss zones on rushed jobs.
- Smell the room: Odors can indicate standing moisture, sewer-related issues, or incomplete drying after prior water damage.
Windows, doors, and trim
- Run fingers through tracks: Clean glass means little if the tracks still hold drywall grit.
- Check stickers and tape residue: Frames, panes, and hardware should be clear.
- Inspect trim lines: Baseboards and door casings collect dust quickly during punch work.
- Open and close everything: Binding doors and gritty sliders often reveal hidden debris.
Floors and hidden moisture risk
This is the part many walkthroughs skip. If the project followed a leak, partial flood, or wet demolition, clean surfaces don’t prove dry materials. As noted earlier in the industry guidance, drywall affected beyond the moisture threshold may need removal well past the visible line, and incomplete debris removal can leave damaging moisture in subfloors. That’s where hardwood cupping and later callbacks begin.
For budgeting context on finishing work after build-out, some owners compare local construction clean up costs to see how service levels vary. Just make sure the comparison is scope to scope. A sparkle clean and a restoration-integrated clean up are not the same job.
Bring a flashlight, blue painter’s tape, and a written punch list. Natural light hides less than overhead lighting, and side light exposes dust, haze, and residue fast.
Why Hire Onsite Pro Restoration for Your LA Project
Most companies can wipe surfaces. Fewer can handle the jobs where construction clean up overlaps with water, mold, smoke, or contaminated debris. That overlap is where projects get delayed, claims get questioned, and “finished” spaces turn into callback sites.
Onsite Pro Restoration is built for that exact gap. The company is licensed and IICRC-certified, serves Los Angeles and nearby communities, and responds around the clock for active losses. That matters when a renovation takes an unexpected turn because of a burst pipe, hidden moisture, or post-demo contamination.
What separates a restoration-capable clean up team
A qualified team doesn’t just make the project look complete. It verifies conditions that affect occupancy and claim support.
That includes:
- IICRC-based restoration practices for drying, cleanup sequencing, and contaminated material handling
- Specialized equipment such as HEPA vacuums, air scrubbers, extraction tools, and moisture detection devices
- Insurance-ready documentation with photos, notes, and condition tracking that helps connect work performed to the covered loss
- Fast mobilization for jobs that can’t wait until normal business hours
Why that matters to property managers
Property managers need one vendor who can communicate with tenants, contractors, and adjusters without losing the thread. If the clean up vendor doesn’t understand restoration, they may miss the reason certain materials were removed, fail to document causation, or sign off on a space that still has a hidden moisture problem.
A clean handoff is only useful if the building is actually ready for use.
Onsite Pro Restoration handles emergency water extraction, structural drying, mold inspections and remediation, smoke and soot cleanup, odor control, sewer backup cleanup, and related post-restoration cleaning. For owners in North Hollywood, Glendale, Burbank, Sherman Oaks, Beverly Hills, and nearby areas, that means fewer handoffs between vendors and fewer chances for responsibility to get blurred.
When the project is simple, that keeps the closeout smoother. When the project is complicated, it keeps small oversights from becoming expensive disputes.
Frequently Asked Questions About Construction Cleaning
Can construction clean up be covered by insurance
Sometimes, yes, but only in the right context. Policies often exclude debris removal unless it’s tied to a covered peril. According to The Facilities Group’s discussion of construction clean-up coverage issues, there was a 25% spike in dual construction-restoration needs post-2025 floods, and 15% of related claims were denied in LA. Clear documentation linking the clean up to the covered loss is critical.
How do I know if I need more than a standard cleaning crew
If the project involved demolition dust, moisture, smoke, sewer backup, or possible mold exposure, you need a restoration-aware crew. Standard cleaning is fine for light residue. It’s not enough for contamination control or drying verification.
Should HVAC vents be part of construction clean up
Yes. If dust-producing work happened nearby, vents and registers should be inspected and cleaned as part of turnover. Otherwise, the system can redistribute residue right after occupancy.
What’s the biggest mistake during final walkthrough
Relying on visual appearance alone. Surfaces can look polished while cabinets, tracks, vents, and previously wet materials still need attention.
If your Los Angeles project needs more than a cosmetic wipe-down, Onsite Pro Restoration can help with construction clean up that also addresses water, mold, smoke, and insurance-related documentation. Request an assessment to get a clear scope, practical recommendations, and a faster path to safe turnover.