Learning how to clean soot from walls starts with one critical fact that most people get wrong: never, ever use water first.
It’s the most common mistake we see, and it can turn a manageable cleanup into a permanent stain. Smearing dry, powdery soot with a wet rag pushes it deeper into porous surfaces like drywall. The right way almost always begins with a specialized dry-cleaning sponge designed to lift the residue without making a bigger mess. If you're facing soot damage after a fire in your Los Angeles home, understanding the right steps is crucial.
Need immediate help with soot cleanup in Los Angeles? Our certified technicians are available 24/7.
Get a Free Soot Damage Assessment
Understanding Soot Damage in Your Los Angeles Home
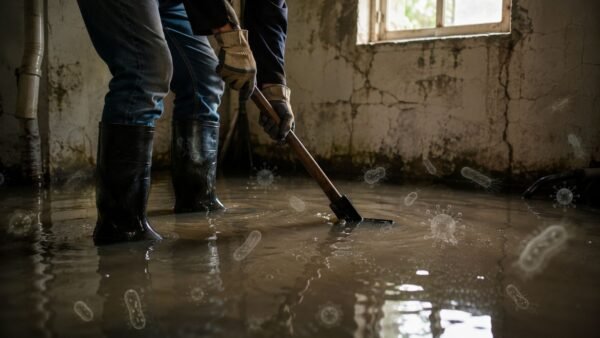
After a fire—even a minor kitchen flare-up in a Sherman Oaks apartment—that dark residue on your walls is far more than just a cosmetic problem. Soot is an acidic, toxic byproduct of incomplete combustion.
If you don't deal with it fast, those acidic particles will start to permanently etch and discolor paint, drywall, and even glass. The urgency is real. After just a few days, the damage becomes significantly harder and more expensive to reverse.

Here's the thing: not all soot is the same. The type of fire dictates the kind of residue you'll be facing, and figuring out which one you have is fundamental to choosing the right cleaning strategy.
The Two Main Types of Soot
In most homes, you'll encounter either dry soot or oily soot. Each comes from a different source and demands a completely different cleanup approach.
- Dry Soot: This is the result of fast-burning fires with plenty of oxygen, usually involving natural materials like wood or paper. It has a fine, powdery, almost dusty feel to it. A classic example is the puff-back from a fireplace in a Glendale home.
- Oily Soot: This stuff is much tougher. It’s a greasy, sticky residue that comes from slow-burning, low-oxygen fires involving plastics, rubber, or other synthetics. It smears easily and leaves behind a stubborn stain that’s incredibly hard to remove.
Before you touch anything, figuring out which type of soot you're dealing with is your first and most important step. This quick table should help you identify what's on your walls.
Identifying Your Soot Type: A Quick Guide
| Soot Type | Appearance | Common Source | Cleaning Method |
|---|---|---|---|
| Dry Soot | Fine, powdery, dusty, almost like chalk dust. Easy to disturb. | Fast-burning fires (wood, paper, natural fibers), furnace puff-backs. | Dry-cleaning sponge, HEPA vacuuming. Avoid water. |
| Oily Soot | Sticky, greasy, smeary. Often forms "soot webs" in corners. | Slow, smoldering fires (plastics, rubber, synthetic materials). | Wet cleaning with degreasing agents (TSP, specialized solvents). |
This distinction is everything. Once you know what you’re up against, you can choose the right tools and avoid costly mistakes.
Key Takeaway: The single biggest mistake homeowners make is treating oily soot like dry soot. Trying to wipe greasy residue with a dry sponge will only grind the oily particles deeper into the wall, practically guaranteeing you'll need professional help.
The impact of soot damage in Southern California is something we've seen firsthand for years. After the 2018 Woolsey Fire, which affected thousands of homes near Los Angeles, restoration crews witnessed just how quickly soot causes permanent damage. In fact, professional fire response data shows that untreated soot on walls leads to permanent staining in 75% of cases after just 72 hours as the acidic particles eat away at surfaces.
Identifying the soot type correctly prevents you from making the damage worse and sets you up for a successful cleanup. For more context on the entire recovery journey, our comprehensive guide to fire damage and restoration can walk you through the bigger picture.
Essential Safety Preparations Before Cleaning Soot from Walls
Before you even think about grabbing a sponge, let's talk safety. Soot isn't just a black smudge on the wall; it's a mix of microscopic, often toxic, carbon particles left over from a fire. Breathing this stuff in can seriously irritate your eyes, nose, and throat, and it’s especially rough on anyone with asthma or other respiratory issues.
Taking a few minutes to gear up properly isn't optional—it’s the most important step for protecting your health.
Get the Right Gear On
This is the non-negotiable part. Professionals wear this personal protective equipment (PPE) for a reason, and you should too.
- Respirator: A simple paper dust mask won't cut it. You absolutely need an N95 or P100 respirator to filter out the tiny particulates in soot.
- Eye Protection: Go for fully sealed safety goggles. They're your best defense against airborne particles getting into your eyes.
- Gloves: A good pair of nitrile gloves will keep the soot—and any cleaning chemicals you use later—off your hands.
Create a Safe and Contained Workspace
Once you're suited up, the next job is to keep the mess from spreading. Soot particles are incredibly light and will go airborne with the slightest draft, contaminating clean rooms before you know it.
First, shut down your HVAC system completely. This is critical. Leaving it on is the fastest way to suck soot into your ductwork and spread it throughout the entire house, turning a small job into a massive contamination problem.
Next, you need to isolate the room. Use heavy-duty plastic sheeting and painter's tape to seal off doorways to the rest of the home. It’s also a good idea to cover any furniture you couldn't move out and lay down plastic or thick drop cloths to protect the floors.
Pro Tip: Set up negative air pressure to keep the dirty air from escaping. Just place a box fan in an open window, facing out. This will push the air (and any soot you knock loose) outside instead of letting it drift into other rooms.
These preparations are crucial steps in the larger process of fire recovery. For a more complete overview of what to do immediately after a fire, you can learn more about the initial steps for house fire recovery in our detailed guide. Taking the time to prep properly not only keeps you safe but makes the entire cleaning process far more effective.
How to Clean Soot from Walls: A Step-by-Step Guide
Alright, you've got your safety gear on and the room is prepped. Now it's time to deal with the soot itself. Learning how to clean soot from walls the right way means following a very specific two-part process that every professional restorer uses: dry cleaning first, then wet cleaning.
Getting this order wrong—or skipping the dry part altogether—is the number one mistake I see homeowners make, and it almost always ends in a bigger, permanent mess.
Start With a Dry-Cleaning Sponge
The single most important tool for this job is a dry-cleaning sponge, which you might also hear called a chemical sponge. Forget your kitchen sponge; this is totally different. It’s made from vulcanized natural rubber and its sole purpose is to grab and hold onto dry, powdery soot without smearing it deeper into the paint.
Technique is everything here. You need to work from the top of the wall down, using straight, slightly overlapping strokes.
- Press the sponge firmly against the wall.
- Drag it straight down in one smooth, controlled motion.
- Lift it off, move over, and start the next stroke, overlapping the last one just a bit.
Whatever you do, don't scrub in circles or wipe back and forth. That will grind the fine soot particles into the wall’s pores, and once it's in there, it's nearly impossible to get out. As the sponge gets loaded with soot, use a utility knife to carefully slice off the dirty layer to expose a fresh surface.
Before you even touch a sponge to the wall, make sure you've covered your bases on safety. This quick protocol is non-negotiable.

This is your mental checklist: proper ventilation, personal protective equipment, and covering any surfaces you want to protect. It’s all about containing the mess and keeping yourself safe.
Transition to Wet Cleaning for Oily Residue
Once you’ve removed as much of the loose, dry soot as possible, you’ll probably be left with a stubborn, oily film. This is where you bring in the wet-cleaning phase. Regular household cleaners are not going to be effective; you need a serious degreaser.
An industry-standard solution that cuts right through the grease is Trisodium Phosphate (TSP). You can pick it up at most hardware stores, but handle it with respect—it’s a powerful chemical, so follow the mixing directions on the box to the letter.
Important Note: Always wear your gloves and goggles when working with TSP. The standard mix is one tablespoon of TSP per gallon of warm water. If you're looking for a less aggressive option, a good commercial degreaser or even a strong dish soap solution can work on lighter, less greasy stains.
Here's a pro tip that seems backward but will save your walls from ugly streaks: wash from the bottom up. When you start at the base of the wall, any drips of clean rinse water won't create clean lines running down through the dirty surface below. Just work in small, manageable sections, applying your cleaning solution with a clean sponge.
Rinse each section right away using a second sponge and clean water, then pat the area dry with a clean, lint-free towel. This methodical approach is a lifesaver on the textured stucco and plaster walls common in older Los Angeles homes, as it stops dirty water from getting trapped in all those little crevices.
Many DIY jobs fail right here. Industry data shows that 62% of homeowners who try to vacuum soot without a HEPA filter just end up spreading fine particles everywhere, making things worse. Professionals start with specialized dry chemical sponges to lift 80-90% of loose soot first, then move to chemical solutions that emulsify what’s left.
After you've gotten the walls completely clean, if repainting is in your future, it's absolutely critical to properly clean walls before painting to make sure the new paint sticks and gives you a perfect finish.
Facing stubborn, oily soot? Our pros have the right solutions.
Book Professional Soot Removal Services
Neutralizing Stubborn Smoke Odors
Even after you've nailed how to clean soot from walls and every surface looks spotless again, that stubborn smoke smell can hang in the air, making your home feel anything but clean. It’s not just in your head—it’s a physical problem. Microscopic smoke and soot particles have a nasty habit of working their way deep into porous materials like drywall, wood studs, and fabrics.

Many people first turn to DIY tricks, setting out bowls of white vinegar or activated charcoal. While these can absorb some minor airborne odors, they’re really just temporary fixes. They only mask the bigger issue and don't get to the odor-causing particles trapped inside the structure of your home.
Moving Beyond Temporary Fixes
To get rid of a serious smoke smell for good, you need a solution that attacks the odor at a molecular level. This is where professional-grade technology comes in, doing what simple household products just can’t.
In the restoration business, two of the most effective methods we rely on are thermal fogging and hydroxyl generation.
- Thermal Fogging: This process uses a special machine to heat a deodorizing solution, turning it into a fine, smoke-like fog. This fog follows the same path the original smoke did, penetrating deep into walls and other porous materials to neutralize odor particles right at the source.
- Hydroxyl Generators: These machines are game-changers. They use UV light to create hydroxyl radicals—powerful, naturally occurring molecules that safely break down odor compounds in the air and on surfaces. It's like scrubbing the air clean on a microscopic level.
Key Takeaway: The goal isn't just to cover up the smell. It's to chemically change and eliminate the particles causing it. Professional methods like thermal fogging and hydroxyl treatments don't just mask the scent; they destroy it.
These advanced techniques are the only way to get a permanent solution, neutralizing the odor at a chemical level and truly reclaiming your home's air quality. For homeowners here in the Los Angeles area, knowing these options exist is key to a full recovery.
If you want to dig deeper into this topic, we've covered it in more detail in our guide on how to eliminate fire smoke odor in a house.
Knowing When DIY Is Not Enough
Knowing how to clean soot from walls is one thing, but knowing your own limits is just as important. It’s a classic restoration scenario: a homeowner tackles what looks like a small patch of soot, only to smear it deeper into the drywall, making a simple cleanup a major repair job.
While a bit of dry, powdery soot from a candle might be a manageable DIY project, many situations demand the kind of gear and expertise you only get from a professional restoration company. Pushing your luck on a complex job can cause permanent damage, turning a recoverable situation into a gut renovation. Making the right call protects your property and, more importantly, your health.
If any of the following sound familiar, it’s a clear sign to put down the sponge and pick up the phone.
When to Call a Professional
Think of this as your non-negotiable checklist. If even one of these boxes is ticked, your safest and most effective move is to contact a licensed restoration team.
- The Damage Is Widespread: If you're looking at more than just a small, contained spot on a single wall, the scale of the job is likely beyond what DIY methods can handle without causing more harm than good.
- You're Dealing with Thick, Oily Soot: That greasy, sticky residue from burnt plastics or synthetic materials won't wipe away with soap and water. It needs powerful chemical degreasers and specific techniques to lift it without smearing it across the surface.
- It Was a Protein Fire: Kitchen fires involving burnt meat or food are deceptive. They leave a nearly invisible, yellowish film that is incredibly corrosive and carries a foul, persistent odor that’s notoriously difficult to eliminate.
- The Soot Has Reached Your HVAC System: This is a big one. If you even suspect soot got into your vents, your entire home is at risk of contamination. Every time the system kicks on, it will blow microscopic soot particles into every room. This requires professional duct cleaning, period.
Expert Insight: A common mistake we see in Los Angeles homes is underestimating the damage from a simple kitchen fire. That sticky, yellowish film on your cabinets and walls is a protein residue, and it will cause permanent etching and a foul odor if not properly remediated with professional-grade solvents.
The Professional Advantage: Equipment and Expertise
Restoration pros bring more to the table than just stronger cleaners; they deploy advanced technology that you simply can't rent at a hardware store. For widespread contamination, they’ll set up HEPA air scrubbers to filter microscopic particles out of the air, making it safe to breathe again. For delicate items, they might use ultrasonic cleaning systems, which use sound waves to gently dislodge soot without damaging the surface.
So, how do you decide between a weekend spent scrubbing and calling in a team? Here’s a quick breakdown.
DIY Cleanup vs Professional Restoration
| Cleanup Task | DIY Approach (Limitations) | Professional Solution (Benefits) |
|---|---|---|
| Soot Removal | Dry sponge and household cleaners. Can smear oily soot or drive particles deeper into pores. | Chemical solvents, media blasting, and specialized techniques for different soot types. |
| Odor Control | Air fresheners and open windows. Masks odors temporarily but doesn't eliminate the source. | Ozone generators, thermal fogging, and hydroxyls to neutralize odor molecules permanently. |
| Air Quality | Household air purifiers. Can't capture the smallest, most harmful airborne particles. | Commercial HEPA air scrubbers that remove 99.97% of airborne contaminants. |
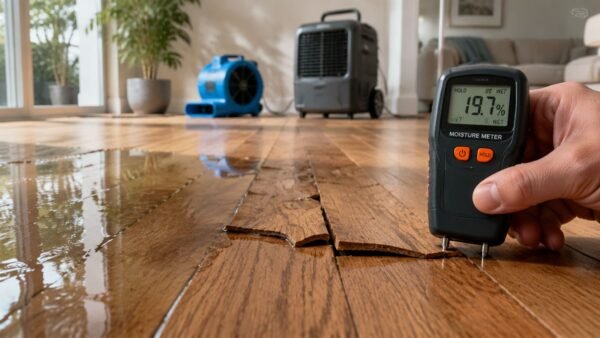
| Hidden Damage | Visual inspection only. Misses moisture and soot in wall cavities, insulation, and HVAC. | Thermal imaging, moisture meters, and borescopes to find and address all affected areas. |
Ultimately, if the soot damage is too extensive or complex for you to handle, understanding the benefits of hiring a professional cleaning company is crucial. Calling a certified team ensures every trace of hazardous material is safely removed, preventing the long-term structural problems and lingering odors that can plague a property for years.
For a clear assessment of your situation, it's always wise to consult with a local restoration pro who can give you an honest evaluation of what the job really requires.
Navigating Your Insurance Claim for Fire Damage
When the smoke clears, the stress of a fire doesn't just disappear—it shifts to dealing with the insurance claim. For any Los Angeles homeowner, knowing how to navigate this process is just as crucial as the cleanup itself.
Before you touch, move, or clean a single thing, your first and most important job is to document everything.
Grab your phone and take extensive photos and videos. Get wide shots of every room showing the soot on walls and ceilings, then move in for close-ups of the most heavily damaged areas. This visual proof is the bedrock of your claim and is absolutely invaluable.
Making the First Call to Your Insurance Company
When you call your insurance company to report the damage, stick to the facts. Let them know you’ve had a fire and are now dealing with the smoke and soot aftermath. Don't speculate on what caused it or try to downplay the damage—just report what you see.
Your agent will then assign an adjuster to your case. This is the point where having a professional on your side can make all the difference.
How a Restoration Company Makes Your Claim Easier
Dealing with insurance adjusters is what we do every day. A professional restoration company like Onsite Pro Restoration becomes your advocate, speaking their language and providing the detailed, industry-standard proof they need to approve a claim without unnecessary delays.
Here’s how we help:
- Detailed Estimates: We use Xactimate, the same standardized software most insurance companies rely on. This means our estimates are accurate, fair, and formatted in a way your adjuster immediately understands and trusts.
- Moisture and Soot Readings: We don't just say something is damaged; we prove it with hard data. We document the precise levels of soot contamination and moisture to justify the required cleanup.
- Comprehensive Reports: You'll get a full report packed with photos, data readings, and a clear scope of work that explains every single step of the restoration plan.
Bringing in a certified restoration company from the start dramatically boosts the chances of your claim being approved quickly and for the full amount you're owed. We manage the paperwork and the back-and-forth so you can focus on getting your home and life back together.
For a deeper dive into what your specific policy might cover, you can learn more about homeowners insurance for fire damage in our detailed guide. It’s essential reading for any homeowner facing this challenge.
FAQs About Cleaning Soot From Walls
Even with the best guide, every soot situation is a little different. Here are answers to the most common questions we get from homeowners in the middle of a cleanup project.
Can I Just Paint Over Soot Stains?
I get this question all the time, and the answer is always a hard no. It might seem like a quick fix, but painting over soot is one of the biggest mistakes you can make.
Soot is oily and acidic. If you just slap a coat of paint over it, those greasy stains will bleed right back through in a matter of weeks. On top of that, you’re trapping the smoke odor underneath the paint. That smell will continue to haunt your home, especially on warm or humid days.
You absolutely must remove the soot completely, then seal the surface with a high-quality, stain-blocking primer before you even think about picking up a paintbrush.
Why Does Soot Keep Reappearing After I Clean?
This is incredibly frustrating, but it usually points to one of two culprits. First, the cleaning wasn't quite thorough enough. If even a thin, oily film is left behind (especially from a protein fire), it acts like a magnet for new dust and dirt, making it look like the stain has returned.
The second reason is more serious: the soot has contaminated your HVAC system. If your air ducts are full of soot, your system will just blow those tiny particles right back onto your freshly cleaned walls every time the heat or AC kicks on. If you suspect this is happening, it's a clear signal that you need professional duct cleaning.
What’s the Difference Between Soot and Mold?
It's easy to confuse them since both can show up as ugly black marks on your walls. But they are worlds apart.
Soot is a carbon residue left behind by incomplete combustion. It will be powdery or greasy and will smear easily if you touch it. It also carries that distinct smoky, acrid smell of a fire.
Mold, however, is a living fungus that thrives in dampness. It often looks fuzzy or spotted and gives off a musty, earthy odor. If you've had a leak or live in a humid area like a Santa Monica home near the coast, and you see black spots, mold is a strong possibility.
Is It Okay to Use My Regular Vacuum on Soot?
Please don't. A standard household vacuum will do more harm than good. Its filter isn't fine enough to trap microscopic soot particles. Instead, it will suck them off the wall and shoot them right back into the air through its exhaust, spreading the contamination all over your house.
Crucial Safety Tip: The only vacuum safe for this job is one with a HEPA (High-Efficiency Particulate Air) filter. HEPA filters are specifically designed to capture 99.97% of particles as small as 0.3 microns, which means the soot actually gets removed from your home for good.
If the soot damage feels overwhelming or that stubborn smoke smell just won't go away, don't risk making things worse. The certified professionals at Onsite Pro Restoration have the specialized equipment and experience to restore your home correctly and safely. Call us 24/7 for a free assessment at https://onsitepro.org.