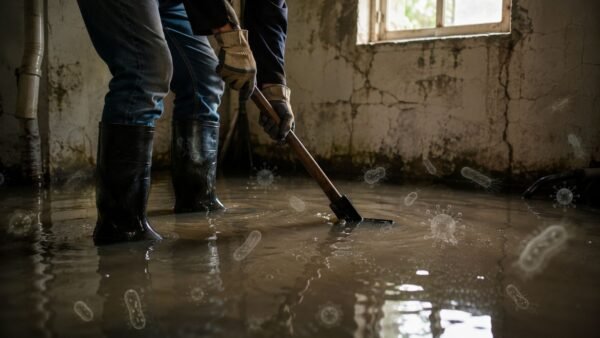
When you first spot a puddle spreading across your floor, what you do in the next 60 minutes can make a massive difference. Your immediate actions can save thousands of dollars and prevent long-term issues like mold. The water damage cleaning process doesn't start when the pros arrive—it starts the second you find the problem. Your immediate job is to stop the source, make the area safe, and limit the damage before anyone even picks up a tool.
When an emergency strikes, you need a team you can count on. Onsite Pro Restoration delivers 24/7 emergency response for water, mold, and fire damage throughout Los Angeles. Call us now for a free assessment and let our certified experts bring back your peace of mind.
What To Do Immediately After Finding Water Damage
That sinking feeling you get when you find a burst pipe in your Sherman Oaks condo or rainwater seeping through a flat roof in Beverly Hills is a tough one. But panic is your worst enemy here. In these first few moments, a clear head and a quick plan can save you thousands in repairs and prevent long-term nightmares like mold and rotted wood. Your first priority isn't the cleanup itself; it's containment and safety.
This infographic cuts right to the chase, breaking down the three non-negotiable first steps.

This simple protocol—stop the water, kill the power, and move your valuables—is the bedrock of a successful recovery.
To make this even easier, here's a quick-reference checklist. Print this out and keep it near your breaker box or water heater.
Immediate Water Damage Response Checklist
| Action Item | Why It's Critical | Pro Tip for LA Residents |
|---|---|---|
| Kill the Power | Water and electricity are a fatal mix. Stepping into a live puddle can cause severe injury or death. | If your breaker box is in a wet garage after heavy rains, don't risk it. Call an electrician or your restoration company immediately. |
| Shut Off the Main Water Valve | This stops more water from flooding your property, containing the problem at its source. | Your main shutoff is often near the street under a concrete or plastic lid marked "WATER," or on an exterior wall where the pipe enters your home. |
| Move Valuables & Furniture | Gets important items out of harm's way and prevents water from wicking up into furniture legs, causing stains and swelling. | Place small blocks or aluminum foil under the legs of heavy furniture you can't move. It creates a barrier that can save a cherished piece. |
| Identify Water Source | Knowing if it's clean (supply line) or contaminated (sewage) tells you whether it's safe to be near. | If the water is dark, smells foul, or is coming from a toilet or drain, assume it's "blackwater." Stay out and call for emergency water cleanup. |
This checklist isn't exhaustive, but it covers the crucial first moves that protect both you and your property while you wait for help.
Prioritize Safety Above All Else
Before you touch a single towel or piece of furniture, you have to deal with the two biggest threats: electricity and contaminated water.
Shut Off the Electricity: If you have standing water, your first move should be to the breaker box to kill the power to affected rooms. Never step into water if there's any chance it's near live outlets or appliances. If you're not sure which breakers to flip, play it safe and shut off the main breaker for the whole property.
Identify the Water Source: Figure out where the water is coming from. Is it from a clean supply line? Or is it greywater from a washer or blackwater from a sewer backup? You must avoid all contact with water that looks dirty, smells bad, or came from a sewage line. It's teeming with dangerous bacteria.
Stop the Water Flow
With the electrical danger handled, your next goal is to stop more water from getting in. You need to find your home’s main water shutoff valve. In most LA homes, it’s in the garage, a basement, or outside near your water meter. A clockwise turn should shut off the water to the entire house, turning a potential flood back into a manageable leak.
Pro Tip: Every single homeowner and property manager should know exactly where their main water shutoff is before an emergency strikes. Seriously, go find it right now. It might be the most important thing you do all year.
Mitigate the Immediate Damage
Okay, the water is off and the power is cut. Now you can focus on damage control while you wait for the pros. This isn't about deep cleaning; it's about triage.
Start moving your most valuable or sensitive belongings out of the wet zone. Lift electronics, family photos, important papers, and furniture with wood legs off the damp floor. A simple trick is to put pieces of aluminum foil or small plastic blocks under furniture legs to stop water from wicking up and causing permanent stains.
If you can, move everything to a completely dry room. Remember, sometimes the problem isn't a sudden burst pipe but a slow, hidden issue. Knowing the signs of a hidden leak can help you catch these things early and prevent a catastrophe down the road.
Documenting Everything for Your Insurance Claim
After the initial shock of finding water in your home wears off, your next move is critical: documenting everything for the insurance claim. This part can feel just as daunting as the flood itself, but trust me, meticulous documentation is the single most powerful tool you have for a smooth, successful claim.
Your goal is to build an undeniable record of the event and its aftermath before any significant water damage cleaning even starts.

Before you touch a single thing—don't move that soaked rug, don't wipe up a drop—pull out your smartphone. Start taking photos and videos. Get wide shots of every room that's been hit, then get in close on the specifics. The more proof you have, the stronger your case will be.
Capture Compelling Visual Evidence
Put yourself in the adjuster's shoes. What would they need to see to understand just how bad things are?
- Do a Video Walkthrough: Hit record and narrate what you’re seeing as you walk through your property. For example, "Okay, this is the living room. Water is dripping from that ceiling light and has completely saturated the rug and the bottom of the couch."
- Take Detailed Photos: Get close-ups. Show the water lines on the walls, the flooring that's started to warp, and every piece of damaged furniture. If a slow leak in your Burbank kitchen cabinet is the culprit, get shots of the swollen wood and any dark spots that look like mold.
- Find the Source: If it’s safe, photograph the burst pipe, the busted appliance hose, or whatever caused the mess. This helps prove the damage was "sudden and accidental"—a magic phrase in most insurance policies.
This first batch of visuals is your baseline. It proves the state of your home before anyone started the restoration, which can shut down any potential disputes down the road.
A thorough visual log is non-negotiable. An adjuster reviewing a claim for a sudden appliance failure in a West Hollywood apartment will rely almost entirely on your initial photos to approve the costs for drying and repairs. Without them, it's just your word against theirs.
Create a Detailed Inventory of Losses
Next up, it’s time to make a list. An exhaustive list of every single item that was damaged or destroyed. Go room by room and get as specific as you can. For commercial property managers in LA, this is especially critical when services like structural drying are needed to get operations back online fast.
Your inventory needs to include:
- Item Description: Note the brand, model, and even the serial number if you can find it.
- Age and Condition: How old was it? Was it in good shape before the water hit?
- Original Cost or Replacement Value: Dig up receipts or look online to estimate what it would cost to buy a new one today.
For homeowners, remember that most standard policies cover sudden water damage but often exclude problems from long-term neglect. This is where professional intervention becomes crucial for a valid claim. The detailed logs a certified company provides will back up the story that this event was unexpected. We break this down even further in our guide to filing an insurance claim for water damage.
Finally, keep a dedicated folder—whether it's a physical one or on your computer—for every single receipt related to this incident. This means emergency plumbing bills, temporary lodging if you had to leave, and any cleaning supplies you bought. Every dollar you spend could be part of your claim, so track it all. Delays can lead to mold, a serious secondary issue that makes up 20% of specialized restoration jobs. You can learn more about the water damage restoration market and its complexities here.
What Pros Do: A Look Inside the Water Damage Cleaning Process
When you call in a certified water damage cleaning team, you’re kicking off a highly structured, scientific response. It’s a world away from just sucking up water with a shop vac and pointing a few fans at the wall. These technicians follow a strict, multi-phase game plan designed to dry, sanitize, and stabilize your property to head off long-term headaches like mold and rot.
Knowing what the pros do helps you understand what to expect and shows why their methods are so critical for getting your home or business truly back to normal.

This isn't about making things look dry; it's about restoring a safe and healthy environment from the inside out.
First Up: Inspection and Damage Assessment
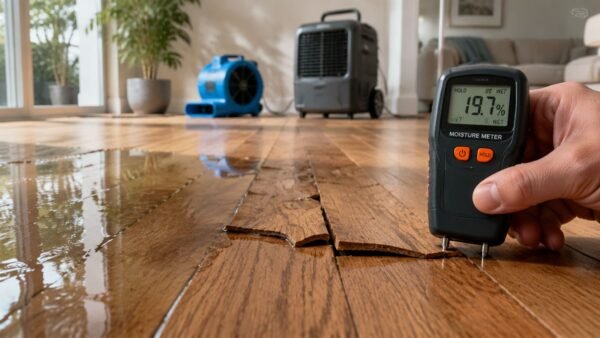
The moment a certified team walks through your door, their first job is to figure out the full extent of the damage. This is way more than a quick look-around; it’s a deep-dive investigation using some pretty specialized gear.
Technicians use tools like moisture meters and thermal imaging cameras to "see" where the water went. This tech is a game-changer, revealing hidden moisture that has wicked up behind walls, soaked into subfloors, or pooled in ceiling cavities—all places you’d never spot with the naked eye.
They’ll also classify the type of water, which dictates the entire safety protocol:
- Category 1 (Clean Water): Think of a burst supply line.
- Category 2 (Grey Water): Water from an appliance discharge, like a washing machine, that has some contaminants.
- Category 3 (Black Water): This is the serious stuff. It's grossly contaminated water from a sewer backup or overland flooding.
For example, imagine a sewer line backs up into a North Hollywood restaurant. That water is immediately classified as Category 3, triggering strict containment procedures. Technicians will seal off the affected area with heavy plastic sheeting and create negative air pressure to stop contaminants from spreading. This is a non-negotiable step in any biohazard situation.
Next: Water Removal and Extraction
With a clear plan in place, the immediate priority is getting all that standing water out—fast. Technicians roll out the heavy equipment, using powerful, truck-mounted extraction units to pull thousands of gallons of water from the structure in a short amount of time.
This rapid removal is absolutely key. It dramatically reduces how much moisture gets absorbed by porous materials like drywall, wood framing, and insulation.
A standard shop vac just can't compete here. Professional extractors have incredible suction, capable of pulling water from deep within carpet padding and right out of the subfloor. This step alone can slash the overall drying time.
This phase is one of the most impactful parts of the entire job, setting the stage for everything that follows.
Then: Tearing Out Soaked Materials
The hard truth is that not everything can be saved. Any materials that have absorbed too much water or have been hit by Category 3 black water have to go. This strategic removal is a critical part of a proper water damage cleaning project.
Here’s what often gets removed:
- Drywall: Once drywall gets soaked, it loses its structural integrity and quickly becomes a perfect home for mold. Pros will make clean cuts, usually a foot or two above the visible water line, to make sure they get every last bit of dampness.
- Insulation: Wet insulation is basically a useless, soggy sponge. It clumps, loses its thermal value (R-value), and holds onto moisture for an incredibly long time, creating a hidden mold factory inside your walls.
- Flooring: While some solid wood floors might be salvageable, materials like carpet, the underlying pad, and laminate are almost always a complete loss after significant saturation, especially if the water was contaminated.
Tearing these materials out isn't just about trashing damaged goods. It’s about opening up the building's skeleton—the framing and subfloor—so it can be dried completely.
Finally: Structural Drying and Dehumidification
Once the bulk water and ruined materials are gone, the focus shifts to wrestling the last bit of stubborn moisture out of the air and the remaining structure. This is where the science of drying, or psychrometry, really comes into play.
Technicians will set up an army of high-velocity air movers, placing them strategically to push air across wet surfaces and speed up evaporation. At the same time, they bring in massive industrial-grade dehumidifiers to suck all that newly evaporated moisture right out of the air. This powerful one-two punch creates the perfect drying environment.
You can get a deeper look into the nitty-gritty of the full water damage restoration process in our complete guide.
This isn’t a "set it and forget it" situation. The team will be back daily to take moisture readings from the air and affected materials, tracking the progress until your property is back to its normal, pre-loss condition. This phase is what truly stops mold in its tracks by taking away the one thing it needs to grow: moisture. Only when the structure is verifiably dry can the final repairs and rebuilding begin.
Don't let water damage sit. The longer you wait, the more complex and expensive the cleanup becomes. Call Onsite Pro Restoration at (818) 336‑1800 for an immediate response.
Why DIY Water Damage Cleaning in Los Angeles Is a Major Risk
When water shows up where it doesn’t belong, the first instinct for most homeowners is to grab a shop vac and start pulling up the mess. It feels productive, right? For a tiny spill on a sealed tile floor, that might be all you need.
But the moment that water touches drywall, disappears under a baseboard, or soaks into a rug, the game has completely changed. What looks like a simple cleanup on the surface can quickly spiral into a much bigger—and more hazardous—problem if you don't have the right training and equipment.
The real danger with DIY water damage cleaning isn’t what you can see; it's what you can’t. Water is relentless. It will find a way into wall cavities, seep into the subfloor, and saturate the insulation behind your walls. Your shop vac can get the surface water, but it won’t touch the trapped moisture that becomes a breeding ground for mold and rot.
It’s Not Just Water—It’s What’s in the Water
To understand why professionals take this so seriously, you have to know how we classify water damage. The industry standard comes from the IICRC (Institute of Inspection, Cleaning and Restoration Certification), which breaks it down into three categories based on contamination levels. This isn't just jargon; it's a critical tool for assessing health risks.
- Category 1 Water: This is "clean water" straight from a sanitary source, like a burst water supply line. It’s the least hazardous at first, but if it sits for more than a day or so, it starts picking up bacteria from building materials and can quickly become Category 2.
- Category 2 Water: We call this "grey water." It's contaminated enough to make you sick if you ingest it. Think of overflows from a washing machine or dishwasher—it's full of soaps, detergents, and other contaminants.
- Category 3 Water: This is "black water," and it's flat-out dangerous. It's grossly unsanitary and teeming with pathogens, bacteria, and toxins that pose a serious risk to your health. Sources include sewer backups, toilet overflows that contain feces, or any floodwater that's come into contact with the ground.
Trying to clean up Category 2 or 3 water without the right personal protective equipment (PPE) is a huge gamble. You’re exposing yourself and your family to microorganisms you can’t see.
A classic mistake we see is a homeowner trying to clean up a toilet overflow that soaked the bathroom floor. Even if the water looks clear, it’s a biohazard. Without proper containment and professional-grade sanitizers, dangerous bacteria can linger long after the floor seems dry.
DIY Cleanup Vs Professional Restoration
It’s tempting to save money, but understanding the difference between a DIY attempt and a professional response is crucial. One approach puts a band-aid on the problem; the other solves it for good.
Here’s a quick comparison of what that looks like in the real world:
| Cleanup Task | DIY Approach & Risks | Professional Method & Benefits |
|---|---|---|
| Water Extraction | Using a shop vac and towels. Risk: Only removes surface water, leaving moisture trapped in subfloors, drywall, and insulation. | Using commercial-grade extractors and pumps. Benefit: Pulls water from deep within materials, drastically reducing drying time and mold risk. |
| Drying | Opening windows and using household fans. Risk: Ineffective for structural materials; can actually spread mold spores if they're already present. | Deploying industrial air movers and LGR dehumidifiers. Benefit: Creates a controlled drying environment, pulling moisture out of the air and materials to prevent warping and rot. |
| Contamination Control | Cleaning with store-bought bleach or cleaners. Risk: Often insufficient for sanitizing against bacteria from grey or black water. Bleach is not effective on porous surfaces. | Applying EPA-registered antimicrobial treatments and sanitizers. Benefit: Kills bacteria, viruses, and mold spores, ensuring the area is safe and hygienic. |
| Moisture Detection | Relying on sight and touch ("it feels dry"). Risk: Fails to detect hidden moisture inside walls or under flooring, which is where mold thrives. | Using moisture meters and thermal imaging cameras. Benefit: Scientifically verifies that all affected materials are returned to a pre-loss dry standard, eliminating guesswork. |
Trying to handle a significant water event yourself often just delays the inevitable. The hidden costs of secondary damage almost always outweigh the initial savings.
When to Stop and Call a Pro Immediately
So, where’s the line? A small, clean water spill you wipe up from your kitchen tile in seconds is probably fine. But you absolutely need to call for professional water damage cleaning if you’re facing any of these situations.
Think about a washing machine overflow in a West Hollywood apartment. That water is instantly Category 2, and it has almost certainly soaked through the flooring and into the subfloor. Only professional drying equipment can prevent that subfloor from rotting and stop mold from colonizing the space between floors. If you want to understand just how serious contaminated water is, you can learn more about what Category 3 water damage is and why it demands an expert response.
The True Cost of Cutting Corners
The biggest risk of a failed DIY job is the secondary damage that follows. When a structure isn't dried completely to a professional standard, mold growth is practically a guarantee—and it can start within 24 to 48 hours.
Suddenly, your water problem has become a much more complicated and expensive mold remediation project.
Worse yet, incomplete drying can cause long-term structural decay. Wood framing rots, subfloors warp, and drywall crumbles from the inside out. These problems often stay hidden for months or even years, silently compromising your property's integrity until a major, costly repair is the only option. Calling a professional isn't just about cleaning up a mess; it's a critical investment in preventing far bigger headaches down the road.
Preventing Future Water Damage in Your LA Home
Once the water damage cleaning crew packs up and your home is finally restored, it’s easy to breathe a sigh of relief. The immediate crisis is over, but your work isn’t quite done. Now, the focus has to shift from reacting to a disaster to preventing the next one.
For homeowners in Los Angeles, this means getting proactive and understanding the unique risks that come with our properties and climate. After all, the best way to handle water damage is to stop it from ever happening again.

A few simple maintenance habits and some smart, affordable upgrades can save you from ever repeating that stressful and expensive restoration process. It’s all about creating layers of protection for your property.
Master Your Home's Plumbing Basics
You don’t have to become a licensed plumber, but knowing a few key things about your home's water systems is non-negotiable. This is your first and most important line of defense.
First things first: everyone in your household should know the location of the main water shutoff valve and exactly how to turn it. In an emergency like a burst pipe, twisting that valve can stop a catastrophe in seconds, literally saving you thousands of dollars.
Next, get into the habit of routine inspections. Once or twice a year, take a close look at the hoses connected to your washing machine, dishwasher, and refrigerator. If you see standard black rubber hoses, replace them with braided steel ones. Rubber gets brittle and cracks over time, while steel hoses are far more durable. It’s one of the cheapest and most effective preventive measures you can take.
You also need to understand all the potential sources of water in your home. For instance, if you ever find unexplained moisture, it's critical to investigate why your AC might be leaking water, since a clogged condensate line is a common culprit for slow leaks that go unnoticed for weeks.
Prepare for the Southern California Climate
We all love the sunny weather, but Los Angeles isn't immune to intense rain, especially during the winter months. Preparing your home's exterior is just as critical as monitoring the plumbing inside.
Clean Your Gutters and Downspouts: Before the first big rain, make sure your gutters are completely clear of leaves, dirt, and debris. Clogged gutters force water to overflow and run down your siding, where it can easily seep into your foundation or walls. We see this all the time in hillside homes in places like Glendale and Sherman Oaks.
Check Your Roof and Windows: Do a quick visual inspection of your roof for any missing, cracked, or damaged shingles. At the same time, check the seals around your windows and doors. The intense California sun bakes the caulk over time, causing it to dry out and crack, creating a perfect entry point for rainwater.
A small investment in a tube of exterior caulk and an afternoon spent checking seals can prevent a massive water intrusion. That simple, proactive step can save you from having to tear out and replace huge sections of drywall. It pays for itself many times over.
Embrace Modern Leak Detection Technology
Today's tech gives us incredibly powerful tools to protect our homes. Smart water leak detectors are small, affordable sensors you can place in all the high-risk areas.
Think about putting them in places like:
- Behind toilets
- Under kitchen and bathroom sinks
- Next to your water heater
- Near the washing machine
These little sensors connect to your home's Wi-Fi and will send an immediate alert to your smartphone the second they detect any moisture.
For even more peace of mind, you can install an automatic water shutoff device on your main water line. This system actually monitors your home's water flow and can automatically close the main valve if it senses an unusual pattern, like a burst pipe. It stops a flood before it can even start.
Taking these steps puts you back in control. While you can never completely eliminate the risk of water damage, this combination of routine maintenance, climate prep, and modern tech will dramatically reduce your chances of ever needing an emergency water damage cleaning service again. It’s about protecting your biggest investment with a little foresight and care.
FAQs About Water Damage Cleaning in Los Angeles
When you're standing in a puddle in your living room, your mind starts racing with questions. It's completely normal. Getting fast, clear answers is the first step to taking back control. Here are some of the most common questions we hear from Los Angeles homeowners when they call us for help.
How much does professional water damage cleaning cost in Los Angeles?
The cost varies significantly based on the extent and type of damage. For a small, clean water leak affecting one room (like a supply line leak in a bathroom), you might expect costs around $1,500. For larger events involving contaminated water or multiple rooms, such as a severe roof leak in a Sherman Oaks home, costs can easily exceed $10,000. The final price depends on the area affected, materials that need removal, and the required drying time. A certified technician must perform an on-site assessment for an accurate estimate.
Will my homeowner's insurance cover water damage cleaning?
In most cases, yes, but only if the damage is "sudden and accidental." A burst pipe inside a wall or a failed appliance hose are classic examples covered by standard policies. Insurance typically will not cover damage from slow, long-term leaks or issues caused by deferred maintenance, such as a leaky faucet you ignored for months. It is crucial to report the incident immediately and work with a restoration company that provides the detailed documentation adjusters need.
How long does the water damage restoration process take?
The timeline depends on the severity. Emergency water extraction is usually completed within 24 hours. The most critical phase, structural drying with industrial dehumidifiers and air movers, typically takes 3 to 5 days. This step cannot be rushed as it prevents mold growth. If significant repairs like replacing drywall and flooring are needed, the entire project from cleanup to rebuild could take several weeks. You can learn more in our guide on how long water damage restoration takes.
Can I stay in my home during the water damage cleaning process?
It depends on safety and the level of disruption. For a small, contained leak with clean water (Category 1), you may be able to stay. However, if the damage involves contaminated water (Category 2 or 3) or affects large areas of your home, relocating is strongly recommended. The restoration equipment is very loud and runs 24/7, and the presence of contaminants or demolition work can create an unsafe living environment.
What's the difference between water mitigation and water restoration?
Water mitigation focuses on stopping further damage. This is the emergency phase: extracting standing water, placing drying equipment, and removing soaked materials to stabilize the property. Water restoration is the next step, involving the repair and rebuilding process to return your home to its pre-loss condition. This includes services like replacing drywall, installing new flooring, and painting.
How soon after a leak does mold start to grow?
Mold can begin to grow within 24 to 48 hours in the right conditions. Porous, damp materials like drywall, carpet padding, and wood provide the perfect environment. This is why rapid, professional drying is so critical. Any delay in the water damage cleaning process significantly increases the risk of a secondary mold infestation, which requires a separate and more complex remediation process.
When an emergency strikes, you need a team you can count on. Onsite Pro Restoration delivers 24/7 emergency response for water, mold, and fire damage throughout Los Angeles. Call us now for a free assessment and let our certified experts bring back your peace of mind.