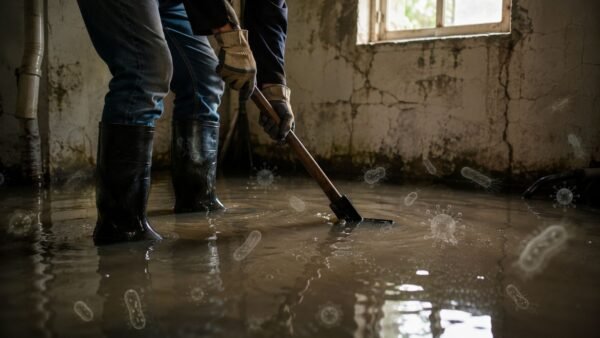
Hidden moisture behind your walls can silently compromise your home's structural integrity and air quality. For homeowners in Los Angeles, where issues can range from a burst pipe in a Sherman Oaks condo to slow leaks in older Glendale homes, early detection is crucial. Recognizing the subtle signs of water damage in walls is the first step in preventing a minor issue from escalating into a costly restoration project. This is especially important for those navigating the competitive real estate market, as these indicators are often considered critical home inspection red flags.
This guide breaks down the eight most common indicators, helping you identify problems quickly. From tell-tale stains to musty odors that signal hidden mold, we'll equip you with the knowledge needed to protect your property investment.
Suspect a leak? Don't wait for the damage to spread. Call Onsite Pro Restoration at (818) 336-1800 for a free, no-obligation inspection today!
1. Discoloration and Staining on Drywall
One of the most common and earliest signs of water damage in walls is the appearance of discoloration or stains. These marks are often the first red flag a homeowner or property manager notices. They typically present as unsightly patches that are yellowish, brownish, or sometimes even grayish-black, depending on the minerals in the water and the duration of the moisture exposure. The stains spread in irregular, often circular or streaky patterns, creating a distinct map of where water has traveled within the wall cavity or across its surface.
The location and shape of these stains provide crucial clues about the water's origin. For instance, a homeowner in Burbank noticing a brownish, circular stain on their bedroom ceiling after a heavy downpour is likely dealing with a roof leak. Similarly, a property manager in a Sherman Oaks apartment who discovers persistent water rings near the base of a bathroom wall may have a slow plumbing leak hidden behind the drywall. These stains are not merely cosmetic; they are definitive evidence of moisture intrusion that requires immediate professional assessment.
Actionable Tips for Water Stains
Ignoring discoloration can lead to more severe structural issues and mold growth. Swift action is key.
- Document Everything: Before any cleanup, take clear photos and videos of the stains. Note the date of discovery. This documentation is invaluable for insurance claims, such as when a burst pipe in a Beverly Hills home creates a clear pattern of damage.
- Avoid Painting Over: A fresh coat of paint is a temporary fix that masks the problem. The underlying moisture will eventually seep through, causing the new paint to peel and bubble, and allowing hidden mold to thrive.
- Trace the Pattern: Observe if the stain is growing, changing color, or feels damp to the touch. An active, spreading stain signals an ongoing leak that needs urgent attention.
- Inspect Key Areas: Pay close attention to corners where walls meet, areas along baseboards, and the drywall surrounding windows and doors, as these are common points of water entry.
2. Soft, Spongy, or Bulging Drywall
Beyond discoloration, one of the most serious structural signs of water damage in walls is a change in the wall's texture and form. When drywall becomes saturated, it loses its rigidity and can feel soft or spongy to the touch. In cases of significant water accumulation, the pressure from trapped moisture can cause the drywall to bulge outward, creating noticeable bubbles or warped areas. This indicates a severe moisture problem within the wall cavity that has compromised the material's structural integrity.

These physical changes are critical red flags that point to an advanced water intrusion issue. For example, a Glendale homeowner who notices their bathroom wall bulging after a water heater leak is witnessing the direct impact of trapped water. Similarly, when a pipe burst hits a West Hollywood property, the resulting spongy walls are a clear signal that the damage extends far beyond the surface. This level of saturation creates the perfect breeding ground for widespread mold and can even affect the wooden framing of the structure if left unaddressed.
Actionable Tips for Bulging or Soft Drywall
A bulging or soft wall is a structural emergency that requires immediate professional attention. Do not delay.
- Do Not Apply Pressure: Avoid touching, pushing, or leaning on the affected area. Compromised drywall can easily collapse, creating a larger mess and a potential safety hazard.
- Document the Damage: Before any work begins, take detailed photos and videos of the bulging or soft spots. This visual evidence is crucial for supporting an insurance claim.
- Plan for Replacement: Soft, saturated drywall cannot be effectively dried or patched. The only proper solution is to have professionals remove the damaged sections to address the moisture source and check for hidden mold.
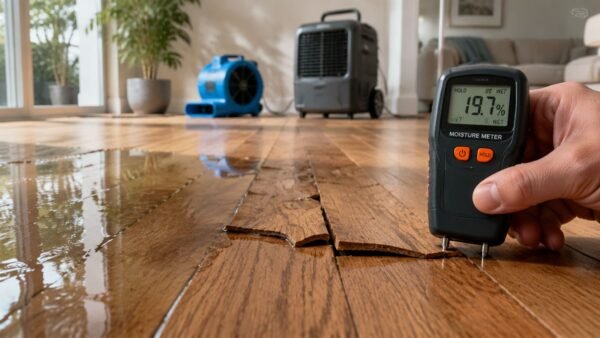
- Quantify the Moisture: Experts use moisture meters to measure the exact saturation levels in the drywall and the underlying framing. This data helps define the full scope of the necessary repairs.
3. Peeling Paint and Wallpaper
When paint or wallpaper begins to bubble, blister, or peel away from a wall, it is a definitive indication that moisture has compromised the bond between the wall covering and the substrate. This is one of the most structural signs of water damage in walls because it reveals that water has penetrated beyond the surface and saturated the underlying drywall or plaster. The peeling can manifest in large, loose sheets or small, persistent blisters, pointing directly to a hidden moisture problem.

The specific pattern of the damage offers valuable clues. For example, a Sherman Oaks homeowner who finds wallpaper peeling in their master bathroom may be dealing with a slow leak from a water supply line inside the wall. Similarly, a rental property manager in Burbank who notices peeling paint on kitchen walls after a storm should suspect a roof leak. This type of damage is not a simple cosmetic flaw; it’s a symptom of a deeper issue that requires immediate professional investigation to prevent further structural decay and mold growth.
Actionable Tips for Peeling Surfaces
Simply scraping and repainting is not a solution; it’s a temporary cover-up. The moisture source must be addressed first.
- Document the Damage: Take detailed photographs and videos of the peeling patterns before you touch anything. Documenting the progression over time can be crucial for an insurance claim, such as when a guest house in Beverly Hills shows seasonal peeling due to water intrusion.
- Don't Scrape and Repaint: Painting over a damp surface traps moisture, accelerating rot and creating a perfect breeding ground for mold. The new paint will quickly fail, leaving you back at square one with a worse problem.
- Check for Active Moisture: Use a moisture meter on the exposed wall substrate to determine if the area is still wet. This confirms whether you are dealing with an active or a past leak.
- Inspect Underlying Surfaces: Gently peel back a loose section to inspect the drywall or plaster underneath for signs of mold, softness, or crumbling. This helps assess the full extent of the damage.
Find peeling paint or bubbling wallpaper? It's a clear sign of a deeper issue. Contact our Los Angeles water damage experts for a professional assessment.
4. Mold Indicators: Musty Odors and Visible Growth
Beyond visual cues like stains or peeling paint, your sense of smell is a powerful tool for detecting hidden water damage. A persistent, musty, or earthy odor is one of the most reliable signs of water damage in walls, signaling that moisture has been present long enough for mold and bacteria to colonize. This distinct smell is caused by microbial volatile organic compounds (MVOCs), which are gases released by actively growing mold. The odor often precedes any visible growth, serving as an early warning system for a problem concealed within a wall cavity.
When mold does become visible, it appears as black, green, white, or brown patches that can be fuzzy, slimy, or spotted. For example, a property manager in Glendale who receives tenant complaints about a "basement smell" in a ground-floor unit may discover a slow plumbing leak feeding extensive mold behind the drywall. Similarly, a Burbank homeowner who finds black mold spots in a bathroom is likely dealing with chronic humidity and poor ventilation. These indicators are not just cosmetic issues; they represent a significant structural and health concern requiring immediate professional remediation.
Actionable Tips for Mold and Odors
Never dismiss a musty smell or a small mold patch. Both are clear evidence of an underlying moisture problem that will only worsen.
- Trust Your Nose: Use your sense of smell as an early detection tool. Try to locate where the odor is strongest, as this can help pinpoint the source of the water intrusion.
- Document and Isolate: If you see visible mold, take clear photos for your records. Avoid touching or disturbing it, which can release harmful spores into the air. If possible, isolate the contaminated area to prevent spores from spreading.
- Avoid DIY Bleach Solutions: Cleaning visible mold with bleach is ineffective and often counterproductive. According to the EPA, bleach doesn't kill mold on porous surfaces like drywall and can release harmful spores.
- Investigate the Source: A musty odor in a North Hollywood bedroom after a leak, for example, points directly to hidden moisture. Professional moisture mapping and air quality testing are needed to confirm the extent of the contamination.
5. Efflorescence (Salt Deposits and White Crystalline Buildup)
Another key visual clue among the signs of water damage in walls is the presence of efflorescence. This appears as a white, chalky, or crystalline substance on the surface of drywall, plaster, or masonry. It occurs when water dissolves natural salts within building materials and carries them to the surface. As the moisture evaporates, it leaves these salt deposits behind, creating a powdery residue that is often mistaken for mold but is distinct upon closer inspection.
The appearance of efflorescence is a definitive indicator that water is actively migrating through your wall structure, even if the surface feels dry to the touch. For instance, a Glendale homeowner might notice these white deposits forming on their drywall weeks after a water extraction, signaling that the wall cavity did not dry completely. Similarly, if a commercial property in North Hollywood shows efflorescence on interior walls months after a flood, it could point to ongoing moisture intrusion from the foundation. It’s a tell-tale sign that a past or present moisture problem has not been fully resolved.
Actionable Tips for Efflorescence
Simply wiping away these salt deposits is not a solution; it’s crucial to address the underlying moisture that causes them.
- Don't Ignore or Conceal: Never paint over or simply brush away efflorescence. This only hides the evidence of an ongoing moisture issue, which can lead to structural decay and mold colonization.
- Document and Monitor: Take clear photographs of the deposits and track their location and growth over time. An expanding area of efflorescence confirms a persistent moisture source.
- Measure Moisture Levels: Use a moisture meter to check the wall's substrate. A reading above the acceptable baseline confirms that the material is still holding excess water, even if it feels dry.
- Verify Drying Completion: If efflorescence appears after a professional drying service, as seen in a West Hollywood building post-pipe repair, it indicates lingering moisture in the wall cavity. Professionals should use thermal imaging and moisture meters to confirm the structure is completely dry before reconstruction begins.
6. Cold Spots and Temperature Variations on Walls
Beyond what the naked eye can see, one of the more subtle but definitive signs of water damage in walls is a noticeable change in surface temperature. Areas of a wall affected by moisture will often feel distinctly cool or even cold to the touch. This phenomenon occurs because water is an excellent thermal conductor; it absorbs and holds heat far more effectively than dry materials like drywall or wood, causing the wet area's surface temperature to drop.
Professionals leverage this principle by using advanced tools like thermal imaging cameras to pinpoint hidden moisture. For a Sherman Oaks residence with a burst pipe, thermal imaging can reveal deep blue and purple cold spots within wall cavities, mapping out the full extent of subsurface moisture invisible from the outside. Similarly, after a fire suppression system discharge in a Burbank commercial property, these cameras help a restoration team strategically place dehumidifiers and air movers to target every last pocket of trapped water, ensuring a thorough drying process.
Actionable Tips for Temperature Variations
Identifying cold spots is a high-tech way to confirm and track moisture. It provides undeniable evidence of the problem's scope.
- Request Thermal Imaging: During any professional water damage assessment, insist on a thermal imaging inspection. This technology provides a clear, visual map of hidden moisture.
- Establish a Baseline: Ask the technician to document baseline temperature readings immediately after the water intrusion. This initial map is crucial for tracking drying progress.
- Monitor Drying Progress: Thermal imaging should be used repeatedly during the drying process. As the equipment operates, the cold spots on the thermal map should shrink and eventually disappear.
- Be Patient with Persistent Spots: If cold spots linger after the standard drying timeline, it signals that deep, trapped moisture still exists. Extended drying may be required to prevent future structural or mold issues.
- Document for Insurance: Use the final thermal images showing no temperature anomalies as definitive proof of complete drying for your insurance claim.
7. Swelling, Warping, and Wood Damage
Beyond surface-level drywall issues, one of the more serious signs of water damage in walls involves the wooden components of your home. When wood framing, baseboards, door frames, or other wooden elements absorb water, they begin to swell, warp, and deform. This physical distortion is often a clear indication that moisture has been present for a significant amount of time, penetrating deeper than just the wall's surface. Unlike drywall that can sometimes be dried and repaired, severe wood damage is often irreversible.
This type of damage points to advanced water intrusion that can compromise structural integrity. For example, a homeowner in Glendale might discover their baseboards are soft and swollen near a bathroom, signaling a slow plumbing leak that has saturated the wood over weeks. In another scenario, a North Hollywood apartment building hit by a pipe burst may see hardwood floors and door frames warp dramatically. When moisture remains, wood rot can develop as fungi decompose the material, turning it soft and spongy. This signals a critical issue requiring immediate professional assessment.
Actionable Tips for Wood Damage
Swollen or warped wood is a red flag for potential structural problems and should be addressed by professionals.
- Document the Damage: Take detailed photos of any swollen, warped, or soft wood from multiple angles and distances. This evidence is crucial for insurance claims and professional assessments.
- Do Not Force It: Avoid attempting to straighten or force warped elements like door frames back into place. This can cause further damage to the surrounding wall and the wood itself.
- Use a Moisture Meter: A professional will use a moisture meter to quantify the saturation level in the affected wood. This helps determine if the wood can be salvaged or if it requires complete replacement.
- Assess for Rot: Carefully check for soft, spongy, or crumbling spots. Wood rot indicates that the material's structural integrity is compromised and replacement is almost certainly necessary.
Key Insight: Warped or swollen wood is a clear sign that water has penetrated structural elements, creating a risk of rot and long-term instability. It's vital to address the moisture source and the potential for hidden mold growth within these materials. Learn more about how to kill mold on wood to understand the professional steps required to treat and restore affected areas.
8. Rising Damp Lines and Water Marks
A distinct, horizontal tidemark appearing along the base of your walls is a telltale sign of a chronic moisture problem known as rising damp. This is one of the more serious signs of water damage in walls because it points to persistent groundwater intrusion. Rising damp occurs when groundwater wicks upward through porous building materials like brick, concrete, or mortar via capillary action. The moisture will continue to rise until the pull of gravity and the rate of evaporation create a natural equilibrium, leaving a very clear, often discolored, horizontal line.
Unlike a sudden pipe burst, rising damp indicates an ongoing battle between your property's foundation and the surrounding soil moisture. For example, a Sherman Oaks homeowner might discover a persistent damp line 18 inches up their basement wall, signaling poor exterior drainage that allows water to pool against the foundation. Similarly, a Burbank commercial building showing these marks consistently at foundation level after heavy rains is likely experiencing groundwater intrusion. This type of damage requires a structural solution, not just a simple drying process.
Actionable Tips for Rising Damp
Addressing rising damp requires identifying and stopping the source of the water. Simply cleaning the wall will not solve the underlying issue.
- Measure and Document: Use a tape measure to record the height of the waterline from the floor at several points. Photograph the marks with a reference object (like a ruler) to track any changes. This data helps professionals diagnose the severity.
- Investigate the Exterior: The root cause is almost always outside. Check for poor grading, clogged gutters, or downspouts that discharge water too close to the foundation. These issues must be corrected to prevent recurrence.
- Use a Moisture Meter: Test the wall at multiple heights. A clear pattern of high moisture readings at the base that decrease as you move upward confirms the capillary action of rising damp.
- Don't Seal It In: Applying waterproof paint or sealant to the interior wall is a temporary and often damaging fix. It traps the moisture inside the wall, which can lead to accelerated decay of structural materials.
Frequently Asked Questions (FAQ) About Water Damaged Walls
Q: How can you tell if water damage in a wall is old or new?
A: New water damage often feels damp to the touch, and stains may have distinct, sharp edges. Old water damage usually feels dry and brittle, and the stains may appear faded with less defined edges. Professionals use moisture meters for a definitive answer, as old damage can still have hidden moisture pockets.
Q: What are the health risks associated with water damaged walls?
A: The primary health risk is mold growth. According to the CDC, exposure to indoor mold can cause allergic reactions, asthma attacks in sensitive individuals, and irritation of the eyes, skin, nose, throat, and lungs. Long-term exposure can lead to more serious respiratory issues.
Q: How long does it take for mold to grow in a wet wall?
A: Under ideal conditions (moisture, a food source like drywall paper, and moderate temperatures), mold can begin to grow within 24 to 48 hours. This is why a rapid response is critical to prevent a simple water issue from becoming a major mold contamination problem.
Q: Can a water-damaged wall dry out on its own?
A: While a very minor surface leak might dry on its own, water that has penetrated into the wall cavity will not. Trapped moisture inside the wall cannot evaporate effectively and will lead to structural rot, mold growth, and compromised insulation. Professional drying equipment is necessary to remove this hidden moisture.
Your Next Steps: Professional Assessment and Restoration
You have now learned to identify the most common signs of water damage in walls, from subtle discoloration and musty odors to more alarming issues like bulging drywall and visible mold. Recognizing these indicators is the crucial first step in protecting your property’s structural integrity and ensuring a healthy living environment. Whether you've noticed peeling paint in a bathroom in Burbank, a strange cold spot on a wall in your Santa Monica home, or concerning salt deposits on your basement walls, you are now equipped with the knowledge to spot a problem before it escalates.
The key takeaway from this guide is that water damage is rarely a surface-level issue. The visible signs you've learned to spot are often just the tip of the iceberg. Moisture can travel along studs, soak into insulation, and create hidden pockets of dampness that become breeding grounds for mold. A small stain could indicate a much larger, saturated area behind the drywall, while a musty smell might signal a significant mold colony that has yet to break through the surface.
Why Professional Intervention is Non-Negotiable
Attempting a DIY repair without understanding the full scope of the problem can be a costly mistake. Simply painting over a water stain or patching a soft spot in the wall ignores the underlying moisture source and traps dampness, which can lead to wood rot, compromised structural components, and persistent mold growth. True restoration requires a systematic approach:
- Accurate Moisture Detection: Professionals use specialized tools like thermal imaging cameras and moisture meters to map the exact extent of water intrusion, revealing hidden wet spots that the naked eye cannot see.
- Source Identification: Is the damage from a leaky pipe inside the wall, a compromised window seal, or a roof issue? Pinpointing the source is essential for a permanent fix. For instance, if you suspect a compromised roof is the culprit, understanding an ultimate guide to repairing roof leakage can help you communicate effectively with roofing and restoration specialists.
- Safe and Complete Drying: Professional-grade air movers, dehumidifiers, and drying techniques ensure that the affected area, including wall cavities and structural materials, is returned to its proper dry standard, preventing future mold growth.
Taking decisive action is the most important next step. The longer you wait, the more severe the damage becomes, increasing repair costs and potential health risks. For property owners and managers across Los Angeles County, a prompt and professional assessment is the only way to gain peace of mind and ensure the problem is resolved correctly the first time.
Don't let water damage compromise your property's safety and value. The IICRC-certified experts at Onsite Pro Restoration specialize in accurately assessing and completely restoring water-damaged walls with a rapid, professional response. Call us today at (818) 336-1800 for a free, no-obligation inspection to understand the full extent of the issue and get a clear plan for recovery.