To effectively kill mold on wood, you must eliminate it at its roots, not just the visible surface growth. Because wood is porous, mold hyphae (roots) grow deep into the fibers. For sealed or non-porous wood, a thorough scrub with soap and water might suffice. However, for porous materials like structural beams or unfinished furniture in a damp Sherman Oaks basement, a more potent solution like undiluted white vinegar or a 3% hydrogen peroxide solution is necessary to penetrate the material. Regardless of the method, the wood must be completely dried afterward, or the mold will inevitably return.
If you suspect a widespread mold issue in your Los Angeles property, don't wait. A professional assessment is the safest first step.
The Hidden Dangers of Mold on Wood in Los Angeles Homes

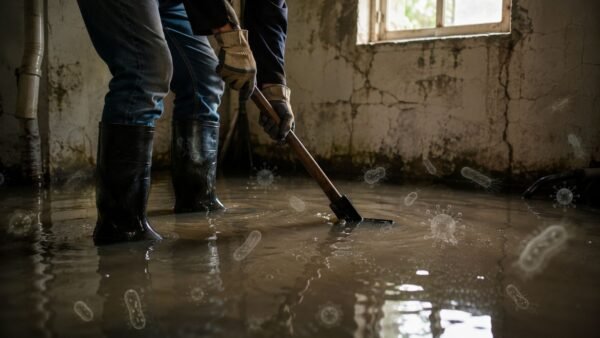
Discovering mold on your home's woodwork—whether on floor joists in a crawl space, attic sheathing, or an antique piece of furniture—is a serious red flag. It’s more than just an unsightly stain. Wood provides an organic food source for mold, and when combined with moisture from coastal fog in Santa Monica or a plumbing leak in Van Nuys, you have the perfect environment for it to thrive. Fungal growth can explode in as little as 24-48 hours.
The problem extends far beyond aesthetics. As mold feeds on the wood, it secretes enzymes that break down cellulose, leading to wood rot and decay. This silent destruction can compromise your home's structural integrity, transforming a minor, hidden leak into a massive and expensive repair job if left unchecked.
Health Risks Linked to Mold Exposure
Beyond property damage, mold poses a significant health hazard by releasing microscopic spores into the air you breathe. This is particularly dangerous for children, the elderly, and individuals with compromised immune systems.
Common health issues linked to indoor mold exposure include:
- Persistent allergy-like symptoms
- Asthma attacks and breathing difficulties
- Chronic sinus infections and recurring headaches
- Unexplained skin rashes and irritation
Ignoring the need to kill mold on wood is not an option. It's a direct threat to your home's value and, more importantly, your family's health. If you see signs of a widespread problem, scheduling a professional mold inspection is the only way to accurately assess the situation and determine the proper remediation strategy.
It's easy to underestimate mold's destructive power. Every year, mold destroys more wood across the globe than all fires and termites combined. That statistic alone highlights the silent, relentless threat it poses to our homes.
Tackling a mold problem head-on is the only way to protect your investment and ensure the air in your home is safe. It’s one of those household battles you absolutely cannot afford to lose.
How to Assess Mold Growth on Wooden Surfaces

Before you can effectively kill mold on wood, you must understand the extent of the problem. A thorough assessment separates a temporary fix from a permanent solution.
First, determine if you are dealing with surface mildew or true mold. Mildew is typically powdery, gray or white, and sits on the wood's surface. It's an annoyance but can be cleaned off relatively easily.
Mold, however, is a different beast. It often appears black, green, or even orange and may have a fuzzy or slimy texture. This indicates a deeper issue, as its roots (hyphae) have penetrated the wood itself, making complete removal more challenging.
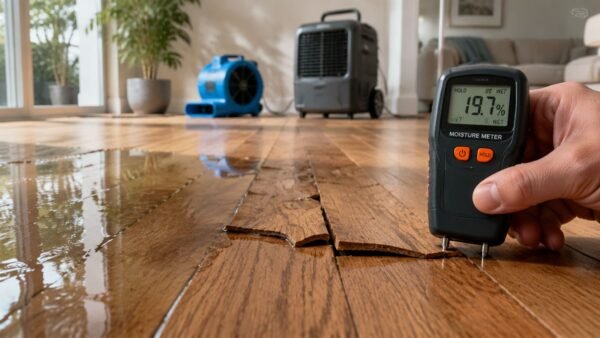
Checking for Moisture Content
Mold's primary requirement is moisture. The wood is merely the food source; water is the activator. This is where a digital moisture meter becomes an indispensable tool. You can’t rely on guesswork.
Test the wood with visible mold, but also check surrounding areas. Healthy, dry wood inside a home should have a moisture content between 6-12%. Readings of 16-20% or higher indicate a problem zone where mold can thrive.
A high reading reveals the moisture source, whether it's a hidden pipe leak, moisture wicking up from a foundation, or consistently high humidity common in many Los Angeles homes. This isn't just a property issue; it's a health one. More than 21% of asthma cases in the United States are attributed to dampness and mold in homes, a figure that highlights the serious risks of letting damp wood sit.
Evaluating the Scale of the Problem
The next critical step is to measure the affected area. This will determine if it's a manageable DIY project or if it’s time to call for professional remediation. The EPA provides a clear guideline: if the mold covers more than 10 square feet—roughly a 3×3 foot patch—it’s a job for a professional.
Key Takeaway: Trying to tackle a large mold problem on your own is risky. You can easily disturb the colony, sending millions of spores into your air and spreading the problem to other parts of your home. Professionals have the containment gear and negative air machines to prevent this.
If you suspect mold is hiding behind your walls, the problem is far more complex than a simple surface issue. For anything beyond a small, isolated spot, a professional assessment is the only way to be sure you’re addressing the entire problem, not just the part you can see.
Choosing the Best Solution to Kill Mold on Wood
When facing mold on wood, selecting the right cleaner is crucial. Your choice determines whether you solve the problem permanently or just temporarily hide it.
Many people instinctively reach for bleach, but this is one of the biggest mistakes you can make on a porous surface like wood. While bleach is effective on non-porous surfaces like tile, its chemical structure is counterproductive on wood. The chlorine—the active ingredient—remains on the surface, while the water component soaks deep into the wood fibers, feeding the mold's roots with the moisture it needs to regrow.
Our guide on why bleach is a bad idea for mold on wood explains this common misconception in detail.
Instead of bleach, several common household items can safely and effectively eliminate minor mold issues.
Effective Household Mold Killers
White Vinegar: This pantry staple is a mild acid capable of killing over 80% of mold species. Its primary advantage is its ability to penetrate porous materials, reaching the roots where bleach cannot. Simply pour undiluted white vinegar into a spray bottle, saturate the moldy area, and let it sit for at least an hour before wiping clean.
Hydrogen Peroxide: A standard 3% solution of hydrogen peroxide is another excellent option. It's a potent antifungal and antibacterial agent that is safe for most wood surfaces. It works faster than vinegar, often bubbling as it attacks the mold. Spray it on, let it work for 10-15 minutes, scrub lightly, and wipe it away.
This logic also applies to other hidden areas. For instance, tackling mold in your ventilation system requires a similar understanding of effective methods, as detailed in these air duct mold removal solutions.
Professional-Grade Treatments
For stubborn, deep-set, or widespread mold, professional-grade treatments are necessary. In the restoration industry, borate-based products are the standard for treating wood. These natural minerals are applied directly to the wood, offering powerful, long-lasting protection against mold, mildew, and even wood-destroying insects.
Expert Insight: Borate treatments don't just kill existing mold. They fundamentally alter the wood on a molecular level, making it inedible to future mold spores. It's a proactive, preventative solution, not just a reactive cleaning job.
To help you decide, here’s a quick comparison of the most common options.
Comparing Mold Killing Solutions for Wood Surfaces
This table breaks down the pros and cons of common DIY and professional solutions, focusing on their performance on porous wood, safety, and ideal applications.
| Solution | Effectiveness on Porous Wood | Safety Concerns | Best For |
|---|---|---|---|
| Bleach | Low (doesn't kill roots) | High (toxic fumes, damages wood) | Non-porous surfaces only; avoid on wood. |
| Vinegar | High (penetrates wood fibers) | Low (natural and non-toxic) | Minor to moderate surface mold on unfinished wood. |
| Hydrogen Peroxide (3%) | High (penetrates and disinfects) | Low (can cause slight discoloration) | Lightly stained wood and stubborn surface spots. |
| Borate Treatments | Very High (long-term protection) | Low (safe once dry) | Structural wood, attics, and crawl spaces. |
Ultimately, winning the fight against mold starts with choosing the correct weapon. Always match your cleaning solution to the type of wood and the severity of the problem. That’s how you ensure you’re not just cleaning the surface, but truly eliminating the mold at its source.
A Practical Guide to Safe and Effective Mold Removal
You've identified the mold and selected your cleaning solution. Now it's time for the removal process. DIY mold removal is possible, but it requires careful preparation and a methodical approach. The goal is not just to wipe away visible stains but to physically remove spores and hyphae without spreading them throughout your home.
This is more than a simple cleaning task; it’s a systematic process involving containment, safety, and thoroughness. Rushing or skipping steps will almost certainly lead to the mold's return.
Setting Up a Safe Workspace
Before you begin cleaning, you must protect yourself and the rest of your house. Mold spores are microscopic and easily become airborne. A contained work area is not optional—it's critical.
- Seal the Area: Use plastic sheeting and painter's tape to seal off all doorways, air vents, and other openings leading out of the room. This prevents cross-contamination.
- Create Negative Air Pressure: If possible, place a box fan in a window facing out. This helps pull contaminated air out of the room rather than pushing it into other areas of the house.
- Wear Proper PPE: Always wear an N95 respirator mask, safety goggles, and non-porous gloves. This personal protective equipment is non-negotiable and essential for protecting your health.
This flowchart breaks down the decision-making process for choosing the right DIY mold-killing solution for your specific situation.

As you can see, each option has its place, from handling minor surface issues to tackling more stubborn, embedded growth.
The Physical Removal Process
With your containment zone secure, you can begin the hands-on work. The key is to be methodical and gentle to avoid agitating the mold more than necessary.
Start by applying your chosen cleaning solution with a spray bottle and let it sit for the recommended time to allow it to penetrate and break down the mold's root structure.
Once it has soaked in, use a soft-bristled brush to gently scrub the surface, lifting the dead mold and spores from the wood. Avoid using a stiff wire brush, as it can gouge the wood, making it more porous and susceptible to future mold growth.
Important Takeaway: Simply wiping the surface is not enough. You must physically remove the dead mold. After scrubbing, use a clean, damp rag to wipe away all residue. For tough cases on unfinished wood, light sanding may be necessary, but only after the wood is completely dry.
Keep in mind, professional mold remediation for wood can range from $500 to $6,000, with costs increasing for structural involvement. Professionals often use a two-step approach: mechanical removal (like sanding the top 1/16-inch of wood to remove 85% of hyphae) combined with chemical treatments to ensure complete eradication.
Cleaning Up and Disposal
Proper cleanup is just as crucial as the removal process. All used materials—rags, brushes, plastic sheeting, and PPE—are now considered contaminated waste.
Carefully place all disposable items into heavy-duty trash bags and seal them tightly inside the contained area before taking them out.
Finally, use a HEPA-filtered vacuum to clean the entire work area, including floors and surrounding walls, to capture any stray spores. While this guide focuses on wood, the principles of containment and cleaning are universal. You can find more effective mold cleaning techniques that apply to other problem areas.
For a deeper dive into the professional process, our detailed guide on the removal of mold is an excellent resource.
How to Prevent Mold from Returning on Wood
Eliminating existing mold is a significant accomplishment, but the job isn't finished. The final and most crucial step is to prevent its return by controlling moisture.
After cleaning, the wood must be completely dry. Mold thrives on moisture, so eliminating its fuel source is essential.
Use fans to accelerate evaporation and run a dehumidifier to remove excess moisture from the air. Aim to keep the room's relative humidity consistently below 50%. Use a hygrometer for accurate monitoring.
Sealing and Protecting the Wood
Once the wood is completely dry, apply a quality mold-resistant sealant or primer. This creates a protective barrier that prevents new spores from taking hold.
These coatings contain antimicrobial agents that inhibit mold growth before it can start. This is especially important for wood in high-risk areas like damp basements, attics, or crawl spaces.
Pro Tip: Don't just treat the cleaned patch. Whenever possible, treat the entire board or section. Mold is opportunistic and will exploit any untreated area to start a new colony. Comprehensive coverage is key to long-term success.
Creating a Mold-Proof Environment
True prevention involves changing the conditions that allow mold to grow. This requires a long-term strategy focused on moisture control.
Here’s a practical plan for permanent mold prevention:
- Control Indoor Humidity: Run dehumidifiers in basements and crawl spaces. Ensure bathroom and kitchen exhaust fans vent outside (not into the attic) and use them during and after showers or cooking.
- Fix Leaks Immediately: A small drip from a pipe or a minor roof leak is an open invitation for mold. Regularly inspect your plumbing, roof, and window seals, and fix any problems immediately.
- Improve Air Circulation: Stagnant air traps moisture. Use fans to keep air moving, especially in stuffy rooms. In attics, ensure soffit and ridge vents are clear to allow humid air to escape.
Ultimately, preventing mold is an ongoing commitment. By managing moisture and remaining vigilant, you ensure your efforts to kill mold on wood provide a lasting solution that protects your property and your family's health.
Frequently Asked Questions About Killing Mold on Wood
Can I just paint over mold on wood?
No. Painting over mold is a critical mistake that only hides the problem. The mold will continue to grow underneath the paint, eating away at the wood and compromising its structural integrity. It will also continue to release spores and mycotoxins that can penetrate the paint and degrade your indoor air quality. Always kill and physically remove all mold before painting.
How do I know if mold caused structural damage to the wood?
Check for signs of wood rot. If the wood feels soft, spongy, or crumbly, it may be structurally compromised. A simple test is to gently probe the area with a screwdriver; if the tip sinks in easily or the wood flakes apart, the fibers have been damaged. Widespread, deep stains are another red flag. If you observe any of these signs, contact a professional restoration company or a structural engineer immediately.
Will my homeowners insurance cover mold removal on wood?
Insurance coverage for mold is complex and depends on the source of the moisture. If the mold resulted from a "sudden and accidental" event covered by your policy, such as a burst pipe, there is a good chance the remediation will be covered. However, mold caused by slow leaks, deferred maintenance, or high humidity is typically excluded. Review your policy documents carefully. Our guide on whether mold remediation is covered by insurance provides a more detailed breakdown.
When should I call a professional for mold on wood?
You should always call a professional if the mold-affected area is larger than 10 square feet (a 3×3 foot patch). Additionally, seek professional help if you suspect mold in your HVAC system, the contamination is on major structural elements like beams or joists, a musty smell persists after cleaning, or anyone in your household has a compromised immune system or respiratory issues. In these situations, professional remediation is essential for a safe and effective outcome.
Don't let mold put your home's safety and value at risk. The certified experts at Onsite Pro Restoration are on call 24/7 to provide professional mold inspections, testing, and remediation. Call us now for a fast, free assessment.