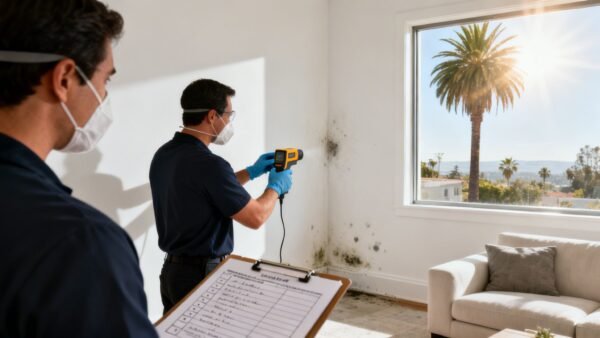
When a pipe bursts or a water heater fails, the first thing you need to know is what your main water valve looks like. This simple device is your single most important tool in a water emergency, and spotting it quickly can be the difference between a small puddle and a full-blown flood. Knowing what to look for is the first step to taking control.
The two types you'll almost always find are the gate valve, which has a round, wheel-style handle like an outdoor spigot, and the ball valve, which uses a straight lever handle. That's it. Understanding the difference tells you exactly how to shut off the water when seconds count.
Your First Line of Defense Against Water Damage
When water is gushing across your floor, every second feels like an eternity. That water doesn't care about your drywall, your hardwood floors, or your family photos. The damage compounds with every passing moment, turning a manageable problem into thousands of dollars in repairs.
This is exactly why finding and identifying your main water shutoff valve is a non-negotiable skill for every property owner. Think of it as the master switch for all the water flowing into your home. Once you know where it is and what it looks like, you go from being a helpless bystander to the first responder on the scene. You can stop the chaos at its source.
A quick shutoff dramatically minimizes the scope of the disaster, often saving the structural bones of your home from becoming completely saturated. Once you've stopped the leak, the next steps are just as critical. Our guide to emergency water cleanup at home walks you through what to do right after you've turned off the water.
In an unexpected water event, the ability to shut off the main valve immediately can reduce the total water damage by over 90%, preventing widespread saturation and the mold growth that almost always follows.
Taking five minutes to find your valve today will arm you with the confidence to handle a water emergency with control.
Identifying the Two Main Types of Water Shut-Off Valves
When a pipe bursts and you need to shut the water off now, you’ll likely run into one of two valves: a gate valve or a ball valve. Knowing how to spot the difference is key, because it tells you exactly how to turn it off in a hurry.
Gate valves are the old guard of residential plumbing. You can spot one by its round, wheel-like handle—it looks a lot like an outdoor garden spigot. To stop the water, you have to turn this handle clockwise, and it takes several full rotations. Think of it as slowly lowering a gate inside the pipe to block the water; it's a gradual stop, not an instant one.
The Gate Valve Explained
Picture this: you're at home in North Hollywood, and a pipe just gave way. Knowing what your main water valve looks like in that moment can be the difference between a puddle and a flooded house. Odds are, it's a gate valve. They're incredibly common, holding a massive 42.30% revenue share in the global water valve market. Their widespread use means you'll find them in homes all across Los Angeles.
This diagram shows the visual difference at a glance. The takeaway is simple: the handle’s shape—wheel versus lever—tells you everything you need to know about how to operate it.
The Ball Valve Explained
Ball valves are the new standard for a reason: they're fast and simple. You'll recognize them instantly by their single, straight lever handle. Forget the multiple turns of a gate valve; a ball valve shuts off completely with just a quick quarter-turn.
When the lever is parallel to the pipe, the water is flowing. When it’s perpendicular (at a 90-degree angle) to the pipe, the water is off. Simple as that.
This on/off action is immediate and reliable, making ball valves a much better choice for emergencies. They're also far less likely to get stuck or fail over time compared to older gate valves.
Of course, knowing your hardware is just one piece of the puzzle. Being proactive is even better. You can check out our guide on how to prevent pipes from bursting for some essential maintenance tips that every homeowner should know.
Where to Find Your Main Water Valve
You've identified what your main water valve looks like, but that's only half the battle. In an emergency, knowing its exact location can save you precious minutes and prevent thousands of dollars in damage. The good news is, most homes have the valve in a pretty logical spot, usually right where the main water line enters your property from the street.

Think of it like this: the municipal water line runs from the curb directly to your house. So, your search should start along the perimeter of your home, focusing on the side that faces the street.
Common Indoor Locations
For most homes, especially those with basements or crawl spaces, the shutoff valve is tucked safely indoors to protect it from the elements. A quick, systematic search will almost always turn it up.
Start with these high-probability areas:
- Basement or Crawl Space: Look for a pipe coming through the foundation wall. It’s almost always on the side of the house closest to the street, and the valve will be installed on that pipe just after it enters your home.
- Utility Closet or Room: Your main valve often hangs out with other essential appliances. Check the walls around your water heater or furnace for that main incoming water line.
- Garage: If your home is built on a slab foundation, the garage is a common spot. Scan the interior walls, again focusing on the one that faces the street.
Common Outdoor Locations
In warmer climates like ours in Southern California, or in homes without a basement, the main shutoff valve might be located outside. These valves are built tough to handle the weather and are usually found in just a couple of predictable places.
Here’s where to check:
- On an Exterior Wall: Scan the outside of your house for a pipe coming out of the ground and going into the siding. You'll often find it near an outdoor hose spigot.
- In a Meter Box: Your property almost certainly has an underground utility box near the curb or sidewalk, usually with a metal or plastic lid stamped "WATER." Inside, you'll find the water meter and two valves. The one on your side of the meter is yours to operate; the one on the street side belongs to the utility company.
The valve on the city’s side of the meter is the curb stop valve. It's the utility company's shutoff and often requires a special wrench to turn. You should only ever touch the valve on your side of the meter. Messing with the curb stop is best left to the professionals to avoid any liability for damage.
How to Safely Operate Your Water Shut Off Valve
Finding your valve is half the battle, but knowing how to use it safely is how you win the war against water damage. Once you've got eyes on it, operating the valve is a simple but critical step. The method comes down to which type you have: a gate valve or a ball valve.
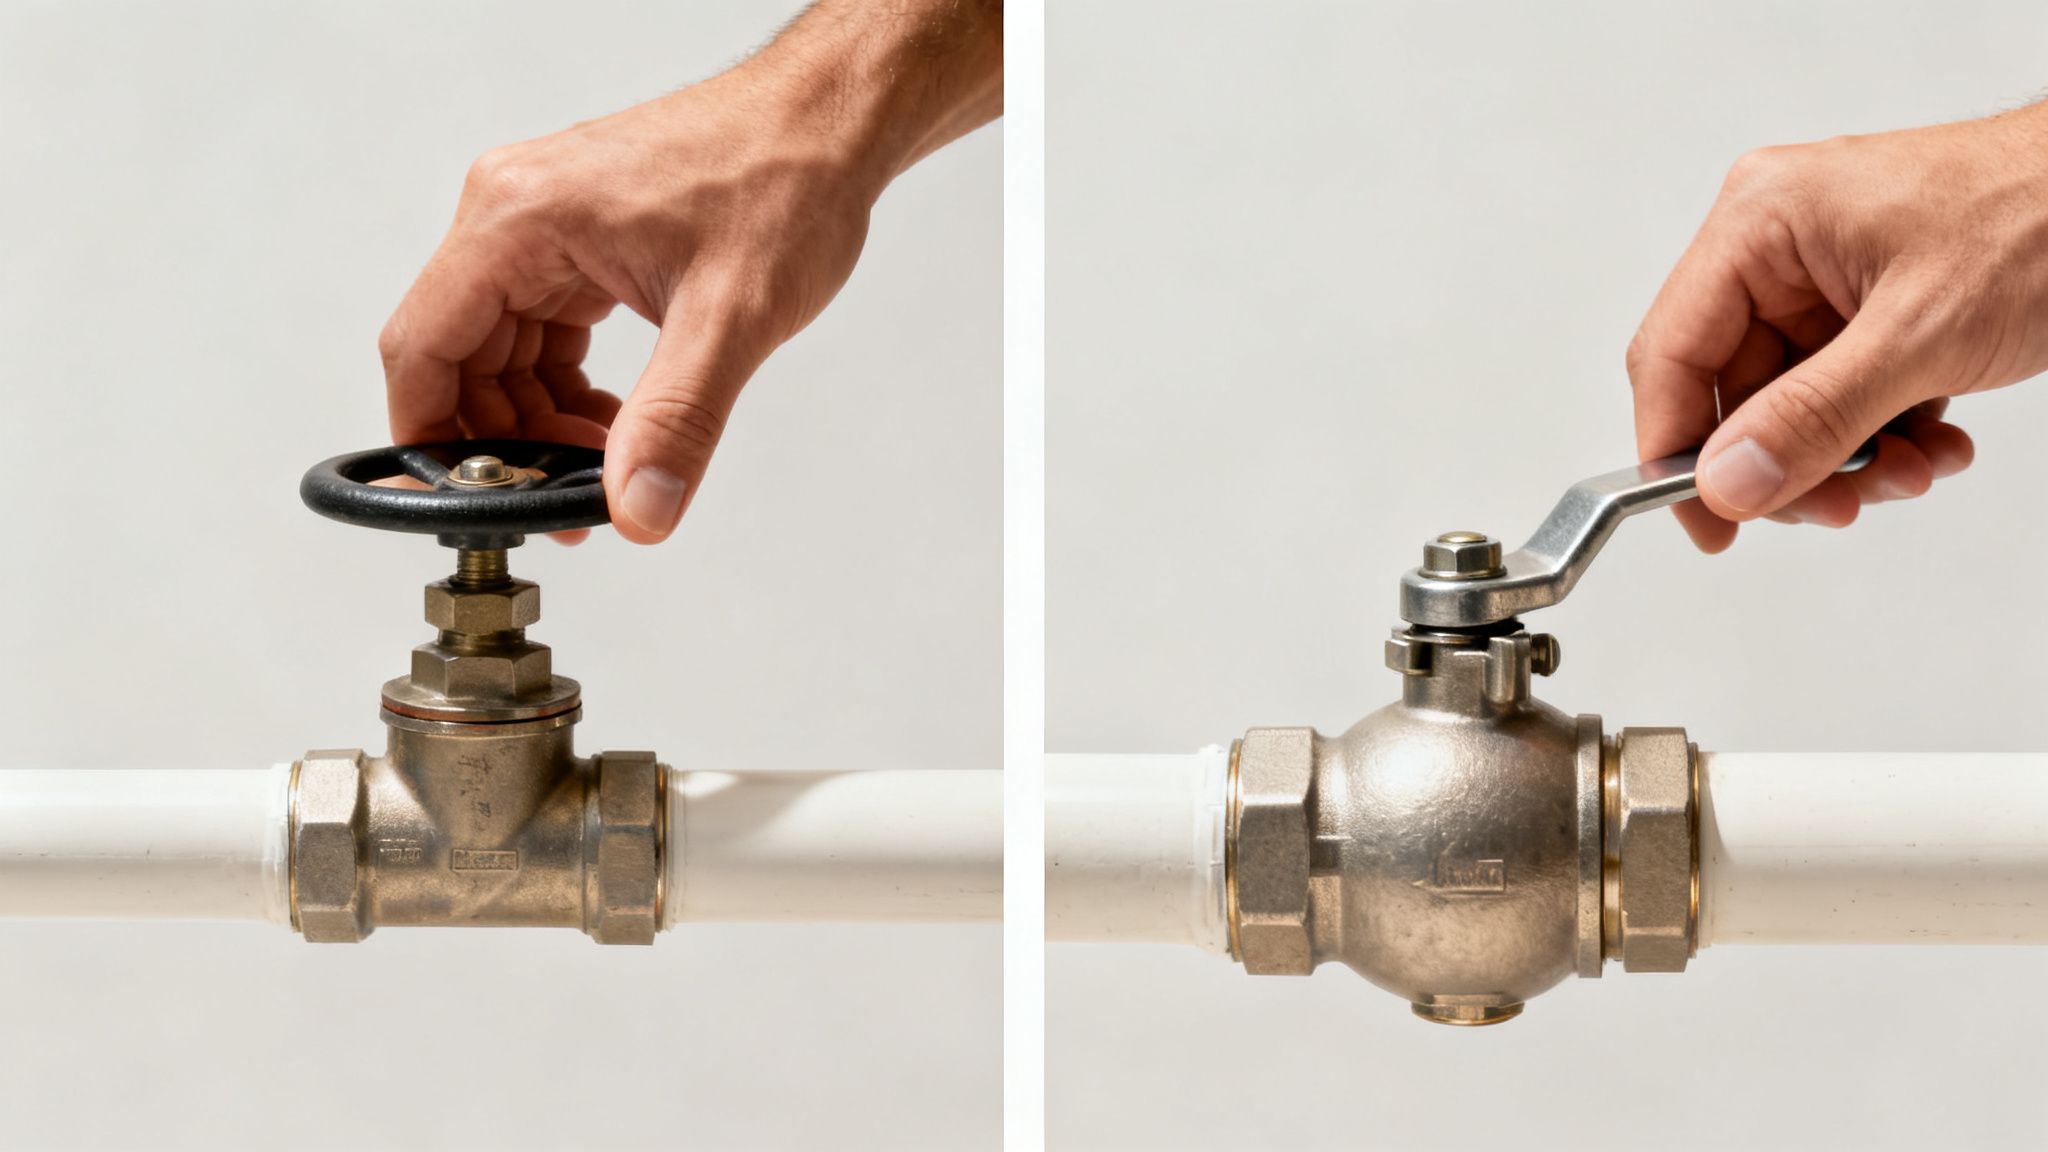
If you're looking at a gate valve—the round, wheel-like handle—just remember the old saying, "righty-tighty, lefty-loosey." You'll want to turn the handle clockwise slowly but with firm, steady pressure. Don't ever force it; just keep turning until it stops. This lowers an internal gate that blocks the flow of water.
For a ball valve with its single lever handle, the process is much quicker. A simple quarter-turn is all you need. When the lever is parallel with the pipe, the water is flowing. To shut it off, turn the lever until it’s perpendicular (at a 90-degree angle) to the pipe.
Final Steps to Confirm Success
After turning the valve, you need to double-check that the water is actually off. Head to the lowest faucet in your home, like a basement sink or a first-floor bathroom, and open the cold tap. This drains the remaining water from the system and confirms nothing new is flowing in. If water is still running after a minute or so, your valve might be failing.
Safety Tip: If the valve handle feels stuck or refuses to budge, do not grab a wrench or try to force it. An old, corroded valve can easily snap under too much pressure, turning a small leak into an absolute gusher. A stubborn handle is a clear signal that it's time to have a professional plumber inspect and likely replace the valve.
Taking these steps ensures you can confidently manage a plumbing emergency. Of course, stopping the flow is just the first step. If the water has already caused damage, the next move is getting professional burst pipe repair and cleanup to restore your home and prevent long-term issues like mold.
What are the Warning Signs of a Failing Main Water Valve?
Your main water valve sits quietly, often for years, waiting for the one moment you desperately need it to work. But like any mechanical part, it’s not immune to wear and tear. Knowing how to spot the warning signs of a failing valve can be the difference between a quick fix and a catastrophic flood.
A valve that's on its last legs simply won't protect your home when a pipe bursts. Let's walk through what you need to look for.
Obvious Signs of Wear and Tear
The most apparent signs of trouble are often the ones you can see. You don’t need to be a plumber to spot these red flags; you just need to take a close look at the valve body and its handle.
Keep an eye out for these tell-tale issues:
- Visible Rust or Corrosion: Reddish-brown rust or a chalky white buildup (calcification) are dead giveaways. These deposits mean there's a slow leak, and the metal itself is starting to break down.
- Persistent Drips: Any moisture or slow dripping from the handle's packing nut means the internal seals have failed. It might seem like a tiny leak now, but it’s a clear signal the valve is compromised and will only get worse.
Operational Problems and Failure to Shut Off
Sometimes the problem isn't what you see, but what you feel when you try to use the valve. A quick operational test can reveal hidden issues that a visual inspection would miss.
If you run into these problems, the valve is no longer reliable:
- A Stiff or Stuck Handle: The handle should turn smoothly with firm, steady pressure. If it’s extremely difficult to turn or feels completely seized, it's likely frozen with mineral deposits. A valve like this is useless in an emergency.
- The Valve Doesn't Stop the Water: This is the most critical sign of failure. You turn the handle all the way to the "off" position, but water still trickles out of your faucets. This means the internal gate or ball mechanism is shot and can no longer create a seal.
These symptoms are clear warnings that your home's first line of defense against water damage is broken. Ignoring them can lead to significant problems, so it's essential to understand the early signs of water damage that a faulty valve can cause. If you spot any of these issues, it’s time to call a professional plumber to get that valve replaced right away.
When a Water Leak Requires Professional Restoration
Okay, you found the valve and cranked it shut. The immediate gusher has stopped, which is a huge first step. Take a breath. But now, the real work to prevent lasting damage begins.
Water is sneaky. It doesn't take long for it to soak into drywall, find its way under expensive flooring, and create the perfect dark, damp environment for mold to take hold. We're talking as little as 24 to 48 hours.
This is where the DIY approach gets dangerous. You can't see the moisture trapped behind your walls or wicking up into the subfloor. Running a few fans and opening the windows simply won't cut it. Without the right equipment, you're gambling with long-term structural rot and a nasty mold problem down the road.
Why Immediate Professional Help Is Crucial
From West Hollywood high-rises to Burbank family homes, knowing what a main water valve looks like is your first line of defense. A quick turn can stop a flood in its tracks and potentially save you from the $12,000 average cost of water damage repairs. This is exactly why those easy-to-use quarter-turn ball valves are becoming so common in a massive global market. If you're curious, you can see just how fast the water valve market's expanding and why this tech is everywhere.
But even with the water off, the damage is already done. The clock is ticking. Every hour that materials stay saturated makes the restoration process more complex and more expensive.
The Restoration Process From Start to Finish
Professional restoration isn't just about mopping up puddles. It’s a scientific process that uses powerful, specialized equipment to bring your home back to its pre-loss condition safely and completely.
A professional restoration team uses industrial-grade air movers, dehumidifiers, and moisture meters to ensure every last bit of damaging moisture is removed from your home’s structure, preventing secondary damage like mold.
The steps are methodical and proven to work:
- Water Extraction: First, we bring in high-powered pumps and vacuums to get all the standing water out—fast.
- Structural Drying: Next, specialized drying equipment is set up. This isn't just fans; these machines pull moisture from deep within wood, drywall, and insulation.
- Damage Repair: Finally, any materials that are too far gone to be saved are carefully removed and replaced.
This systematic approach is the only way to be certain your home is truly dry, safe, and restored. You can get a much deeper look into how it all works by reading our guide to the complete water damage restoration process.
Answering Your Questions About Main Water Valves
Even after you've found and figured out what kind of valve you have, a few questions always seem to pop up. Here are the straight-up answers to the most common things we hear from homeowners trying to get a handle on their main water shutoff.
What Should I Do If My Main Water Valve Handle Is Stuck?
First and most importantly, do not force it. Grabbing a wrench and trying to crank it is a recipe for disaster. You can easily snap the valve stem, turning a frustrating problem into a full-blown flood. A handle that won’t budge is almost always a sign of internal corrosion or mineral scale that’s built up over years of just sitting there.
Think of it as a huge red flag—that valve is no longer reliable. The only safe move is to call a licensed plumber. They’ll assess the situation, but expect them to recommend a full replacement. It's the only way to ensure the valve will actually work when you need it most.
Is It a Good Idea to Turn My Main Water Valve Off and On Periodically?
Yes, absolutely. This is one of the smartest (and easiest) pieces of preventative maintenance you can do. We tell all our clients to gently close and reopen their main water valve at least once or twice a year.
This simple exercise acts like stretching a muscle—it breaks up any mineral deposits just starting to form and keeps the internal parts from seizing. It’s especially critical for older gate valves, which are notorious for getting stuck. A valve you test is a valve you can trust in an emergency.
Could My Main Water Valve Look Different in an Older Home?
Definitely. While the vast majority of modern homes have either a gate valve or a ball valve, very old properties can throw you a curveball. You might find something like a stopcock valve, which can have a T-shaped handle or require a special key to operate.
If you look at your valve and it doesn't match the common types we’ve described, don’t play the guessing game. Get a professional plumber to identify it for you. They can confirm what your main water valve looks like and show you the right way to use it before a crisis hits.
I Closed the Main Valve but Water Is Still Dripping From a Faucet. Why?
That’s the classic sign of a failed valve. It means the internal washer or seal that's supposed to completely block the water flow has worn out. It can no longer create a watertight seal.
A failing valve might slow a major leak from a gusher to a trickle, but it won’t stop it—making it pretty useless for preventing water damage. This is a clear signal that the valve needs to be professionally repaired or, more likely, replaced to be reliable again.
If a faulty valve has already caused water damage in your home, don't wait for mold to set in. The expert team at Onsite Pro Restoration is on call 24/7 to handle water extraction, drying, and full repairs. Call us now for an immediate response.