The water damage restoration process is a systematic, multi-phase approach designed to return your property to its pre-loss condition after a water disaster. It begins with an immediate emergency response to stop the water source, followed by a thorough damage assessment, water extraction, structural drying, deep cleaning, and finally, the repairs that put everything back together. Understanding these steps can demystify the experience and help you make informed decisions during a stressful time.
When you discover water damage, every minute counts. A fast, professional response is the single best thing you can do to minimize the damage and kick off the formal restoration process.
Call (818) 336-1800 for 24/7 Emergency Water Damage Service
What To Do Immediately After Finding Water Damage
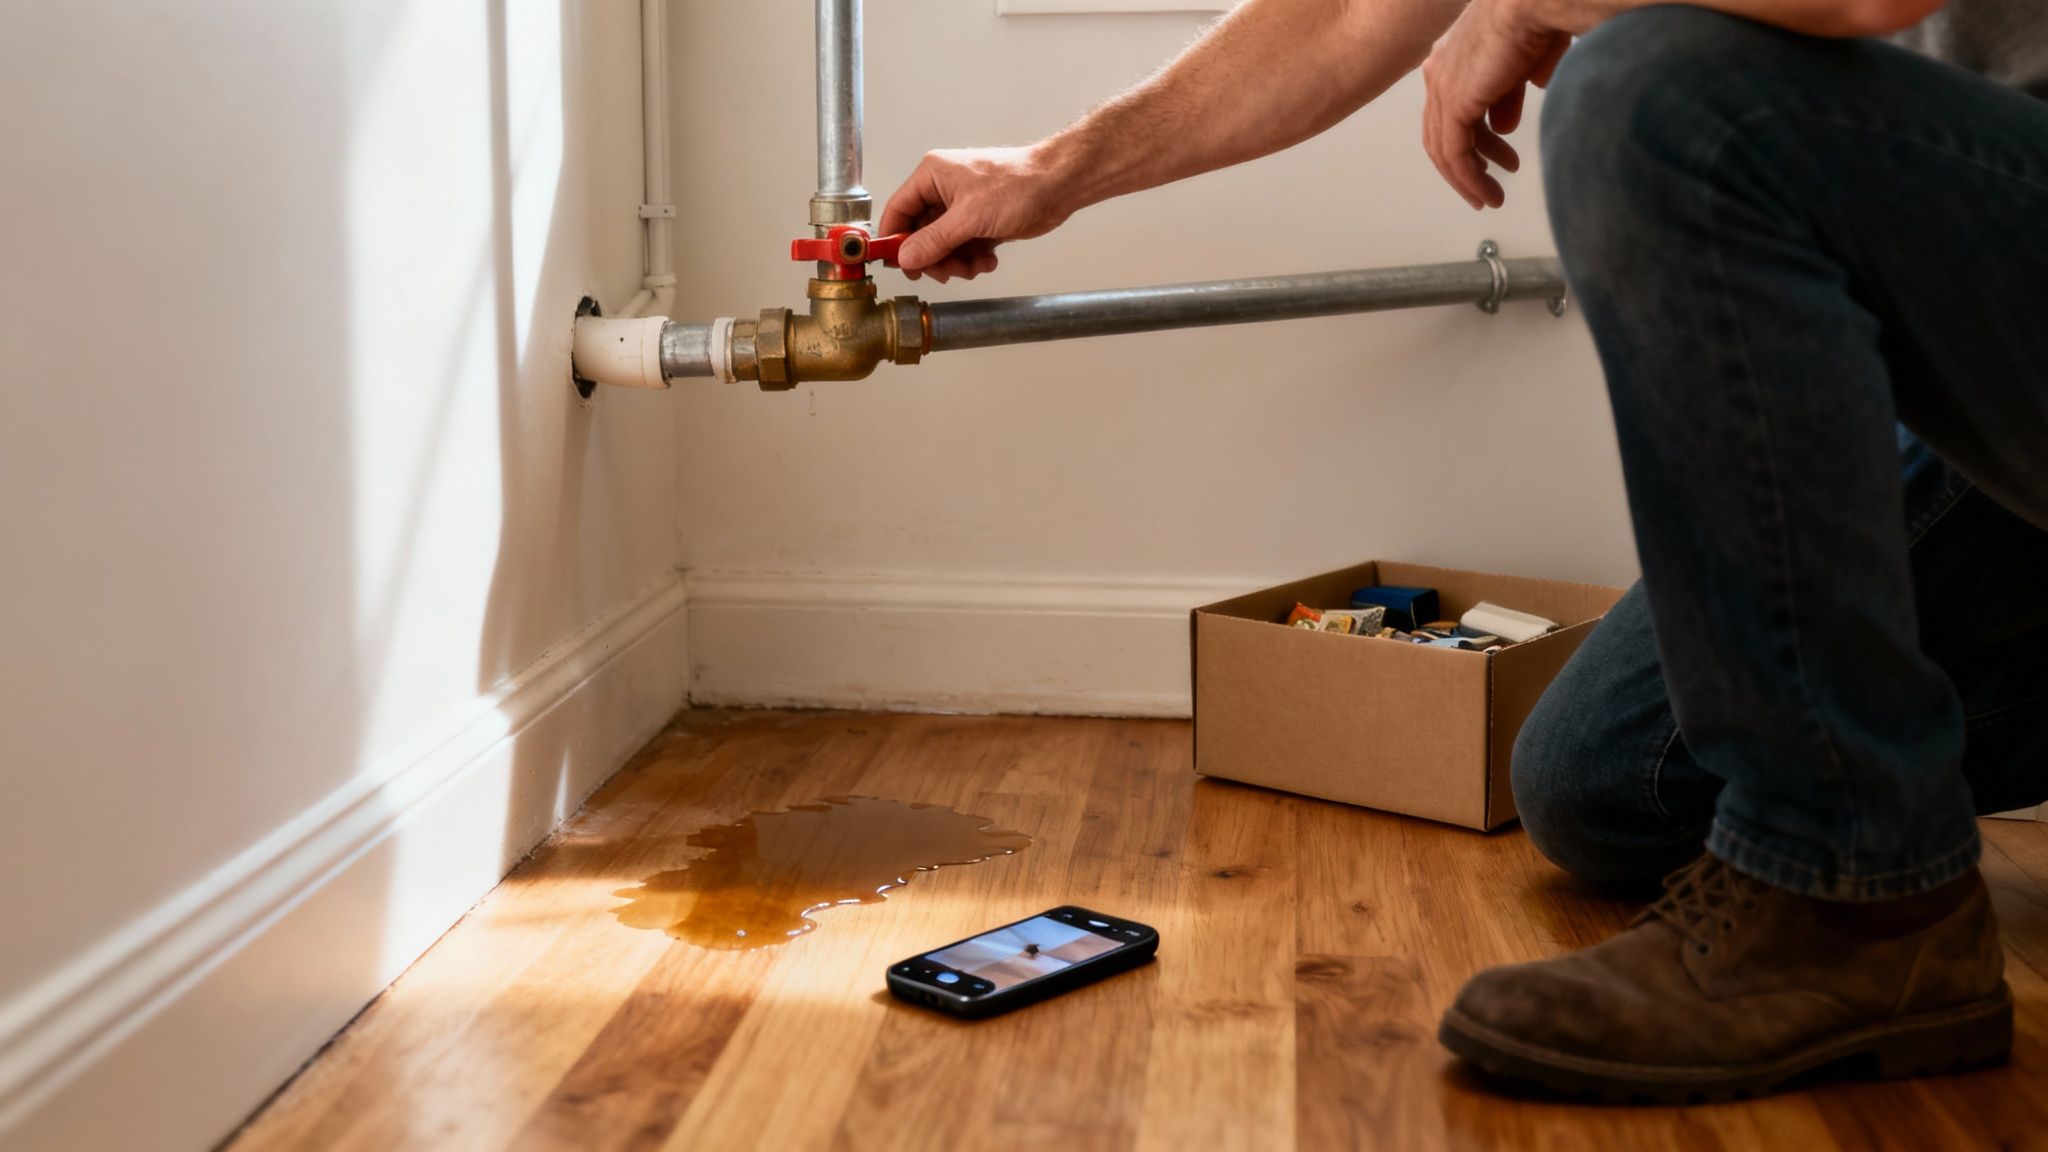
The moment you find water pooling where it shouldn't—whether from a burst pipe in a Van Nuys condo or a roof leak in a Sherman Oaks home—is pure stress. But what you do in that first hour can make a huge difference. A calm, measured response can seriously reduce the total damage, head off safety hazards, and even make your insurance claim go smoother.
Your two biggest priorities are simple: stay safe and stop more water from coming in.
Prioritize Safety Above All Else
Before you even think about cleanup, you must assess the safety risks. Water and electricity are a lethal combination.
If you can get to your circuit breaker box without stepping through water, kill the power to the wet areas immediately. If you're not sure, or if the area around the breaker is wet, don't risk it. Leave it for the pros.
Next, find and shut off your home's main water valve. This is the kill switch for a burst pipe or a busted appliance hose, and it's absolutely critical for containing the mess.
This quick visual breaks it down perfectly: safety and documentation come before any major cleanup starts. Getting this right from the beginning sets the stage for a much smoother restoration.
The following checklist outlines the non-negotiable first steps to protect your family and your property.
| Emergency Water Damage Checklist |
| :— | :— | :— |
| Priority Action | Why It's Critical | Pro Tip |
| Shut Off Electricity | Prevents electrocution risk. Water is an excellent conductor and can energize the entire flooded area. | If you can't reach the breaker box safely, call an electrician or the restoration company immediately. Don't be a hero. |
| Stop the Water Source | Minimizes the volume of water causing damage. The longer water flows, the more it spreads and soaks into materials. | Know where your main water shut-off valve is before an emergency happens. It’s often in a garage, basement, or utility closet. |
| Document Everything | Creates crucial evidence for your insurance claim. Photos and videos prove the extent of the damage at its worst. | Use your phone to take a video walkthrough. Narrate what you see, capturing the standing water and all affected items. |
| Move Valuables | Protects irreplaceable or sensitive items from ruin. Electronics, documents, and photos are especially vulnerable. | Place aluminum foil squares or wood blocks under furniture legs to prevent rust or wood stains from bleeding into the carpet. |
| Call a Professional | Ensures a rapid response with the right equipment. Certified pros can start mitigation within hours to prevent mold. | Have a 24/7 restoration company's number saved in your phone. Look for IICRC certification. |
Following these steps methodically will help you regain control in a chaotic situation and lay the groundwork for a successful recovery.
Document and Mitigate Further Damage
Once the area is safe, grab your smartphone and become a crime scene investigator. Take tons of photos and videos of everything. Get shots of the water source, the standing water, and every single item that got wet—furniture, rugs, electronics, you name it. This visual proof is gold for your insurance adjuster.
If it's safe, start moving what you can. Get electronics, family photos, important papers, and furniture to a dry spot.
Key Takeaway: Do not try to be a hero and handle major cleanup yourself. Never use a regular household vacuum to suck up water—you'll ruin the vacuum and risk a shock. And don't try to pull up tacked-down carpet; you can easily delaminate it, making it impossible to save.
With the rise of extreme weather events, being ready for water damage is more important than ever. In just one recent year, the U.S. was hit with 24 billion-dollar disasters by November, many of which involved storms and flooding that caused massive property damage.
Finally, make the most important call: to a certified restoration company. When you dial, have this info ready: your name and address, a quick summary of the problem (e.g., "washing machine hose let go in the laundry room"), and your insurance company's name. This helps them dispatch a crew for emergency water cleanup right away.
Step 1: Damage Assessment and Water Removal
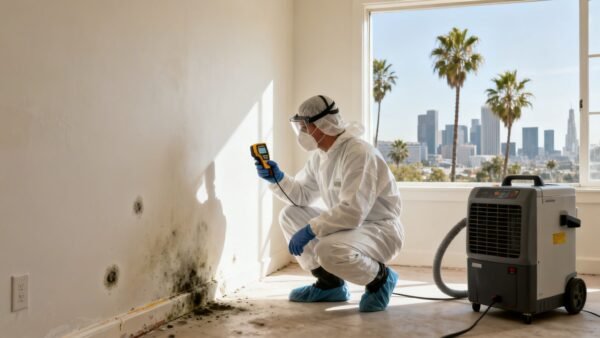
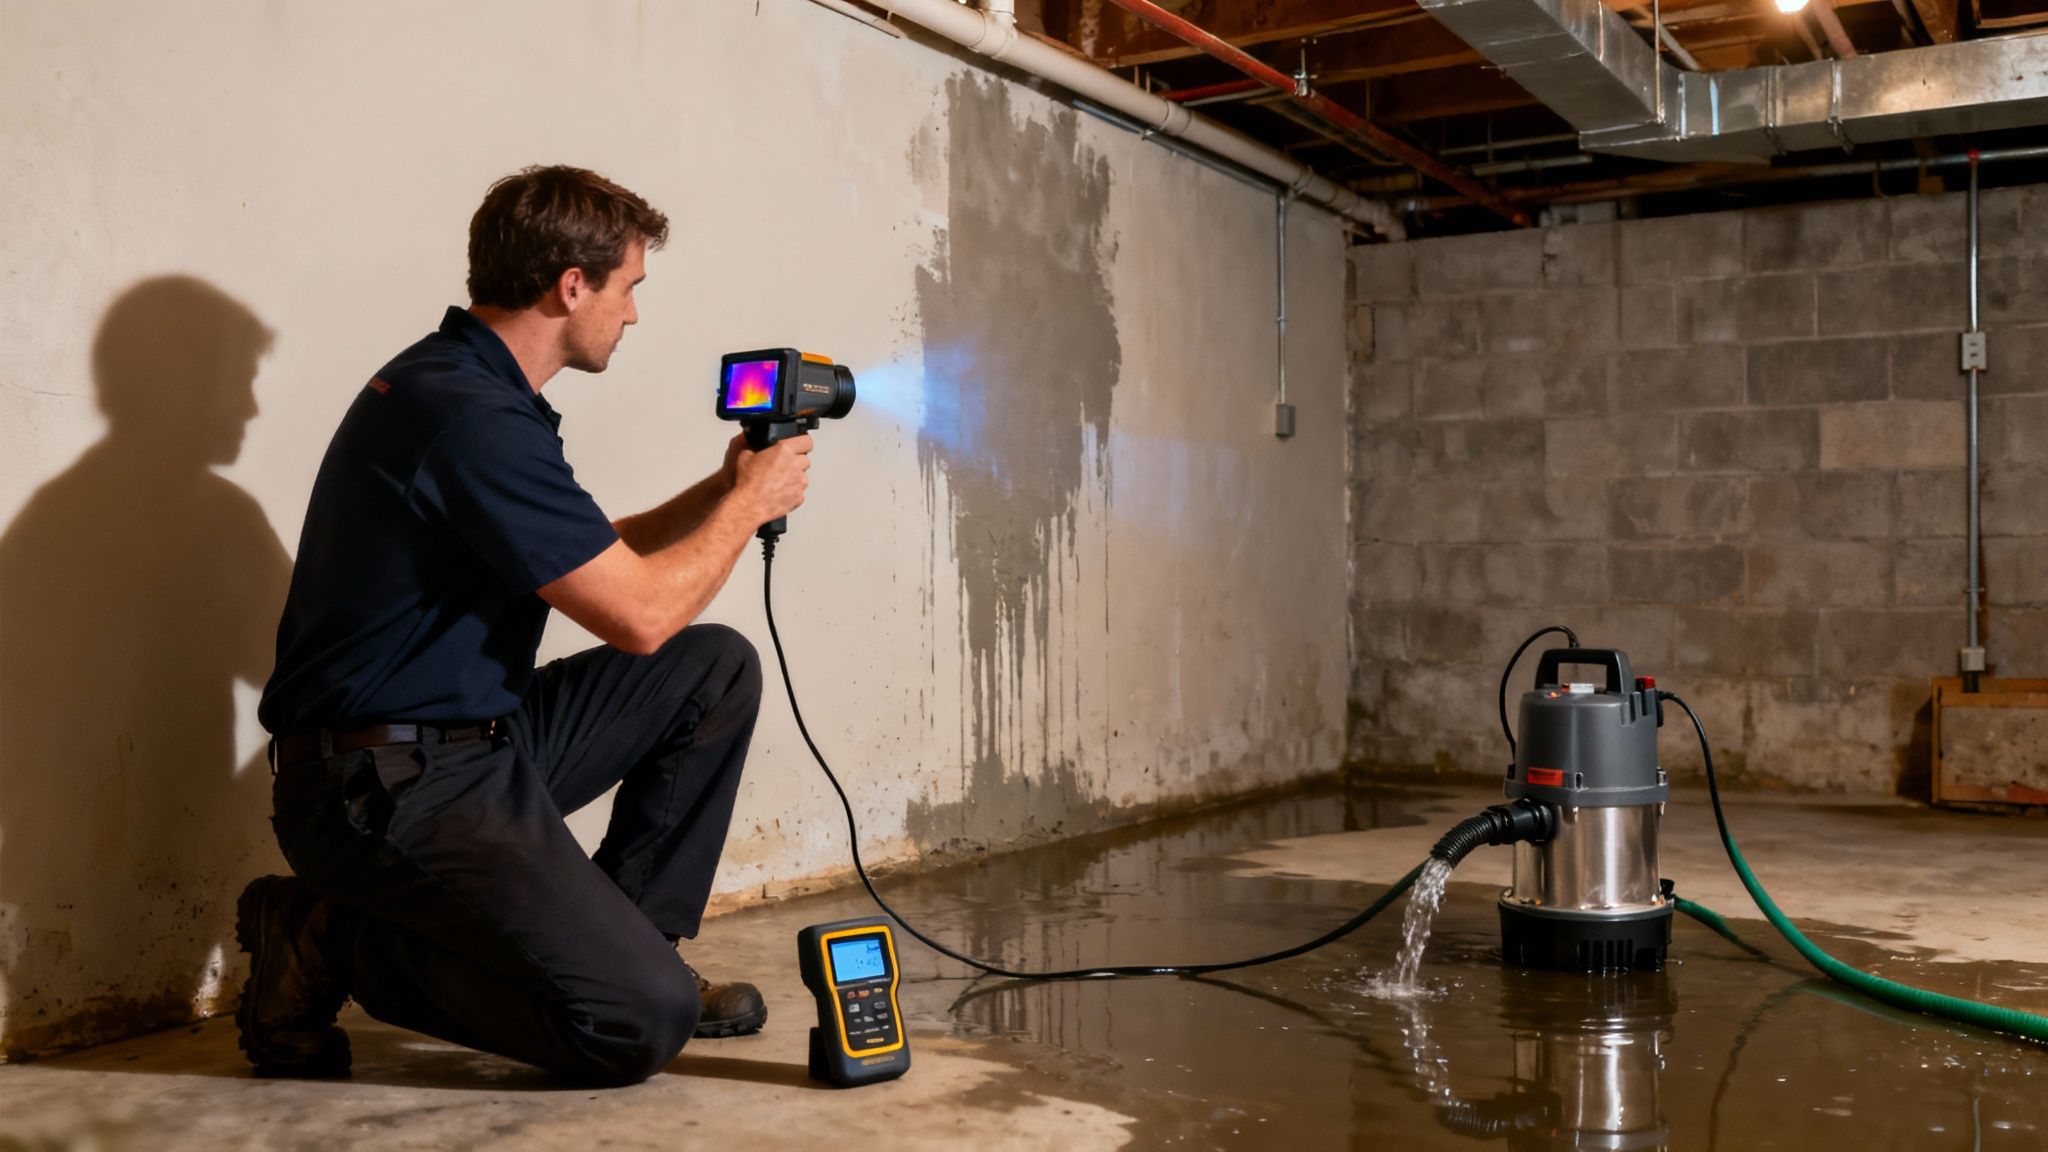
When our certified specialists arrive on-site, the real technical work begins. The first thing we do isn't grabbing a mop—it's a full-blown investigation to figure out exactly what we’re up against. This isn't just a quick look-around; it's a scientific assessment to map out the entire path the water has taken through your property.
Our techs use specialized gear to see what the naked eye can’t. With high-sensitivity moisture meters and thermal imaging cameras, we can find water hiding behind drywall, lurking under floorboards, or trapped deep inside insulation. Skipping this step is a recipe for disaster, because any moisture left behind will turn into mold and cause structural rot.
Classifying the Damage
Next, we classify the situation based on two critical factors: the water category and the damage class. This isn't just industry jargon; this system, set by the IICRC, dictates the entire game plan for the restoration.
There are three main categories of water we deal with:
- Category 1 (Clean Water): This is the easy one. It comes from a sanitary source, like a broken supply line. It’s not an immediate health risk, but if you let it sit, it can quickly degrade into Category 2.
- Category 2 (Gray Water): Now we're talking contamination. This water can make you sick. Think of overflows from a washing machine or a busted dishwasher line.
- Category 3 (Black Water): This is the worst-case scenario. It’s grossly contaminated and can cause serious illness. We’re talking sewage backups and floodwaters from rivers or streams.
At the same time, we're figuring out the class of damage, which tells us how much moisture has soaked into the materials. It’s a scale from Class 1 (very little absorption) all the way to Class 4, where water has deeply saturated dense materials like concrete and hardwood.
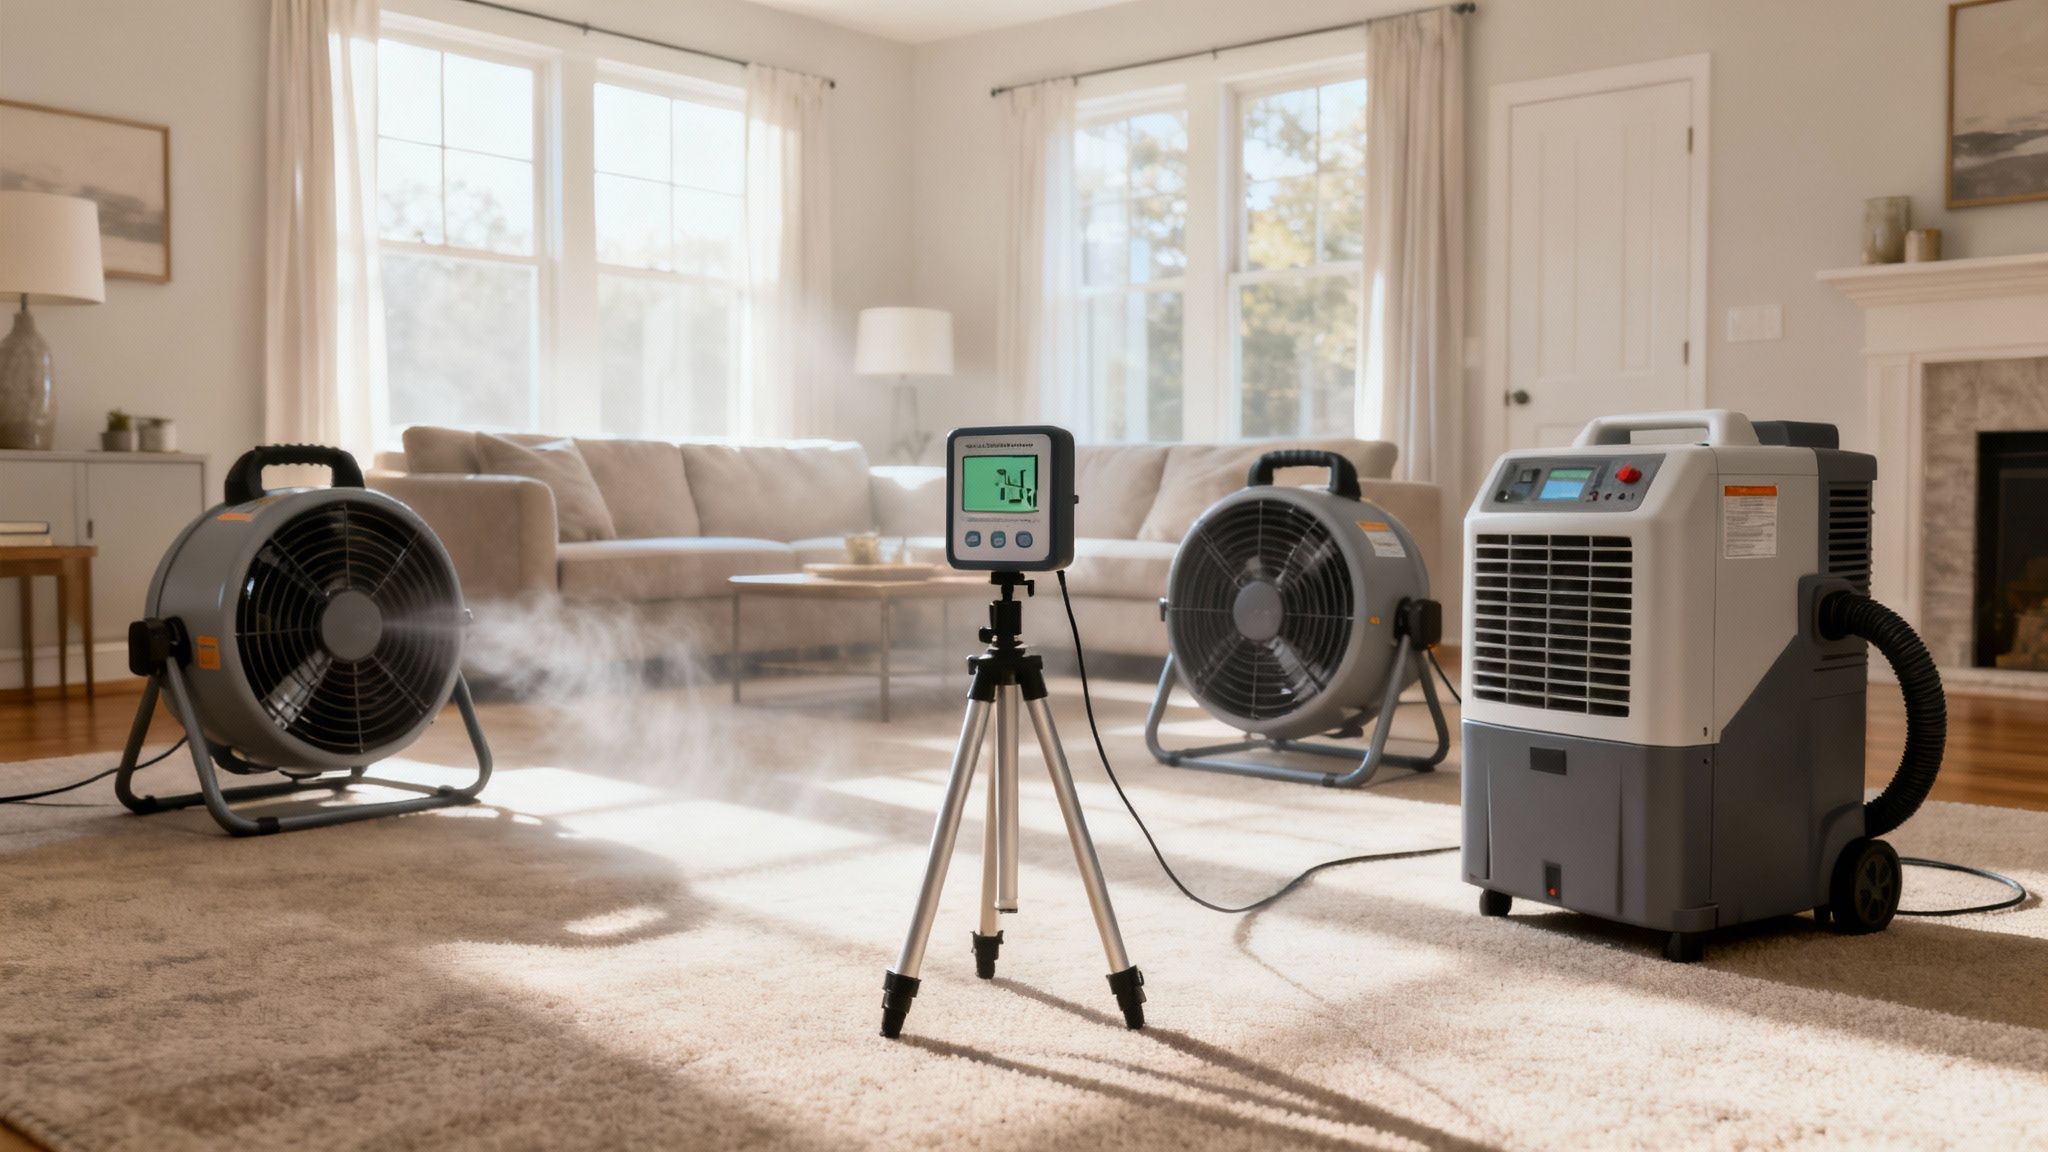
The Water Extraction Phase
Once we have a clear picture of the damage, the top priority becomes getting the standing water out—fast. This is no job for mops and buckets. We roll in with powerful, industrial-grade equipment built for serious extraction.
Powerful extraction is the first major step in mitigating loss. The faster standing water is removed, the less time materials have to absorb it, which significantly reduces secondary damage like warping, swelling, and delamination.
For major flooding, we’ll drop in submersible pumps that can move thousands of gallons of water in a hurry. After that, we bring in the truck-mounted and portable extraction units. These are essentially super-powered wet vacuums that pull every last drop of water from carpets, padding, and hard floors. It’s a crucial part of our emergency water extraction services, designed to get your property on the fast track to drying.
Technology is also giving us a major leg up in this critical phase. We're now seeing artificial intelligence (AI) tools that can analyze images and sensor data to assess damage with incredible speed and accuracy. This doesn't just speed up the insurance claims process; it helps us pinpoint exact moisture levels in real-time, which means we can avoid unnecessary demolition and keep your repair costs down. This kind of rapid, precise evaluation sets the stage for a much more efficient and effective drying process to follow.
Step 2: Strategic Drying and Dehumidification
Once all the standing water is gone, the real science of the water damage restoration process begins. This isn't about just wiping things down with a towel; it’s a highly technical phase focused on pulling out all the hidden moisture your home's structure has soaked up. Getting this wrong is the number one reason we see secondary problems like mold and warped floorboards pop up weeks later.
The ultimate goal is to hit what we call a "dry standard"—a measurable state where the moisture levels in wet materials get back to their normal, pre-damage balance. We get there with a carefully orchestrated trio of airflow, dehumidification, and temperature control.
The Power Duo: Air Movement and Dehumidification
The workhorses of this entire phase are our high-velocity air movers and industrial-grade dehumidifiers. We don't just plug them in and hope for the best; their placement is completely strategic. Air movers are set up to create a powerful vortex of air that rushes across wet surfaces like drywall, carpets, and subflooring. This constant, rapid movement is what speeds up evaporation, literally pulling moisture out of the materials and into the air.
But where does all that airborne moisture go? That's the dehumidifier's job. These powerful machines are like the lungs of the operation, sucking in all the damp, humid air the fans create.
- Refrigerant Dehumidifiers: These work a lot like an air conditioner, cooling the air to condense moisture and collecting it as water. They're at their best in warmer, more humid conditions.
- Desiccant Dehumidifiers: Instead of cooling, these use a special material that absorbs moisture directly. They really shine in cooler temperatures and are our go-to for drying out dense materials that are stubborn to dry.
This one-two punch of evaporation and moisture collection is the heart and soul of effective structural drying. To really get into the weeds on the science, our guide on structural drying for homeowners breaks down exactly how this equipment works together.
Meticulous Monitoring for Proven Results
Hitting that dry standard isn't a guessing game. Our technicians are on-site daily to monitor and document every step of the drying progress. This is a completely data-driven process.
Pro Tip: Whatever you do, don't turn off the drying equipment to save a few bucks on electricity. I know it can be noisy, but interrupting the process can add days to the drying time and dramatically increases the risk of mold taking root.
Using specialized moisture meters and thermal cameras, we take daily readings of all affected materials. We’re also tracking the temperature and relative humidity in the air. This data tells us precisely how the structure is responding and lets us make targeted adjustments—like repositioning fans or bringing in more dehumidifiers—to hit those stubborn damp spots.
For example, a water-logged sill plate at the base of a wall in a Sherman Oaks home will always dry much slower than the surface of the drywall. It needs focused airflow to hit its drying goal.
We compare our daily readings to an unaffected, dry area of your home to establish a clear baseline. The job is only done when every single affected material—from the carpet pad to the wall insulation—meets or beats that established dry standard. This meticulous approach guarantees no hidden moisture is left behind, protecting your home and giving you complete peace of mind.
Step 3: Cleaning and Sanitizing for a Safe Home
Once everything is bone-dry, our focus shifts from mitigation to true recovery. The goal now is to make sure your home isn’t just dry, but also clean, sanitary, and completely safe for your family to return to. This step involves a deep, professional cleaning and sanitization of every affected surface, personal item, and even the air you breathe.
This is far more than your typical weekend tidying-up. We're dealing with contaminants potentially left behind by the water, especially if it was gray or black water. Our technicians use professional-grade, EPA-approved cleaning agents and antimicrobial treatments to sanitize everything, eliminating harmful bacteria and pathogens to make the environment hygienic again.
Preventing Future Mold Growth
After a water incident, mold is the biggest lingering threat. Even after a structure is fully dried, microscopic mold spores can lie dormant, just waiting for the slightest hint of moisture to spring back to life. A thorough cleaning and sanitization is your absolute best defense against a future infestation.
Expert Insight: Mold can start growing in as little as 24-48 hours in damp conditions. The professional sanitization step after drying isn't just about cleaning—it's a critical preventative measure that neutralizes spores before they can colonize and turn into a much bigger headache.
This is where having a certified team really pays off. We apply specialized antimicrobial treatments to all surfaces that were exposed to moisture. This isn't just cleaning what you can see; it creates an environment where mold spores simply can't thrive, effectively shutting down the potential for future growth. If we suspect significant contamination, our comprehensive mold remediation services can tackle the problem right at the source.
Specialized Cleaning and Odor Removal
Beyond sanitizing the structure, we also work to salvage your personal belongings. Different materials need different tactics:
- Hard Surfaces: Furniture, non-porous flooring, and similar items are cleaned and disinfected.
- Soft Goods: Things like clothes, curtains, and linens can often be saved with specialized laundering methods.
- Documents & Photos: We can sometimes restore valuable papers and photographs using advanced techniques like freeze-drying.
Finally, we go after any lingering odors. That distinct musty smell is a byproduct of moisture and microbial activity. To get rid of it for good, we often use methods like thermal fogging. This process disperses a deodorizing agent as a fine mist that gets deep into porous materials like drywall and wood, neutralizing odor-causing particles at a molecular level. The result? Your home smells fresh, clean, and back to normal.
Step 4: Final Repairs and Restoration
Once your property is clean, dry, and sanitized, we move into the final and most satisfying phase of the job: the rebuild. This is where we stop mitigating the damage and start putting your home back together. After all the chaos of the initial emergency, seeing new drywall go up and fresh paint on the walls is a huge relief.
The scope of these repairs can be anything from minor touch-ups to a full-blown renovation, all depending on how bad the initial water damage was. A small leak from an appliance might just mean patching a section of drywall and painting. But if a pipe bursts in an upstairs bathroom, we could be looking at replacing the ceiling below, the subfloor, and everything in between.
From Minor Fixes to Major Rebuilds
What needs to be rebuilt is dictated by what had to be torn out. During the mitigation stage, any porous materials that got soaked—especially by contaminated water—are usually a lost cause. They have to go to guarantee a safe, healthy environment.
This often leads to common reconstruction tasks like:
- Drywall Installation and Finishing: Cutting out and replacing wet wallboard is standard practice. We then tape, mud, and texture it to match the surrounding area.
- Painting: A fresh coat of primer and paint makes the new drywall blend in seamlessly.
- Flooring Replacement: If the carpet, laminate, or hardwood was removed, we’ll handle the installation of the new flooring.
- Cabinetry and Millwork: This involves reinstalling or replacing kitchen and bathroom cabinets, plus crucial finishing touches like baseboards and door trim.
For more severe damage, the list gets longer. We might be rebuilding interior walls, coordinating with electricians to replace compromised wiring, or bringing in plumbers to restore damaged pipes.
Our Goal: A successful restoration is one where you can't tell the damage ever happened. The final repairs should blend perfectly with the existing structure, matching textures, colors, and finishes to restore both the function and aesthetic of your home.
Coordinated Project Management
A professional restoration company shouldn’t just dry things out—they should manage the entire project from start to finish. Instead of you having to find and schedule a separate drywaller, painter, and flooring installer, we handle it all. This single point of contact makes your life easier, ensures quality control across all trades, and honestly, just gets the job done faster.
The water damage restoration sector is a huge part of a U.S. industry that has grown to an estimated $7.1 billion, climbing by 4.5% annually in recent years. This growth isn’t surprising when you consider aging homes and more frequent extreme weather events. This integrated approach, where one team manages everything, is the final, crucial step in making your home whole again.
Navigating Your Insurance Claim
Dealing with the aftermath of water damage is stressful enough. Throwing an insurance claim on top can feel like a second full-time job. But it doesn't have to be that way. With the right restoration partner and a clear plan, you can manage this part of the water damage restoration process with confidence.
The entire game is won with clear communication and rock-solid documentation from the moment we arrive.
Think of your restoration company as the crucial link between you and your insurer. We're the ones providing the detailed reports, moisture readings, and line-item estimates that adjusters need to see. This professional documentation is what validates the scope of work and helps push approvals through, ensuring you get every dollar of coverage you're entitled to.
Understanding Your Policy and Coverage
Not all water damage is created equal in the eyes of an insurance company. It's critical to know what your specific policy covers.
Most standard homeowner's policies are designed for "sudden and accidental" damage—think a burst pipe under the sink or a washing machine hose that lets go. However, they almost always exclude damage from gradual leaks that have been happening over time or overland flooding from a storm.
It's also essential to know the difference between standard home insurance and a separate flood policy. For a deeper look at that, understanding flood insurance coverage is a fantastic resource that breaks down the specifics. Getting these details straight from the start sets realistic expectations for your claim.
Your Role in the Claims Process
While we handle the technical side of the documentation, your active participation is still a key ingredient for a smooth process.
Here’s exactly what you can do to help move things along:
- Provide Your Policy Information: As soon as you have it, get your project manager your insurance company's name, your policy number, and your adjuster's contact info.
- Keep a Communication Log: Jot down notes from every single conversation you have with your insurance company. Who did you talk to? What was the date and time? A simple log creates a powerful record of your claim's progress.
- Compile a Loss Inventory: Start a detailed list of all your damaged personal belongings. Include their approximate age, what you paid for them, and the replacement cost if you know it. Those initial photos and videos you took are pure gold here.
Key Takeaway: Your restoration team is your advocate. We speak the same language as insurance adjusters and use the same industry-standard software, like Xactimate, to build estimates they already know and trust. This direct, professional collaboration cuts down on back-and-forth, speeds up approvals, and seriously reduces your out-of-pocket stress.
Ultimately, a successful insurance claim is a team effort. By working closely with your restoration pros, you can ensure the financial recovery is just as thorough as the physical one. For more on what's typically covered, check out our guide on homeowner's insurance coverage for water damage.
Frequently Asked Questions About the Water Damage Restoration Process
When you're dealing with a water emergency, a million questions run through your head. The uncertainty can be just as stressful as the damage itself. Getting clear, honest answers helps you regain control. Let's walk through some of the most common questions we get from homeowners.
Q: How long does the restoration process take?
A: The honest answer is: it depends. The timeline is completely dictated by the severity and scope of the damage. For a small, contained issue—like a toilet overflow that stayed in one bathroom—we can often have everything dried out and back to normal in just 2 to 3 days. For a major event like a burst pipe flooding multiple levels, the initial drying phase typically takes 3 to 5 days, but the reconstruction that follows can take several weeks.
Q: Will my homeowner's insurance cover this?
A: Most of the time, yes. Standard homeowner's insurance policies are designed to cover damage from "sudden and accidental" water events, like a burst pipe or faulty appliance hose. Coverage gets tricky with gradual problems, such as a slow leak under a sink, which is often considered a maintenance issue. Widespread flooding from storms also requires a separate flood insurance policy. Always call your agent to clarify your specific coverage.
Q: Can I stay in my house during the work?
A: This really comes down to safety and comfort. For minor damage limited to a small area, you can usually stay. For major damage, especially involving contaminated water (Category 2 or 3), it's often unsafe. Even with clean water, the constant, loud noise from industrial air movers and dehumidifiers running 24/7 can be incredibly disruptive. We typically recommend finding temporary accommodation for widespread damage.
Q: What is the difference between water mitigation and water restoration?
A: People often use these terms interchangeably, but they are two distinct phases. Think of mitigation as the emergency first aid that stops the bleeding—extracting water, removing soaked materials, and drying the structure to prevent further damage. Restoration is the reconstructive surgery that puts everything back together, including installing new drywall, flooring, and painting to return your home to its pre-loss condition.
Q: What should I not do after discovering water damage?
A: Do not use household vacuums to remove water, as this can cause electrical shock and ruin the appliance. Avoid placing newspaper on wet surfaces, as the ink can transfer and stain. Don't turn on ceiling fans or lights in rooms with sagging, wet ceilings. Most importantly, do not wait to call a professional—mold can begin growing within 24-48 hours.
Q: How do you ensure all the moisture is gone?
A: We use a data-driven approach with professional tools. Our technicians use thermal imaging cameras and moisture meters to find hidden water behind walls and under floors. We establish a "dry standard" by taking readings from an unaffected area of your home and monitor the wet materials daily until they meet or exceed that baseline, ensuring no hidden moisture is left behind.
When water damage strikes, you need a team that can respond immediately and manage the entire water damage restoration process with expertise and care. Onsite Pro Restoration is here 24/7 to secure your property and bring it back to life.
Call (818) 336-1800 now for a free, no-obligation assessment.
https://onsitepro.org