Negotiating with an insurance adjuster isn’t a single event; it’s a process that kicks off with your very first conversation. The keys to success are simple but powerful: be prepared, stay professional, and practice patience. Always remember that their initial offer is just that—an offer. It's a starting point, not the final destination. With meticulous documentation and confident communication, you can navigate the process of an insurance claim and secure the full value you're owed. This guide will show you how to negotiate with an insurance adjuster effectively, starting from day one.
Understanding the First Conversation with the Insurance Adjuster
That first phone call from the insurance adjuster is a pivotal moment. It sets the tone for everything that follows. They'll likely sound friendly and eager to help, but never forget their primary role: to protect their company's bottom line by resolving your claim for the lowest possible amount.
Think of it this way: if a pipe just burst in your Sherman Oaks home, your goal is to make your house whole again. The adjuster’s goal is to close the file as efficiently and inexpensively as possible. Those two goals don't always line up.
Setting Boundaries From the Start
This initial conversation is your chance to establish control. You are not obligated to give a detailed, recorded statement right then and there, no matter how much they push it as "standard procedure."
Instead, keep your goals for this call simple:
- Gather Information: Get the adjuster’s full name, direct phone number, and the claim number for your case.
- Provide Only Basics: Confirm your name, contact details, property address, and the date the damage happened. That's it.
- Set Expectations: Politely state that you're still figuring out the full scope of the damage. Let them know you won't discuss specifics or agree to a recorded statement at this time.
Key Takeaway: Treat the first call as an introduction, not an interrogation. You are in control of what information you share and when. A polite "I'm still gathering all the details and will get back to you in writing" is a perfectly acceptable—and powerful—response.
How you handle this first meeting can significantly impact your claim's outcome. Here’s a quick guide to navigating that initial discussion effectively.
Initial Adjuster Meeting Do's and Don'ts
| Action | Do | Don't |
|---|---|---|
| Information Sharing | Provide only basic facts: your name, address, and the date of loss. | Give a recorded statement or speculate on the cause or extent of damage. |
| Tone | Remain calm, professional, and courteous. | Become emotional, confrontational, or apologetic. |
| Documentation | Take detailed notes of the conversation, including the adjuster's name and ID number. | Agree to anything verbally or sign any documents without a thorough review. |
| Next Steps | State that you are assessing the damage and will provide documentation later. | Accept a quick, low settlement offer made on the spot. |
| Control | Ask for their contact information and confirm the best way to communicate (email is best). | Allow them to rush you or pressure you for immediate answers. |
By following these simple guidelines, you protect your rights and position yourself for a more favorable negotiation down the road.
Understanding Their Opening Moves
Adjusters are trained negotiators, and they have a playbook. One of the most common tactics is the quick, lowball settlement offer. They know you're stressed and just want this nightmare to be over, so they might offer a few thousand dollars right away to close the claim fast.
Accepting this is almost always a mistake. You have no idea what the full scope of the damage is yet. Hidden moisture festering behind walls or soot that has settled deep inside your HVAC system can take days or even weeks to uncover.
To learn more, it's worth reviewing some essential insurance claim tips for water damage to better prepare yourself. By understanding their playbook from day one, you shift from being a passive victim to an empowered advocate for your claim. Your patience and evidence-based approach will be your greatest assets in the conversations to come.
How to Build an Undeniable Property Damage Claim
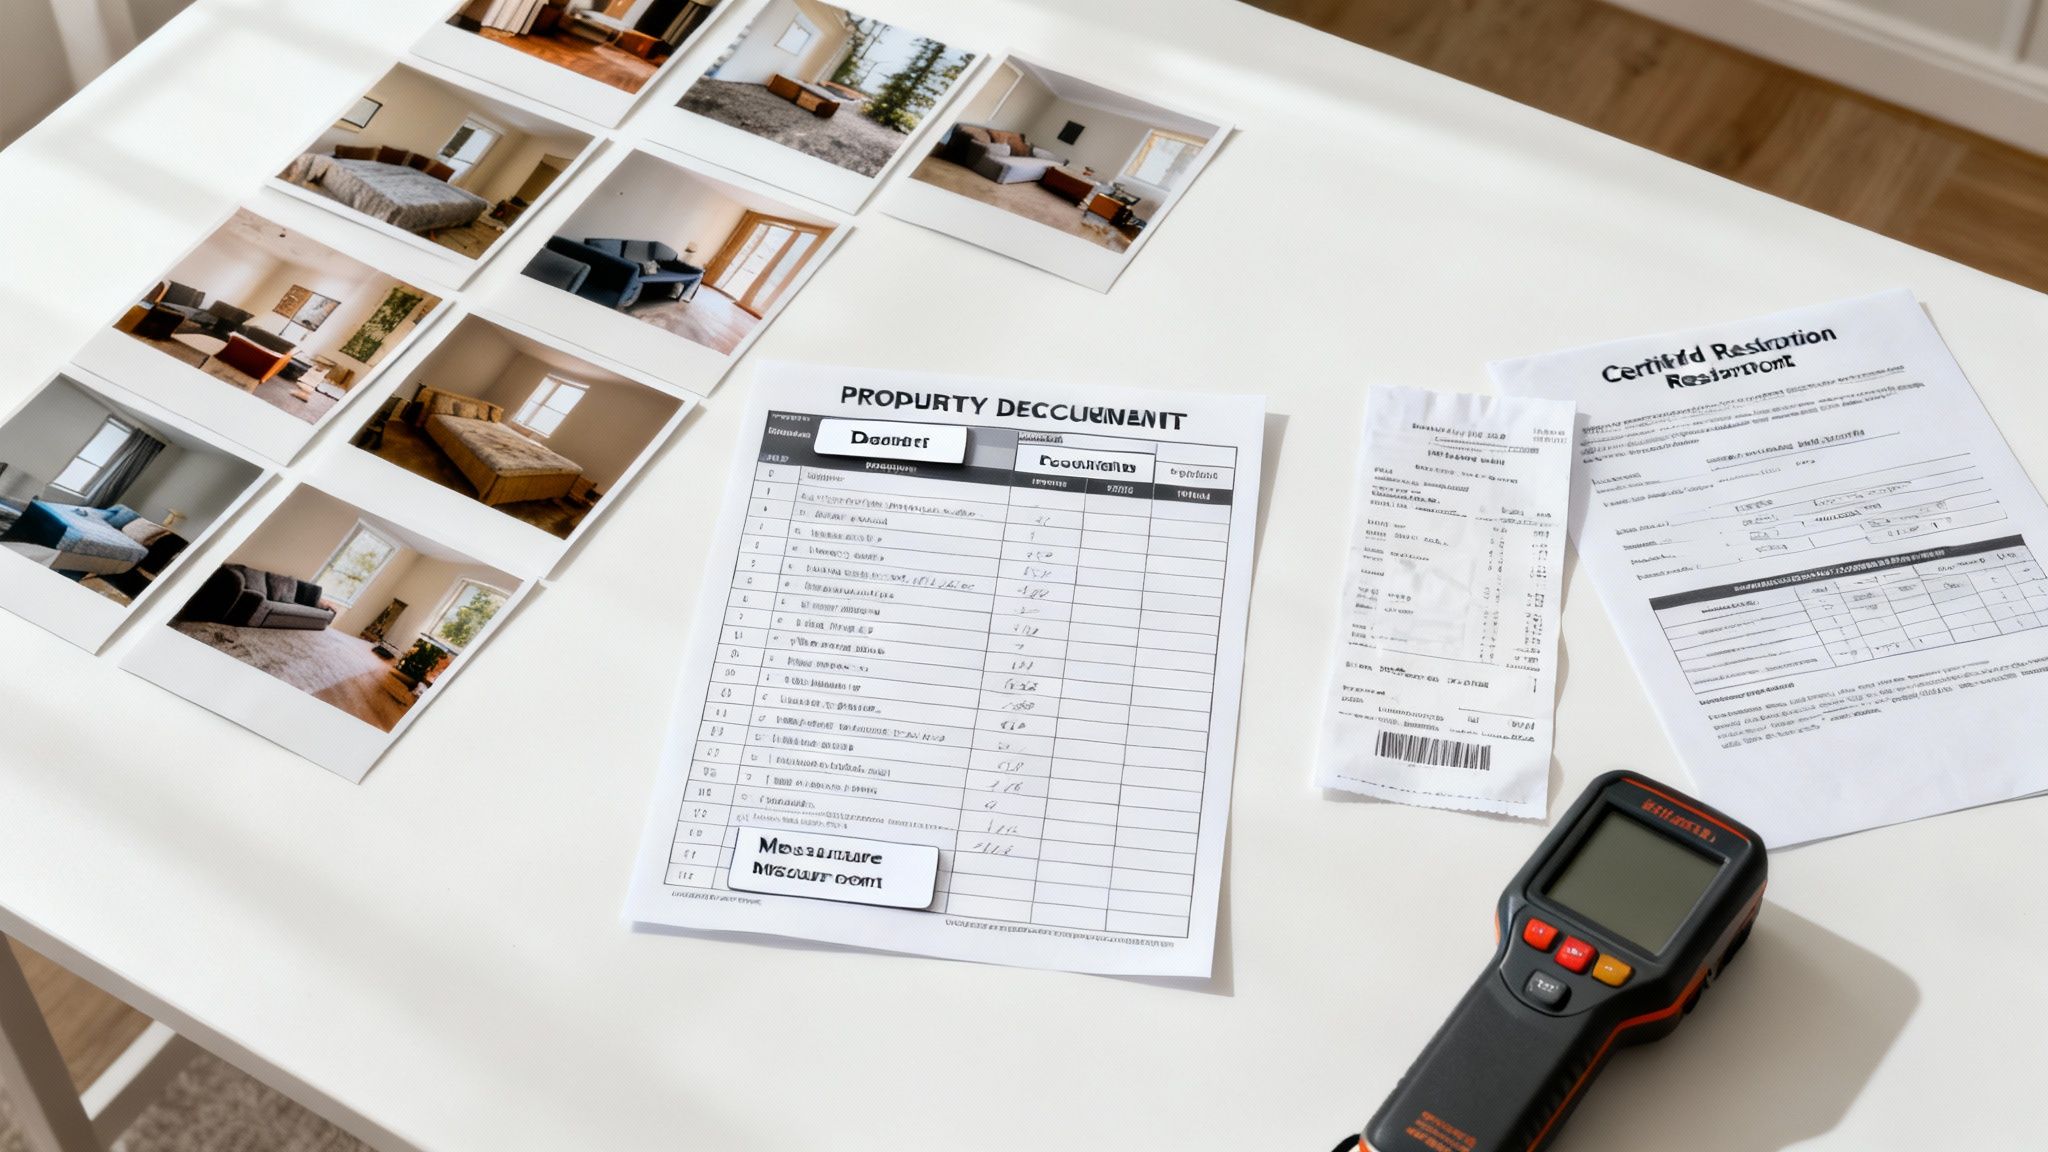
A successful insurance negotiation is rarely won during a heated phone call. It’s won long before that, in the quiet, methodical process of building an undeniable mountain of evidence.
Your goal is to create a claim so thorough, so detailed, and so well-supported that the adjuster has no legitimate reason to lowball it. Think of yourself as a detective building a case. Every photo, receipt, and expert opinion makes your position stronger, shifting the conversation from subjective opinions to objective facts.
The Power of Over-Documentation
From the moment you discover the damage, your mantra should be: document everything. You can never have too much proof. An adjuster might see a water-stained ceiling, but your documentation will show the burst pipe that caused it, the standing water that was extracted, and the moisture readings inside the wall cavity.
Your documentation toolkit should include:
- Hundreds of Photos and Videos: Get every angle you can think of—wide shots to show scope and close-ups to detail specific items. A video walkthrough where you narrate what you're seeing is incredibly effective.
- A Detailed Inventory: Create a spreadsheet listing every single item that was damaged or destroyed. Include the brand, model, age, and what you think it costs to replace.
- Receipts and Invoices: Keep a folder for every expense, no matter how small. That includes everything from emergency water extraction services to the tarp you bought to cover a damaged roof.
Your Most Powerful Tool: An Independent Assessment
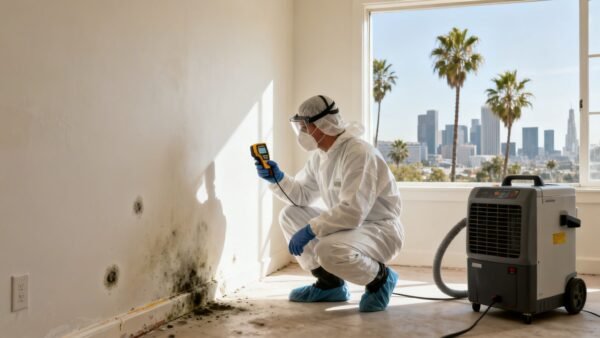
While your own photos and lists are crucial, the single most powerful piece of evidence you can have is a third-party assessment from a certified restoration expert. This is your professional counterweight to whatever the adjuster’s estimate says.
An adjuster works for the insurance company. A restoration professional like Onsite Pro Restoration works for you. Our job is to determine what it truly takes to return your property to its pre-loss condition according to industry standards.
An expert report from a certified technician provides objective proof that is difficult for an adjuster to dispute. It includes moisture meter readings, infrared thermal imaging results, and a detailed scope of work that justifies the necessary repairs, effectively neutralizing common arguments like "pre-existing damage."
This professional assessment becomes the foundation of your claim and the benchmark you’ll use to measure any settlement offer.
Building Your Damage Inventory
Creating a comprehensive list of lost or damaged items is tedious, but it’s absolutely essential. Don't just write "couch"; specify "Restoration Hardware Cloud Sofa, 3-piece sectional, purchased 2021." The more detail, the better.
For each item, try to find:
- Original Purchase Price: Dig up old receipts, bank statements, or credit card records if you can.
- Current Replacement Cost: Do some online research to find what a new, comparable item costs today.
- Age and Condition: Be honest about the item's condition before the damage happened.
When building your property damage claim, having a solid grasp of potential costs is everything. For instance, understanding the true costs of a new roof can dramatically strengthen your position if roof damage is part of your claim.
This detailed inventory not only proves your personal property loss but also shows you're taking this process seriously. By compiling this evidence, you transform a potentially contentious negotiation into an evidence-based discussion. For a deeper dive, learn more about managing an insurance claim for water damage and the specific documentation it requires. This level of preparation is how you negotiate with an insurance adjuster from a position of undeniable strength.
Mastering the Art of the Counteroffer
When the insurance adjuster’s first settlement offer lands in your inbox, don't be surprised if your stomach drops. It will almost certainly be lower than your contractor’s estimate—sometimes shockingly so.
Take a deep breath. This isn’t a final verdict; it's the opening bell for negotiations. That low number isn’t personal, it’s just business. The adjuster’s goal is to close your claim for the least amount possible, and they start low because many exhausted homeowners simply accept it to be done with the whole ordeal. You're not going to be one of them.
Why the First Offer is Always a Starting Point
To counter a lowball offer, you have to understand the logic behind it. Adjusters are juggling an insane workload, often managing between 50 to 100 claims every month. Speed and efficiency are their primary tools, and that includes making low initial offers to see who bites. It’s a strategy that works surprisingly often.
Remember, rejecting the first offer is standard practice. A staggering 95% of cases are settled before ever seeing a courtroom. Your calm, evidence-based rejection simply signals that you know your rights and are serious about a fair settlement.
Calculating Your Counteroffer Number
Before you even think about replying, you need your own number. This can't be a random figure you pull out of thin air; it must be a solid, defensible number rooted in the documentation you’ve carefully gathered. The detailed estimate from a trusted restoration company like Onsite Pro Restoration should be your foundation.
Here’s how to build your target settlement figure:
- Start with Your Contractor's Estimate: Use the total from the detailed scope of work. This is the baseline for direct labor and material costs to put your property back together.
- Add Your Personal Property Losses: Tally up the replacement value for every single damaged item from the inventory list you created.
- Factor in All Additional Expenses: Did you have to stay in a hotel? Pay for professional cleaning? Add every out-of-pocket expense you incurred because of the damage.
- Build in a Negotiation Buffer: It’s smart to add a 10-20% buffer to your total. This gives you room to negotiate down without ever dipping below what you actually need to finish the repairs.
This calculated number is the core of your counteroffer. If you’re unsure how specific repairs are priced, getting familiar with the components of water damage cleanup costs can give you a major advantage.
Real-World Scenario: A fire in a Burbank home causes major smoke damage. The insurer’s initial offer is $28,000, only covering basic painting and cleaning. The homeowner’s contractor provides a detailed $45,000 estimate that includes critical items the adjuster missed, like soot removal from the HVAC system, attic insulation replacement, and specialized deodorization. The homeowner calculates a counteroffer of $52,000 ($45,000 + a buffer) and sends it over with the contractor’s report as proof.
Crafting a Professional Response
Never, ever reject an offer verbally. Always put it in writing—usually an email—to create a clear paper trail. Your counteroffer letter needs to be firm, professional, and built entirely on the evidence you've collected.
Your letter should clearly state three things:
- You are formally rejecting their initial offer of [Amount].
- Your counteroffer is [Your Calculated Amount].
- A point-by-point breakdown of why their offer is too low, referencing your contractor’s estimate and other documents directly.
Attach your contractor’s line-item estimate, all relevant photos, and your detailed inventory list to the email. When you tie every dollar you’re asking for to a specific, documented need, you transform the conversation from an emotional plea into a business negotiation. This methodical approach is the key to learning how to negotiate with an insurance adjuster and getting the fair outcome you deserve.
Common Insurance Adjuster Tactics and How to Respond
Negotiating with an insurance company feels like a strategic game, and frankly, it is. Adjusters are trained pros, and they come to the table with a playbook designed to minimize what the insurance company pays out. Knowing their common moves is the key to protecting your interests.
This isn't about starting a fight. It's about being prepared. When you can spot these tactics as they happen, you can stay in control of the conversation and guide it back to a fair settlement based on the actual facts of your claim.
The Recorded Statement Pressure
Almost immediately after you file a claim, you'll likely get a push for a recorded statement. The adjuster will make it sound like a routine, harmless step that’s required to get the ball rolling.
They’ll say something like, "I just need to get your recorded statement to get the facts of what happened. It will only take a few minutes."
Your best move is to politely but firmly decline. You are rarely obligated to provide a recorded statement. A better response is: "I'm not comfortable providing a recorded statement right now, but I'm happy to answer any specific questions you have in writing via email." This simple sentence does two crucial things: it prevents your words from being twisted later and creates a clean paper trail.
Intentional Delays and Radio Silence
This one is frustratingly common. The adjuster goes quiet. Your claim seems to fall into a black hole. They know that the longer things drag on, the more stressed and financially strained you become, making you far more likely to accept a low offer just to end the nightmare.
You'll see this when weeks go by without a single reply to your emails or calls. When you do manage to get someone on the phone, the adjuster is always "in a meeting" or conveniently "out of the office."
The countermove? Document everything. Every call, every email, every voicemail. After leaving a message, immediately send a follow-up email summarizing the call and stating you’re waiting for their response. If the delays get out of hand, a more formal email referencing your policy's "good faith" clause and requesting an update within 48 hours can work wonders.
Key Takeaway: Consistent, documented follow-up is your best defense against delays. It builds a record of their unresponsiveness, which can be powerful leverage if you need to escalate the claim later.
Misinterpreting Your Policy Language
Adjusters know your insurance policy inside and out—and they can use that knowledge to interpret clauses in the company's favor. A classic example is denying coverage by labeling water damage as "gradual seepage" instead of a "sudden and accidental discharge." This distinction is critical, as you can learn by researching homeowners insurance coverage for water damage.
You'll hear phrases like, "Unfortunately, your policy doesn't cover damage from long-term leaks," even when a pipe obviously burst last night.
When this happens, ask them to put their reasoning in writing, citing the exact policy language they are using to justify their position. Once you have that, you can push back with your own documentation—your copy of the policy, photos, and the detailed report from your restoration contractor.
This simple graphic breaks down how to structure your counteroffer.
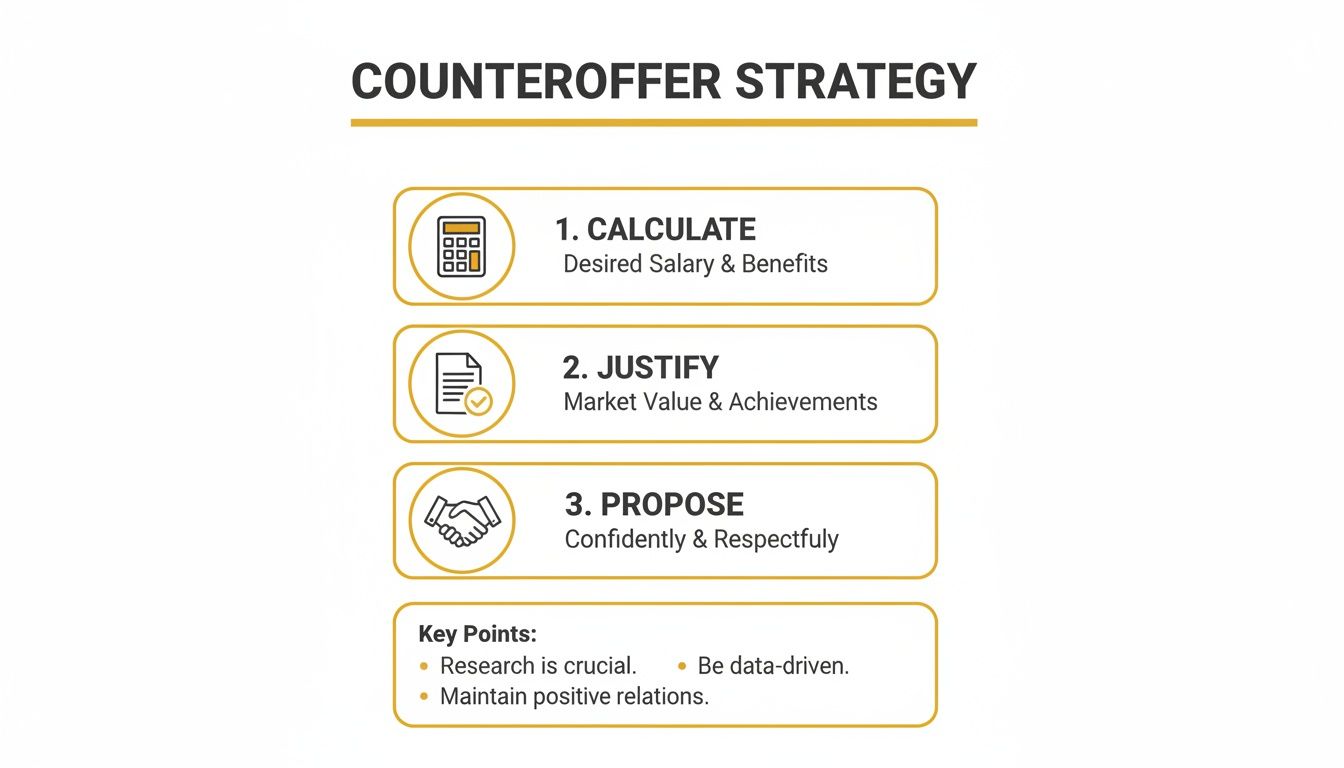
Each step logically builds on the last, helping you turn your evidence into a professional proposal that’s much harder for an adjuster to simply dismiss.
The Quick, Lowball Offer
This is probably the most common tactic of all: the fast, low settlement offer. It’s a test. They throw out a number hoping your stress and desire for a quick fix will make you say "yes" without thinking it through.
It usually happens within days of the incident. The adjuster calls with an offer that might seem okay at first glance, but it doesn't come close to covering the detailed estimate from your contractor.
Never, ever accept the first offer. Thank them for it, but state clearly that you are still assessing the full extent of the damages and will be submitting your own documentation for their review. This immediately signals that you're an informed homeowner who won’t be rushed into an unfair deal.
Decoding Adjuster Tactics and Your Strongest Responses
To make it even easier to spot these strategies, we've put together a quick-reference table. Think of this as your cheat sheet for those tough conversations.
| Adjuster Tactic | Why They Use It | Your Best Response |
|---|---|---|
| Requesting a Recorded Statement | To get you on record, potentially finding contradictions or admissions that can be used to limit or deny the claim. | "I'm not comfortable with a recorded statement, but I can answer specific questions in writing." |
| Delaying Communication | To increase your frustration and financial pressure, making you more likely to accept a low offer just to be done. | Document all communication attempts. Follow up voicemails with emails and set reasonable deadlines for a response. |
| Misinterpreting Policy Language | To find loopholes or cite vague exclusions that benefit the insurer, even if they don't fully apply to your situation. | "Please send me that denial in writing, citing the specific policy language you are referencing." |
| Making a Quick, Lowball Offer | To test if you're in a hurry or uninformed. They hope you'll take the fast money without doing your homework. | Never accept the first offer. Thank them and state you'll be submitting your own detailed estimate for review. |
| Using Preferred Contractors | Their contractors may have an incentive to keep repair estimates low to maintain a good relationship with the insurer. | You have the right to choose your own contractor. Get multiple independent estimates to ensure the scope is accurate. |
Understanding these moves ahead of time empowers you to stay calm and focused on the facts. It’s not about being adversarial; it’s about ensuring the outcome is fair and your property is restored correctly.
When to Escalate and Call for Reinforcements
You’ve done everything right. You documented every detail, submitted a solid counteroffer, and handled the adjuster's tactics with calm confidence. Still, the negotiation has hit a brick wall.
Sometimes, despite your best efforts, an insurance company simply refuses to play fair. This isn’t a sign you failed—it’s a critical decision point. Knowing when to stop going it alone and bring in professional help is a strategic move, not an admission of defeat. It's about leveling the playing field when the game gets lopsided.
Telltale Signs You Need Professional Help
Knowing when to call for backup can save you months of stress and thousands of dollars. If you see any of these red flags, it’s time to seriously consider getting reinforcements.
Key indicators include:
- A Bad Faith Denial: The insurer denies your claim for reasons that flat-out contradict the clear language in your policy or the mountain of evidence you’ve provided.
- Major Structural Damage: Your claim involves serious damage to the foundation, roof, or structural frame of your home, like after a major fire in a Beverly Hills property. The stakes are just too high to handle alone.
- The Adjuster Goes Silent: They refuse to budge from an absurdly low offer, ignore your evidence, or just stop responding to your calls and emails altogether.
- The Blame Game: The adjuster insists the damage was caused by a "pre-existing issue" or "poor maintenance," even when you have expert reports proving otherwise.
When you run into these scenarios, you're no longer in a simple negotiation. You're in a dispute that requires specialized expertise.
Understanding Your Two Main Allies
When it’s time to escalate, you generally have two types of professionals to turn to: public adjusters and attorneys. They serve different, but sometimes overlapping, roles in getting you the settlement you deserve.
The Public Adjuster
A public adjuster is a state-licensed insurance pro who works exclusively for you, the policyholder. They are absolute experts at interpreting dense insurance policies and documenting property damage down to the last nail. They take over the entire claim process for you—from assessment and documentation to negotiating directly with the insurer.
Public adjusters typically work on a contingency fee, which means they get a percentage of the final claim settlement—usually 10-20%. Their involvement often leads to a significantly higher payout, making their fee a worthwhile investment. In fact, the data on this is pretty staggering.
While 97% of litigated insurance claims settle before trial, effective negotiation is key. Public adjusters, paid on contingency, have been shown to increase homeowner payouts by an average of 711% compared to what homeowners achieve on their own. Discover more insights about these powerful negotiation statistics.
The Insurance Attorney
An attorney becomes necessary when your claim involves a lawsuit, a serious breach of contract, or accusations of bad faith by the insurer. If the insurance company has acted unethically or illegally, a lawyer can sue them not just for the value of your claim, but for additional damages.
Like public adjusters, most property damage attorneys also work on a contingency basis, though their percentage might be higher, often 33-40% of the settlement. You should consider hiring an attorney if the insurer is outright refusing to pay a valid claim or if you've suffered a significant personal injury in addition to the property loss.
Making the right choice is crucial. A public adjuster is often the best first move for a stalled negotiation over the value of your claim. If that doesn't work or if legal action is required, an attorney is your next call.
Partnering with a skilled team ensures your property is put back together the right way. Find out more about how a professional restoration team can support your claim.
Answering Your Insurance Negotiation Questions
Going head-to-head with an insurance company on a property damage claim always brings up tough questions. This section tackles the most common hurdles Los Angeles homeowners run into during negotiations, giving you direct, experienced advice to strengthen your position and give you more confidence.
What Should I Do If the Adjuster's Estimate Is Much Lower Than My Contractor's?
First, don't panic. This happens all the time. It's a standard opening move, and your first step is to politely but firmly refuse their initial offer. Think of it as a starting point for discussion, not the final word.
Ask the adjuster for a detailed, line-by-line breakdown of their estimate. When you get it, you’ll likely find the gaps pretty quickly. They often leave out essential steps (like replacing attic insulation after a fire), price for lower-quality materials, or use outdated labor costs that don''t reflect the reality of working in the Los Angeles area.
Now, counter with the detailed estimate from your trusted contractor. Your job is to highlight the differences and clearly explain why each item your contractor included is necessary to bring your property back to its pre-loss condition. That’s the entire point of your insurance policy.
Key Takeaway: Your contractor’s professional estimate isn’t just another number—it’s your most powerful negotiation tool. It’s an expert, evidence-based report that details the real work needed. Stand firm on a complete and proper repair.
How Long Should I Wait for a Response to My Counteroffer?
Insurance companies are legally required to handle claims in good faith and in a timely manner. Here in California, insurers generally have 15 calendar days to acknowledge communications from you.
If you’ve sent a solid counteroffer with all your supporting documents and haven't heard a peep within two weeks, it's time to follow up. A polite but firm email reminding them of your position and asking for a status update is the right next move.
Be sure to document every single communication attempt. If the delays start to feel excessive or intentional, you might be dealing with a bad faith tactic meant to wear you down. This is a huge red flag and a clear signal that it's time to bring in a public adjuster or an attorney.
Can I Start Repairs Before the Claim Is Settled?
You should only tackle temporary repairs that are absolutely critical to prevent more damage. Think emergency water extraction for a burst pipe in your Burbank home or boarding up a window that was shattered in a storm.
Document these emergency measures meticulously and save every single receipt. However, do not start any permanent, large-scale restoration work until you have a signed, written agreement on the scope of work and settlement amount from your insurer.
Jumping the gun on major repairs can give the adjuster an excuse to deny parts of your claim. They might claim they couldn't properly assess the original damage because you already altered the scene. Protect your claim by waiting for the official go-ahead.
The Adjuster Says My Damage Was Caused by Gradual Seepage and Isn't Covered
This is one of the oldest tricks in the book. Standard homeowner's policies often exclude damage from long-term leaks and deferred maintenance, but they do cover "sudden and accidental" events. The adjuster is trying to push your emergency into an uncovered maintenance category.
This is exactly where your professional documentation becomes your saving grace. An expert assessment from a certified restoration company can pinpoint the true origin of the water to a sudden event, like a failed appliance hose or a burst pipe under the slab. Their report, complete with moisture readings and photos, is a direct rebuttal to the "gradual seepage" claim.
Present this expert report to the adjuster and point to the specific language in your policy that covers sudden and accidental events. It’s also important to know if your policy covers other unique situations—for example, Does Home Insurance Cover Suicide Cleanup—and what to ask your provider. If the adjuster still won't budge after seeing your proof, it’s a clear sign you need to escalate.
Navigating a property damage claim is complex, but you don't have to do it alone. If your insurance adjuster is giving you the runaround, Onsite Pro Restoration can provide the expert documentation and support you need to build an undeniable claim.