Meta description: Moisture barrier installation in Los Angeles homes. Learn where it goes, what materials work, and when a vapor barrier alone won't solve moisture issues.
SEO title tag: Moisture Barrier Installation in Los Angeles
A musty smell under the house, damp flooring near an exterior wall, or a crawl space that never seems to dry out usually means the same thing. Ground moisture is moving into the structure, and moisture barrier installation is often part of the fix.
For many Los Angeles homeowners, especially in older homes in Sherman Oaks, Glendale, and Burbank, the question isn't whether moisture is a problem. It's whether a simple sheet of plastic will solve it, where it should go, and how to install it without trapping moisture where you don't want it.
A moisture barrier, often called a vapor retarder, is a low-permeability material that slows water vapor movement through floors, walls, or exposed soil. Done right, it helps protect framing, insulation, indoor air quality, and finishes. Done wrong, it can hide leaks, trap moisture, and create a bigger restoration job later.
Why Your LA Home Needs a Moisture Barrier
If your house has a crawl space and you smell damp air after a marine layer morning or a rainy week, don't ignore it. In Los Angeles, moisture problems don't always show up as standing water. They often show up as a persistent odor, darkened wood, rusting hardware, swollen flooring, or mold around registers and baseboards.
Older homes in neighborhoods like Glendale and Sherman Oaks often have vented crawl spaces, inconsistent insulation, and years of patchwork repairs. That combination lets ground vapor move upward into the framing and living space. A proper moisture barrier blocks that vapor path at the source.
The code side matters too. The 2021 IRC requires a continuous Class 1 vapor barrier for exposed earth in unvented under-floor spaces, and the same market research projecting the global vapor barrier market to USD 19.9 billion by 2033 shows how standard this has become in modern construction and remediation, according to vapor barrier market research and code summary.
If you're comparing assemblies and trying to understand how crawl spaces differ from basements, this guide on basement vs crawl space differences is a useful starting point.
Practical rule: If the soil under the house is exposed and the air under the house smells earthy or stale, the barrier isn't a cosmetic upgrade. It's part of moisture control.
For homeowners who want a second perspective on how insulation and moisture control work together, this Florida homeowner's insulation guide is worth reading. The climate is different, but the core lesson holds up: vapor control has to match the assembly, not just the material.
What a Moisture Barrier Actually Does
A moisture barrier doesn't stop every water problem. It doesn't fix bulk water intrusion from bad grading, plumbing leaks, or an active foundation seep. What it does is reduce vapor movement from damp soil or adjacent materials into the building assembly.
That matters because vapor can do slow damage. It can feed mold growth, soften wood over time, and keep a crawl space humid enough that insulation sags and ducts sweat.
Why Los Angeles Homes Need a More Careful Answer
LA sits in a mixed reality. You may have dry stretches, coastal humidity, intermittent rain, old venting details, and air conditioning that changes the direction of moisture drive. That's why simple advice like "always put the barrier on the warm side" often fails in real houses here.
Choosing Your Materials and Planning the Layout
Material choice comes before labor. If the material is wrong for the assembly, the install can look clean and still fail.
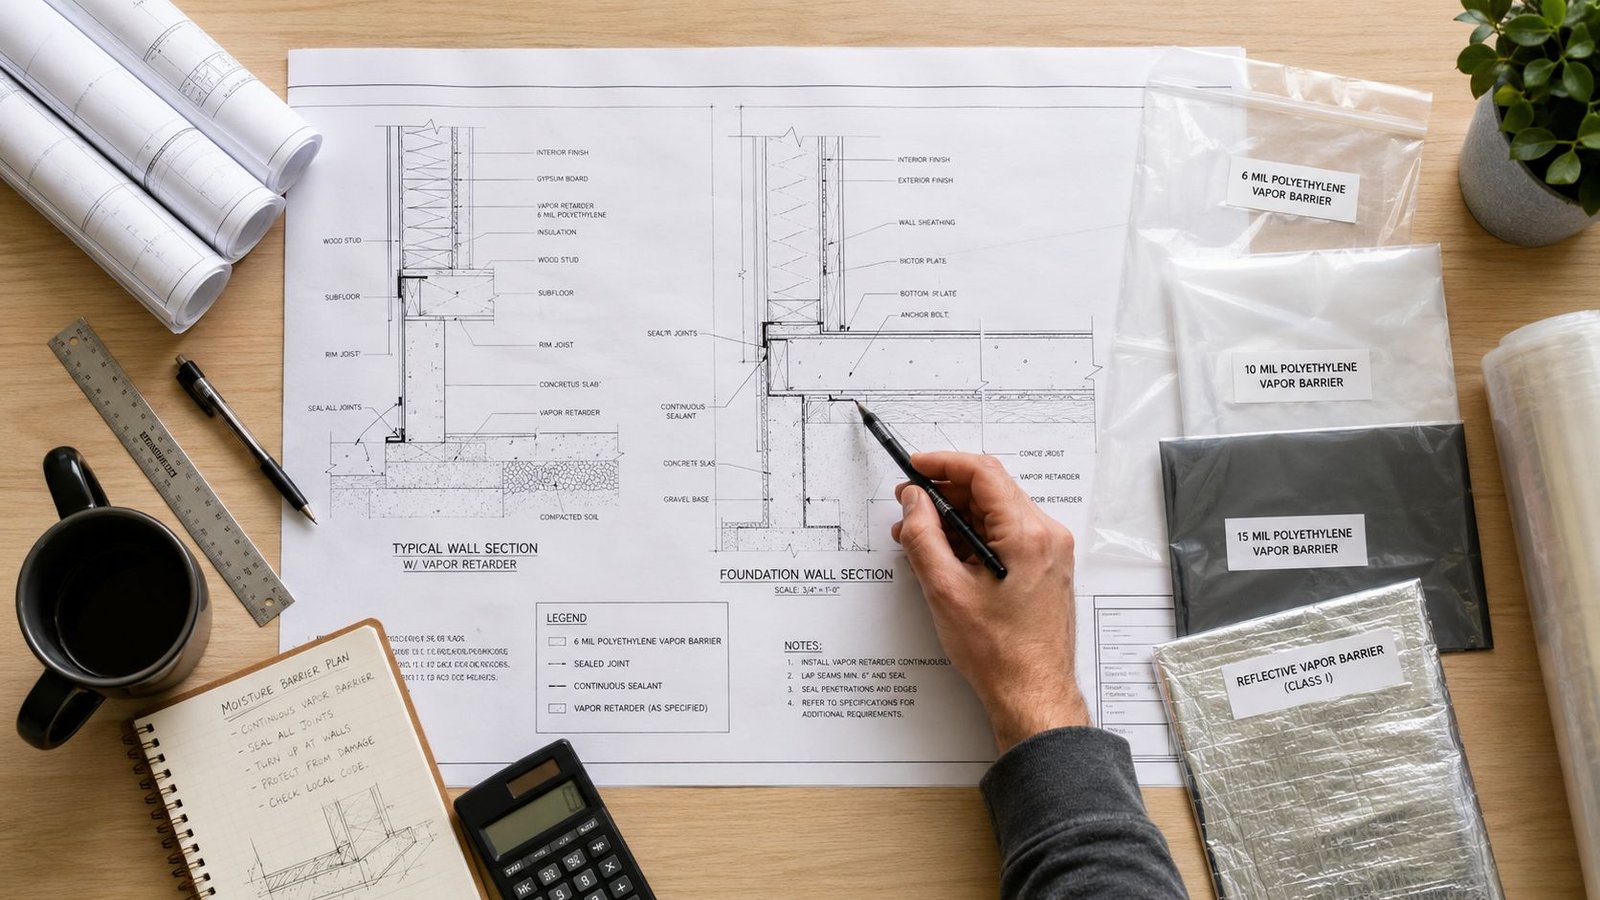
Start with perms, not just thickness
The technical measurement behind vapor control is permeance, measured in perms. A material with a perm rating of 1.0 allows 1 grain of water vapor to pass through 1 square foot of material under a 1-inch mercury vapor pressure difference, according to the University of Alaska Fairbanks guide on water vapor permeability.
That same guidance notes that 6-mil polyethylene has a perm rating of 0.06, which places it in Class I. It also shows how permeability changes by material and thickness: 0.002-inch polyethylene is 0.16 perms, 0.0006-inch polyethylene is 0.06 perms, and aluminum foil can be as low as 0.01 perms.
That tells you two things.
- Low perm materials block vapor well. That's what you want over exposed soil or in selected assemblies.
- Low perm materials can also trap moisture. If you put them on the wrong side, the assembly may dry in the wrong direction.
What I recommend for crawl spaces
For a basic residential crawl space, 6-mil poly is the minimum baseline. For tougher conditions, technical guides commonly recommend 10-mil or 20-mil material because it resists punctures better and holds up better during service work and inspections.
Use layout planning before you cut anything.
- Measure the longest runs first. Fewer seams usually means fewer failure points.
- Plan wall turn-ups. The sheet should continue up the wall, not stop flat at the edge.
- Map every pier and penetration. Pipes, conduit, ducts, and columns decide how much patching you'll need.
If you're weighing scope and budget, this page on average basement waterproofing cost factors helps frame where barrier work fits into a larger moisture-control project.
Where the barrier goes in Los Angeles homes
Placement is where many DIY jobs go wrong. Building science guidance commonly says vapor barriers go on the outside in hot, humid climates and on the inside in cold climates. But for California homes with seasonal humidity swings and air conditioning, the decision depends on whether the primary moisture drive is outside-in or inside-out, as discussed in this building science video on vapor barrier placement.
In mixed-climate homes, there isn't a one-size-fits-all side. You have to ask where moisture starts, where conditioned air sits, and how the assembly is supposed to dry.
In practical terms, that means a crawl-space ground barrier is usually straightforward. Wall and floor assemblies are not. If you're dealing with a retrofit in a 1950s house in Burbank or a hillside property with intermittent AC use, placement needs actual diagnosis.
Essential Site Preparation Before You Begin
Most failed moisture barrier jobs don't fail because the plastic was too thin. They fail because somebody covered a problem instead of fixing it.
Technical guidance is clear on the sequence. Contractors should remove debris and damaged insulation, smooth the substrate, and seal rim joists and penetrations before installing the polyethylene sheeting, as outlined in this crawl space vapor barrier installation guide.
In our experience restoring homes in Burbank and Glendale, moisture below the house is often a symptom, not the root cause. We check for leaks, wet soil conditions, air leakage, mold growth, and decayed framing before laying a single sheet.
What to remove and what to inspect
Start with the obvious physical hazards. Sharp stone, broken concrete, nails, old metal straps, and splintered wood will puncture the membrane. Wet or fallen insulation should come out, because it hides damage and keeps the space damp.
Then look at the structure itself.
- Dark or softened wood can indicate prolonged moisture exposure.
- White residue on masonry can point to moisture movement through concrete or block.
- Rust on fasteners or hangers suggests repeated damp conditions.
- Visible microbial growth means the barrier work needs to pause until the contamination issue is addressed.
If you're not sure whether materials are still wet, a proper reading matters more than guesswork. This guide on how to read moisture meter readings will help you understand what technicians are looking for.
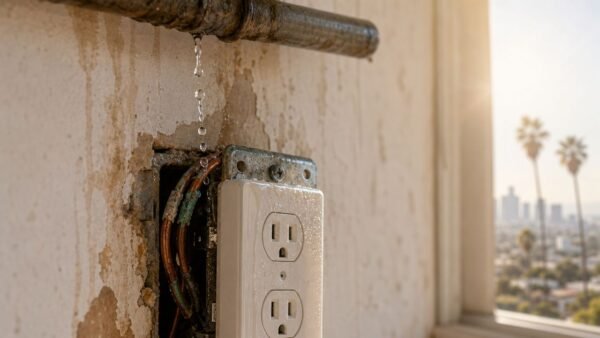
Fix water entry before you cover the ground
A moisture barrier isn't a cure for active water intrusion. If grading sends water toward the foundation, if a condensate line drips into the crawl space, or if a supply line has a slow leak, the barrier will only hide the issue.
Don't install over standing water, rotted framing, or active mold. The barrier should cap a controlled environment, not bury an ongoing failure.
Before installation, I want to see a dryable space, sealed obvious openings, and no unresolved source of liquid water.
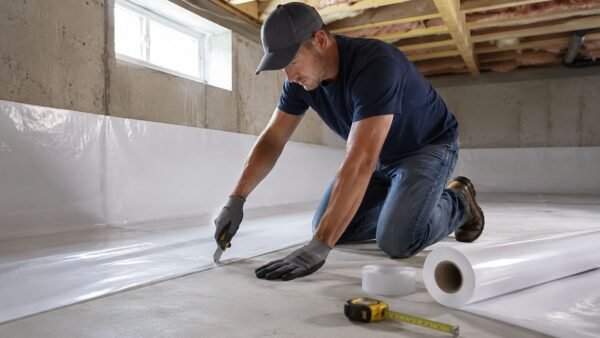
Installing the Moisture Barrier Sheets Correctly
Even neat-looking work can still go wrong. The goal isn't to throw plastic over the dirt. The goal is to build a continuous system that limits vapor bypass.
A solid installation workflow starts by pre-cutting manageable sections, staging the rolls near the work area, and keeping the membrane off rough edges as much as possible. Dragging long sheets across jagged soil or concrete is how punctures happen before the barrier is even in place.
Build the floor first, then the vertical surfaces
Lay the main sheets across the floor area with at least 6-inch overlaps. In crawl spaces, technical guidance also calls for 6 to 12-inch wall turn-ups and taped seams, which keeps the assembly continuous rather than leaving the edges open.
Work in a sequence that reduces traffic over finished areas. Once a section is down and aligned, avoid kneeling on tools or twisting the sheet under your boots. Small abrasions become future leak points.
A clean sequence usually looks like this:
- Dry-fit each run so you know where seams land.
- Lay the center field first across the exposed ground or slab.
- Turn the material up the perimeter walls with enough extra at the top for final sealing.
- Wrap piers and columns carefully instead of trying to force one sheet around every obstacle.
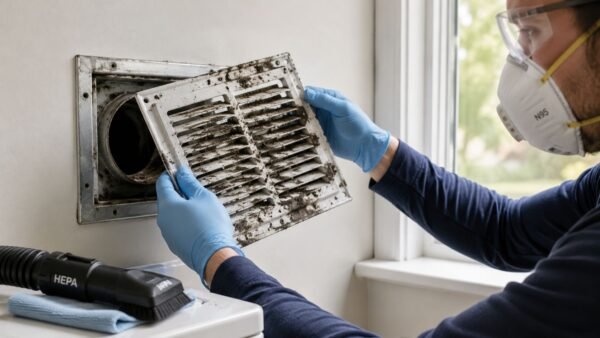
If the crawl space already has mold concerns, barrier work should be coordinated with remediation, not treated as a substitute. This page on mold remediation in crawl space conditions explains why.
Here's a visual overview of the process in the field:
Why continuity matters more than appearance
A lot of DIY installs look fine from the access hatch. Then you crawl all the way in and find open edges behind piers, missing patches around pipe groups, or loose turn-ups that fell off the wall.
What works is repetition and consistency.
- Pre-cutting reduces accidental tears.
- Long, straight seam lines are easier to tape and inspect.
- Extra material at corners gives you room to fold and patch instead of stretching the membrane thin.
- A final inspection pass catches lifted edges before the crawl space gets closed up.
A barrier only performs as well as its weakest gap. One bad corner can undo a lot of careful work.
Sealing Seams and Penetrations for an Airtight Finish
This is the part homeowners usually underestimate. They assume the heavy sheet does the work and tape is just cleanup. It's the opposite. The sheet blocks vapor. The sealing makes the system continuous.

The most common failures come from seam gaps, punctures, and untreated penetrations. Guidance for crawl-space systems stresses using manufacturer-approved butyl or acrylic tapes, rolling seams to remove air pockets, and patching around plumbing and wiring with a tight first patch plus a larger cover patch, as described in Polyguard's crawl space vapor barrier installation guidance.
Tape choice matters
Generic duct tape isn't made for this job. It dries out, lifts, and loses bond in dirty or humid conditions. Use the tape the membrane manufacturer approves, then press and roll the seam so it bonds to the full surface.
A good seam has three qualities:
- Clean contact surfaces
- Full overlap with no fishmouths or wrinkles
- Pressure applied after taping
How to seal around pipes, wires, and piers
Penetrations need custom cuts. Don't slash an oversized X and hope tape will save it. Cut tight to the object, wrap the first patch snugly, then add a second larger patch that bridges onto the surrounding field membrane.
Corners need the same discipline. Fold them deliberately, keep the membrane flat, and patch stress points where the plastic wants to spring back.
Small openings create moisture bypass paths. If air and vapor can find the gap, they will.
A final walk-through should include every seam, every patch, and every edge termination. If an edge is lifting now, it won't stay sealed later.
DIY Installation vs Hiring a Restoration Professional
Some moisture barrier jobs are reasonable DIY projects. A small, dry crawl space with good access, no standing water, no mold, and no structural damage can be manageable if you're careful.
A lot of LA homes don't fit that description.
Lowe's guidance advises homeowners not to take on crawlspace encapsulation without consulting a licensed professional first. It also notes that technicians may need to fix grading and drainage problems, check moisture levels with a meter, replace rotten structural members, or add a dehumidifier because a barrier alone doesn't solve active water issues, as outlined in Lowe's crawlspace vapor barrier guidance.
When DIY makes sense
- The area is dry now and stays dry after rain.
- Access is simple and you can work without crawling over hazards.
- There are no signs of mold or wood decay.
- You're installing a ground vapor barrier, not trying to redesign a wall assembly.
When you need a pro
If you smell mold, see rot, find efflorescence, or notice chronic humidity, bring in a specialist. In those situations, the membrane is only one part of the repair.
One local option is Onsite Pro Restoration's certified restoration team, which handles moisture assessment, water damage restoration, and related remediation work in Los Angeles-area properties.
Checklist for Hiring a Moisture Barrier Pro in Los Angeles
| Question | Why It Matters |
|---|---|
| Are you IICRC-certified? | Certification shows the contractor works within recognized restoration standards. |
| Are you licensed and insured in California? | You need protection if hidden damage or site hazards complicate the job. |
| How do you check for active moisture before installation? | A barrier should never go down before the source is understood. |
| Do you handle mold, rot, or wet insulation if found? | Many crawl spaces need more than membrane work. |
| What product and seam tape system do you use? | Compatibility matters at seams and penetrations. |
| How do you deal with drainage or grading issues? | Exterior water management can determine whether the barrier succeeds. |
| Do you document the work? | Photos of seams, patches, and terminations make later inspection easier. |
If your crawlspace has standing water, visible mold, or a persistent damp smell, a simple barrier isn't enough. You need diagnosis first, then correction.
Frequently Asked Questions About Moisture Barriers
A lot of Los Angeles homeowners ask the same question after finding a damp crawl space under a 1940s bungalow or a musty smell in a hillside home. Will a moisture barrier solve the problem, or just cover it up? The answer depends on what is driving the moisture in the first place.
Is 6-mil poly enough for moisture barrier installation
For many homes, yes. Six-mil poly is a common baseline material because it slows vapor movement well enough for standard residential applications.
In older LA homes with rough crawl space soils, exposed debris, low clearances, or service traffic from plumbers and HVAC techs, I usually see durability become the bigger issue. Thicker material often holds up better against punctures and torn seams. If the membrane gets damaged a few months after installation, the lower material cost did not save much.
Can a moisture barrier trap moisture
Yes, if it is installed without understanding the assembly.
That happens in homes with existing wet framing, active leaks, or moisture entering from the wrong side of the building envelope. Coastal conditions, cool nights, and mixed-climate swings in Los Angeles can make moisture behavior less predictable than homeowners expect. A barrier blocks vapor movement. It does not dry wet wood, stop plumbing leaks, or correct poor ventilation by itself.
Will a barrier fix a musty crawl space by itself
Sometimes, but not reliably.
A musty smell often points to mold growth, damp insulation, rodent contamination, soil gas issues, or chronic ground moisture that has been there for years. In many LA crawl spaces, especially under older homes, the membrane is one part of the correction plan, not the whole repair. If the odor source stays in place, the smell usually comes back.
What is the biggest installation mistake
Poor sealing is the failure I see most often.
Open laps, loose patches around piers, bad cuts at pipe penetrations, and wall terminations that peel away let moisture bypass the sheet. The other common mistake is installing a barrier over an active problem, such as seepage, condensation, or wet insulation, and calling the job done. That is how homeowners end up paying twice.
If your Los Angeles home has a damp crawl space, musty odor, or signs of hidden moisture, get the assembly checked before you cover it up. Onsite Pro Restoration provides moisture assessment, water damage restoration, and remediation support across Los Angeles, including North Hollywood, Glendale, Burbank, and Sherman Oaks. Call 818-336-1800 for an inspection.