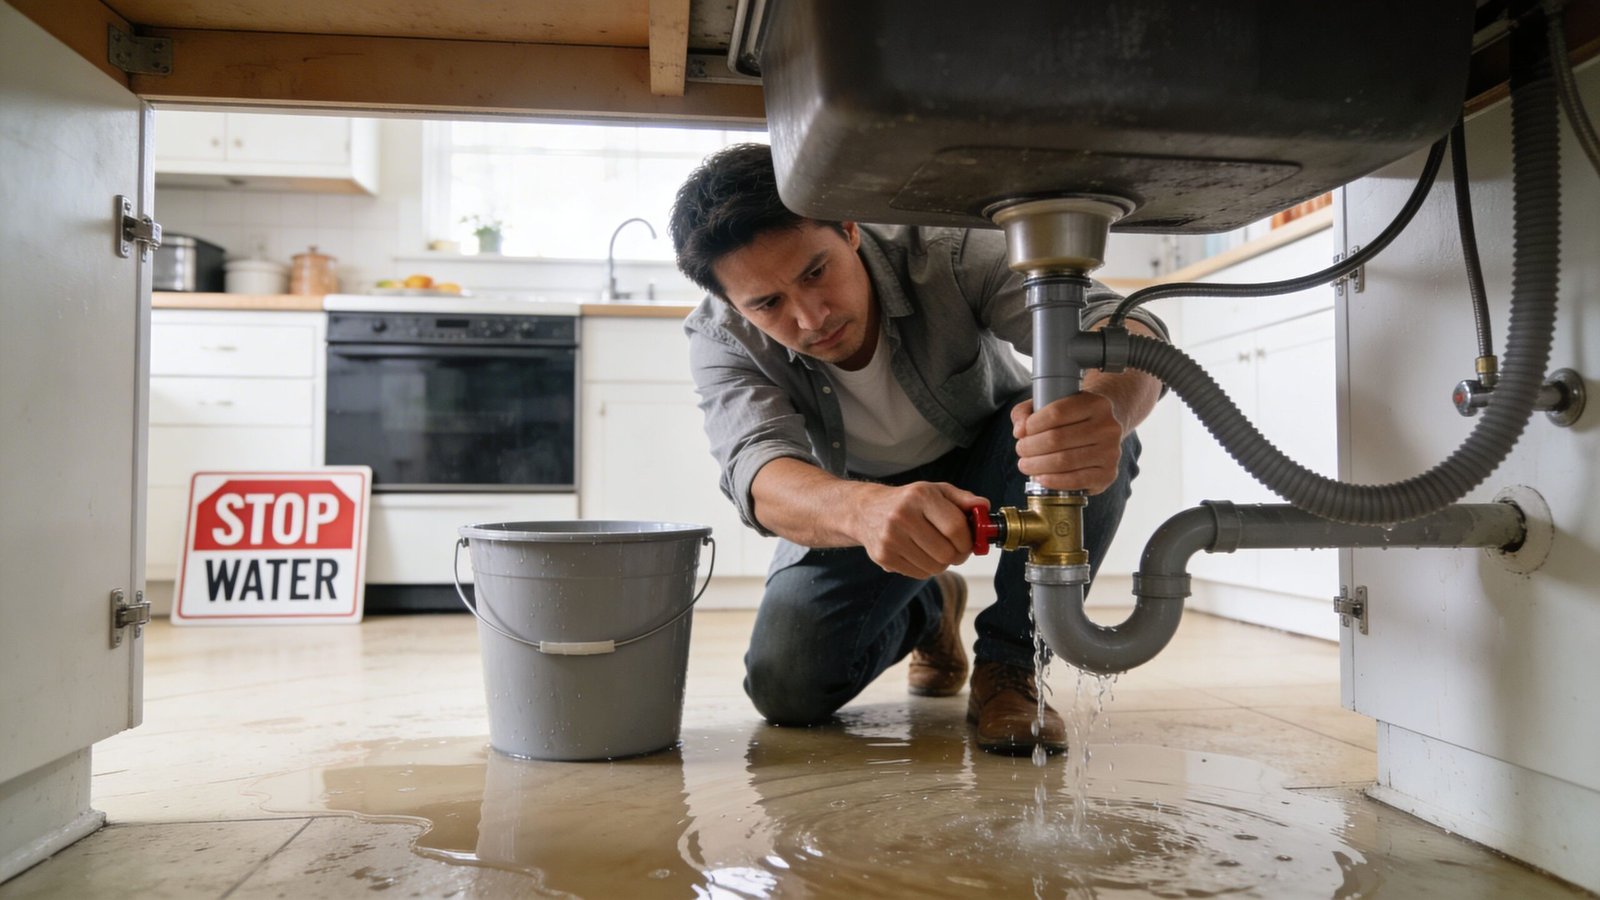
A pipe lets go under the sink in Sherman Oaks. You hear it before you see it. Then you open the cabinet and find water spreading across the kitchen floor, slipping under baseboards, heading toward the hallway, and turning a normal morning into a property emergency.
That’s usually the moment people start making expensive decisions too fast. They grab towels, pull out a box fan, and assume water damage home repair means drying what’s visible and patching whatever stains remain. It doesn’t. The job involves stopping the source, protecting people, documenting the loss, removing water correctly, and drying the structure completely before repairs begin.
If you’re in that first-wave panic, take a breath. This is common, even if it feels personal. Water damage affects many people in the U.S. daily and it’s a very common home insurance claim, with the average payout for water damage claims averaging $13,954 according to iPropertyManagement’s water damage statistics.
If you’re not even sure how serious the problem is yet, start by reviewing the common signs of water damage. Stains, swelling, soft drywall, warped flooring, and musty odor often mean the visible wet spot isn’t the whole loss.
That Sinking Feeling When You Discover Water Damage
What homeowners usually notice first
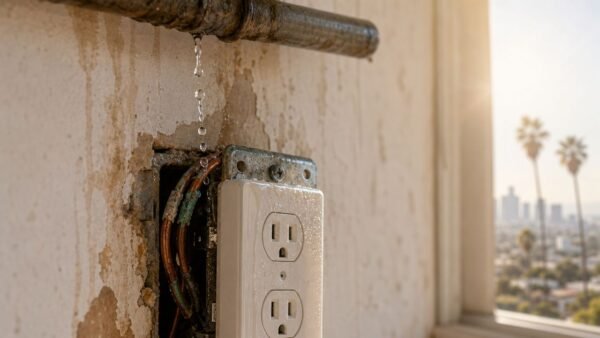
In Los Angeles homes, the first clue is often small. A warm patch on hardwood. A bubbling paint line near a window. A ceiling stain under an upstairs bath. In older neighborhoods, supply lines, angle stops, refrigerator lines, and aging drain connections cause a lot of sudden interior losses.
What turns a manageable incident into a bigger one is delay. Water moves fast through drywall, insulation, subfloors, and framing. It doesn’t stay where it started.
What matters in the first few minutes
Your priorities aren’t cosmetic. They’re safety and containment.
Focus on four things:
- Stop active water flow: Shut off the fixture valve if you can reach it safely.
- Protect people: Keep children and pets out of affected rooms.
- Preserve evidence: Take photos and video before you move items.
- Limit spread: Block migration with towels only if it’s safe and the water source is clean.
Practical rule: Don’t judge the loss by what you can see from standing height. Water often travels under flooring, behind cabinets, and inside wall cavities before surface damage looks dramatic.
Why calm decisions save money
Many homeowners lose time deciding whether the damage is “bad enough” to call for help. That hesitation is understandable. It’s also where claims, repair scope, and mold risk start to get more complicated.
A clean-water leak caught quickly is one thing. A leak left running through the day, or a backup that affected porous materials, is a different type of job entirely. The repair plan changes. The documentation matters more. The drying process becomes technical instead of improvised.
That’s why the rest of this guide is focused on the sequence that works in real homes. Not internet shortcuts. Not cosmetic cover-ups. The goal is to help you make good decisions in the first hour, understand what professional drying does, and avoid repairs that fail because moisture stayed hidden.
Your First Hour Emergency Action Plan
The first hour sets the direction of the whole job. If you do the right things early, you reduce spread, improve documentation, and give your insurance claim a cleaner paper trail.
Start with safety before cleanup
If water is near outlets, appliances, power strips, or an electrical panel, stay out of that area until power to the affected space is shut off. If the ceiling is sagging, don’t stand under it. Wet drywall can lose strength fast.
If you need help finding the house shutoff, this guide on where to find the main water shut-off is worth bookmarking before an emergency happens.
What to do in order
Shut off the water source
If it’s a sink, toilet, dishwasher, or refrigerator line, close the local supply valve if possible. If the valve won’t turn or the source isn’t clear, shut off the main.Cut power to affected areas if needed
Use the breaker panel only if you can reach it without stepping into standing water. If you can’t do that safely, leave it alone and wait for a qualified professional.Photograph and record everything
Take wide shots, close-ups, and video of the source, affected rooms, wet contents, flooring, walls, and ceiling areas. Do this before moving furniture or throwing anything away unless there’s an immediate safety issue.Move valuables and soft goods
Pick up rugs, paper items, electronics, artwork, and loose contents. Place aluminum foil, wood blocks, or plastic barriers under furniture legs if the water is clean and the pieces are too heavy to move.Begin light containment only when safe
Use towels or mops for small clean-water spills. Open cabinet doors and interior doors to improve airflow.
What not to do
Some mistakes make the loss harder to restore and harder to claim.
- Don’t use a household vacuum on standing water: It’s unsafe and the equipment isn’t designed for extraction.
- Don’t pull up flooring blindly: You can destroy evidence of the loss path and make the scope harder to document.
- Don’t run HVAC without thinking: If the system might pull humid air or contamination through the house, leave it off until the situation is assessed.
- Don’t assume bleach fixes the problem: Bleach doesn’t replace drying, cleaning, or material removal when contamination is present.
Take photos first. Homeowners often remember to clean up, but forget to preserve the condition of the property before they changed it.
Insurance steps that help immediately
Call your carrier early. Stick to observable facts. Tell them what happened, when you discovered it, what rooms are affected, and what emergency steps you took to prevent further damage.
Keep a simple written log with the time you found the issue, who you spoke with, what emergency work started, and what items were affected. That basic record becomes useful later when drying logs, invoices, and repair estimates start coming together.
The Science of Water Removal and Structural Drying
Homeowners often think drying means air. It doesn’t. Air movement helps, but real structural drying is a controlled process built on measurement, extraction, dehumidification, and verification.
Why visible dryness means very little
A floor can feel dry and still be holding moisture below the surface. Drywall can look normal while insulation behind it stays wet. Baseboards can remain tight to the wall while framing behind them is still raised.
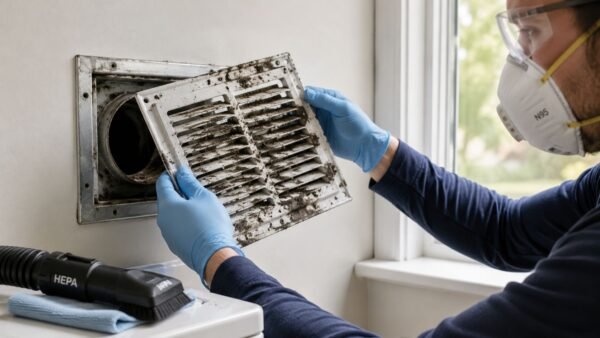
That’s why professional mitigation starts with inspection and moisture mapping. Technicians use moisture meters, infrared thermal imaging, and probing tools to identify where water moved and what materials are retaining it. They also classify the water source under IICRC S500 standards as Category 1, 2, or 3, because the source determines how aggressive cleaning and removal need to be.
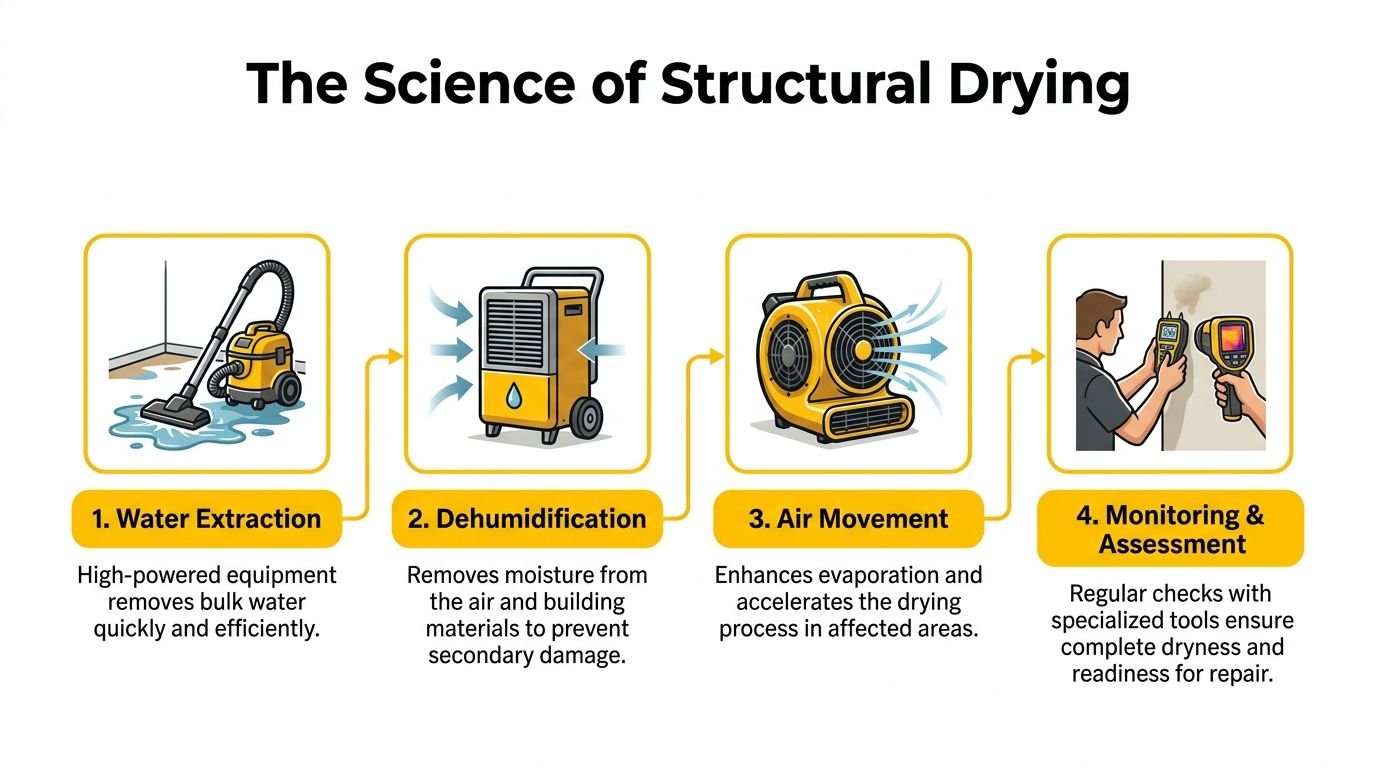
The equipment that delivers results
Professional drying works because each tool does a different job.
- Commercial extractors: Remove bulk water quickly from flooring, pad, and hard surfaces.
- Air movers: Increase evaporation across wet materials when placed correctly.
- Dehumidifiers: Pull moisture from the air so evaporation can continue instead of stalling.
- Meters and thermal cameras: Confirm where moisture is and whether drying is progressing.
Here’s the practical point. A few box fans may make a room feel less damp, but they don’t create a documented drying system. They also don’t prove anything to an adjuster if there’s later disagreement about whether materials were fully dried.
A lot of homeowners benefit from understanding how humidity affects your indoor comfort because indoor humidity control is tied directly to how efficiently wet materials release moisture during mitigation.
The target is measured dryness
Professional drying aims to bring affected materials to below 15% moisture content under IICRC S500 drying standards, with daily monitoring and adjustments during the process, according to Reyes Restoration’s guide to water damage restoration.
That same source notes that moderate jobs often take 3 to 7 days to dry when monitored properly, and that 70% of secondary mold failures come from premature drying cessation. That’s a critical point. The equipment doesn’t come out because the room “looks better.” It comes out after readings support removal.
If you’ve ever looked at a meter and had no idea what the reading meant, this breakdown of how to read moisture meter readings gives homeowners useful context for the numbers they’ll see on site.
A short visual helps if you want to see the process in action:
What works and what fails
What works is simple, even if the execution isn’t. Extract first. Open affected assemblies when needed. Set the right amount of airflow. Control humidity. Monitor every day. Adjust equipment based on actual readings.
What fails is just as consistent.
Field observation: Stopping equipment too early is one of the most common reasons a “small leak” turns into a tear-out later.
The failed version usually looks like this: towels, a fan, open windows, maybe a fresh coat of paint after the stain dries. Weeks later the baseboard swells, the flooring cups, or the wall cavity smells musty. At that point, repair costs and demolition scope are often worse than they would have been with proper drying on day one.
Assessing the Full Damage and Spotting Hidden Dangers
The stain on the ceiling or the wet plank on the floor is often just the clue, not the full loss. To make smart decisions, you need to think like an inspector. Where did the water start, where could it have traveled, and what materials likely trapped it?
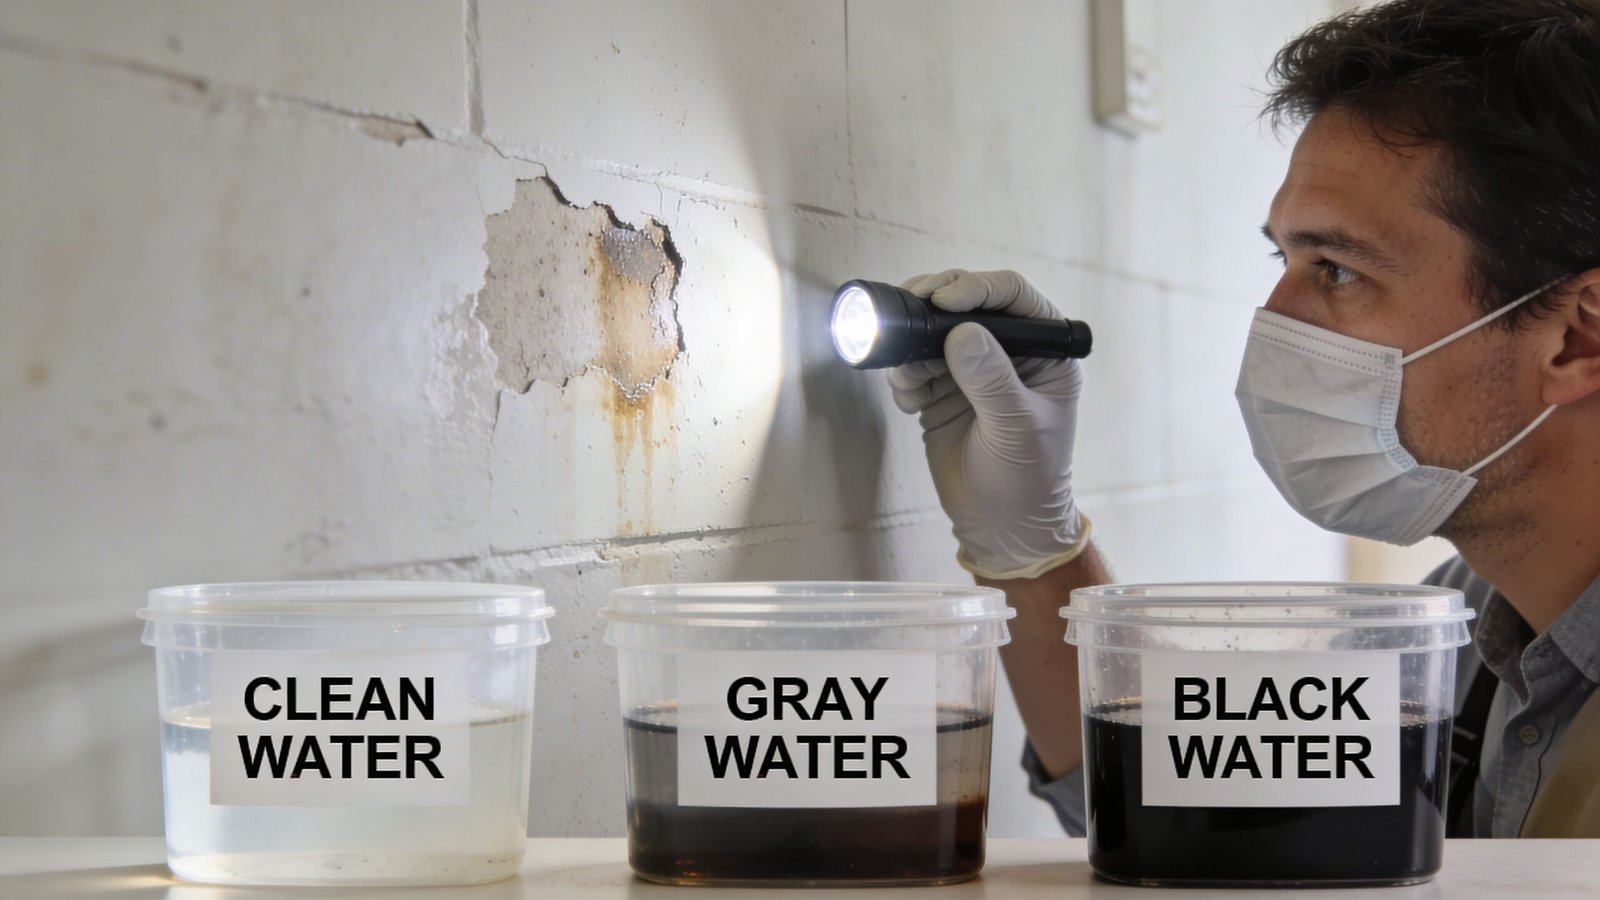
Start with the water category
Not all water damage home repair is handled the same way.
Category 1 starts as a clean source, such as a fresh supply line leak.
Category 2 involves gray water, which may contain contaminants from appliances or certain plumbing sources.
Category 3 is black or contaminated water, such as sewage or flood-related intrusion.
That category matters because it changes the cleaning method, what materials can be saved, and whether DIY handling is even appropriate. Porous materials exposed to contaminated water often need removal rather than surface cleaning.
Hidden moisture is where many jobs go sideways
A wall can look mostly normal and still be wet inside. Water wicks upward in drywall. It settles in insulation. It follows framing and can move laterally past the point where you see staining.
Hidden water damage in walls and insulation accounts for 40-60% of water loss claims that escalate to require mold remediation, and delayed discovery often increases total repair costs by 2-3 times, according to this Home Depot restoration guide.
That’s why a proper inspection uses tools, not guesses. Infrared cameras help flag temperature differences that suggest moisture. Moisture meters verify material conditions. In some cases, controlled probing or small access openings are the only way to confirm what’s happening inside the assembly.
If you suspect concealed moisture, this page on how to detect water leaks in walls is a useful starting point for understanding what signs matter.
What homeowners can check themselves
You don’t need to diagnose the whole loss alone, but you can identify red flags.
- Look for material change: Swelling baseboards, loose vinyl plank, lifted laminate edges, and soft drywall all suggest migration.
- Trust odor changes: A musty smell after a leak often points to trapped moisture, not just surface dampness.
- Check adjacent rooms: Water crosses thresholds, follows underlayment, and shows up in places that seem unrelated.
- Pay attention to insulation and ceilings: Wet insulation holds moisture longer than many homeowners expect.
For recurring issues, homeowners also benefit from learning the basics of water leak detection because the source of the problem isn’t always obvious from the room where damage appears.
If the visible damage seems surprisingly minor compared to how much water escaped, assume some of the loss is hidden until testing proves otherwise.
Local conditions that complicate hidden damage
Los Angeles homes bring their own quirks. Older plaster assemblies, mixed remodel work, flat-roof transitions, slab-on-grade areas, and wall cavities altered by decades of patching can all hide moisture in different ways. In hillside properties, drainage patterns can also send water to lower levels long after the original event.
That’s why “wait and see” is such a risky strategy. It doesn’t just delay repair. It often changes the kind of repair required.
DIY Repair vs Calling a Professional Restoration Company
Some water losses are small enough for a homeowner to handle. Many aren’t. The hard part is that people usually make the DIY decision before they know the actual scope.
A good rule is this. If the loss involves contamination, hidden moisture, multiple materials, or insurance documentation, the risk of getting it wrong rises fast.
DIY vs Professional Water Damage Repair
| Factor | Okay for DIY | Call a Professional Immediately |
|---|---|---|
| Water source | Small clean-water spill from a known source that was stopped quickly | Gray or black water, sewer backup, unknown source, or water that sat long enough to become unsanitary |
| Affected materials | Non-porous surfaces with minimal spread | Drywall, insulation, cabinetry, subfloor, hardwood, laminate, or built-ins that may hold hidden moisture |
| Scope you can confirm | A very limited area with no sign of migration | Water moved into walls, under floors, across rooms, or below cabinets |
| Safety conditions | No electrical concern and stable ceilings/walls | Water near outlets, appliances, sagging drywall, or structural concern |
| Documentation needs | You’re paying out of pocket for a minor issue | You expect to file an insurance claim and need moisture maps, photos, and drying records |
| Confidence in full drying | You can dry and monitor a tiny clean-water incident confidently | You can’t verify internal moisture or material dryness |
The insurance trade-off homeowners miss
DIY can save money on a minor issue. It can also create a bigger financial problem if the job needed professional mitigation and the documentation never existed.
Insurance carriers usually want a clear cause of loss, emergency mitigation records, photos, scope notes, and invoices that connect the damage to necessary repair. If a homeowner removes materials too early, throws away evidence, or paints over staining before the claim is evaluated, the file gets harder to support.
That doesn’t mean every claim is denied. It means avoidable ambiguity gets introduced.
When the decision should be immediate
Call for professional help right away if:
- Contaminated water is involved
- Drywall, insulation, or flooring stayed wet
- The leak affected more than one room
- The source was hidden inside a wall, ceiling, or slab area
- You need a documented drying process for insurance
If you need a benchmark for what a qualified restoration provider should look like, review what a dedicated restoration pro is expected to handle. The key is technical drying, documentation, and reconstruction coordination, not just cleanup.
A contractor who can repaint a wall isn’t automatically equipped to mitigate a water loss correctly.
The Water Damage Home Repair and Restoration Phase
Once the structure is dry and the wet materials have been identified, the repair phase begins. At this point, the house starts looking normal again, but only if the mitigation work was done correctly first.
What reconstruction usually includes
The repair scope depends on what had to be removed and what can be saved. Common work includes replacing drywall, reinstalling insulation, resetting baseboards, repairing trim, painting, and putting flooring back together. In heavier losses, crews may also need to replace cabinetry components, sections of subfloor, or damaged ceiling assemblies.
The sequence matters. Rebuild too early and you trap residual moisture. Rebuild too late and the home stays disrupted longer than necessary.
What the budget can look like
The national average cost for water damage repair is $3,869, but the range is broad depending on the water category, affected materials, and scope of reconstruction, according to the Harvard Joint Center for Housing Studies blog on disaster repairs.
That same source notes:
- Drywall repair: $300 to $850 per wall
- Flooded basement repair: $500 to $2,800
Those are useful anchor points, but they don’t tell the whole story in Los Angeles homes. Finish level, access, matching existing materials, and whether the loss affected custom cabinetry or specialty flooring all influence the final number.
What works best during rebuild
Homeowners usually get better outcomes when they separate emergency urgency from finish decisions.
Use that approach:
- Approve necessary dry-out and demolition quickly: Delay makes hidden issues harder to contain.
- Take time on finish matching: Flooring, paint sheen, trim profiles, and cabinet faces deserve careful review.
- Ask what is being repaired versus replaced: Partial repair can be reasonable, but only if the result is durable and visually acceptable.
- Keep documents organized: Save drying reports, photos, invoices, and estimate revisions in one place.
The practical goal of restoration
The best repair work doesn’t just hide the incident. It restores function, sanitation, structural integrity, and appearance in the right order.
That matters in kitchens, baths, laundry rooms, and upstairs plumbing areas where a rushed cosmetic fix often fails first. Stain-blocking paint can cover a mark, but it won’t flatten cupped flooring. New baseboards won’t solve trapped moisture in the wall. Water damage home repair is successful when the assembly is dry, stable, and rebuilt to perform normally again.
Partnering with Onsite Pro Restoration in Los Angeles
For Los Angeles homeowners, response time changes outcomes. A team that can arrive quickly, inspect properly, and start containment without delay gives you a cleaner path on both mitigation and insurance.
Onsite Pro Restoration serves communities within a 25-mile radius of North Hollywood, including areas such as Glendale, Burbank, West Hollywood, Beverly Hills, and Sherman Oaks. The company is available 24/7 and typically arrives in about an hour to assess, contain, and begin restoration work based on the publisher information provided for this article.
What that means in practical terms
The process is built around emergency assessment, moisture mapping, work authorization, mitigation, documentation, and coordination with insurance carriers. For a homeowner in crisis, that structure matters because it reduces the chance that key steps get skipped in the rush.
IICRC-certified handling also matters. Water losses aren’t just cleanup jobs. They require category assessment, equipment planning, daily monitoring, and clear records that support the claim and the rebuild.
Why insurer coordination helps
A lot of friction in water losses comes from communication gaps. The homeowner is trying to protect the property. The adjuster needs support for the scope. The mitigation team is generating readings, photos, and equipment logs in real time.
When a restoration company already works directly with major insurers, that handoff is usually smoother. It doesn’t guarantee a coverage decision, but it does help the file move with better documentation and fewer missing details.
If you’re in Los Angeles and the loss is active, the main priority is simple. Get the source under control, protect the house from further damage, and bring in a team that can document what’s wet before the repair conversation starts.
FAQ for Water Damage Home Repair in LA
| Question | Answer |
|---|---|
| What’s the difference between water mitigation and water restoration? | Mitigation is the emergency phase. It includes stopping further damage, extracting water, removing unsalvageable materials when needed, and drying the structure. Restoration is the repair phase that brings the home back to pre-loss condition, such as drywall replacement, painting, flooring, and finish work. |
| Can I stay in my house during water damage home repair? | Sometimes yes, sometimes no. If the loss is limited, contained, and doesn’t affect critical rooms, homeowners often remain in place. If contaminated water is involved, equipment noise is heavy, power is disrupted, or demolition affects bathrooms or kitchens, temporary relocation may be the safer option. |
| Will my homeowners insurance cover water damage repair? | Coverage depends on the cause of loss and your policy language. Sudden and accidental interior water damage is often handled differently than long-term seepage, deferred maintenance, or certain flooding events. The best move is to report the loss promptly, document conditions before cleanup, and ask your carrier specific coverage questions in writing. |
| Why does the wall look dry if professionals still say it’s wet? | Surface appearance is a poor indicator. Drywall paper, paint, trim, and flooring can appear normal while moisture remains inside the assembly. Professionals rely on meters, thermal imaging, and comparative readings because those tools show what visual inspection misses. |
If you need immediate help with a leak, overflow, or hidden moisture issue, contact Onsite Pro Restoration. They provide 24/7 emergency response in Los Angeles, document damage for insurance, and handle the full path from water extraction and structural drying to repair coordination.