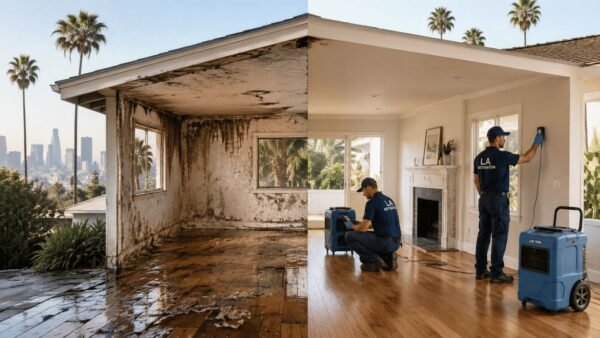
The first few moments after you discover a burst pipe, a small fire, or a creeping mold problem are chaotic. It’s easy to feel overwhelmed, but what you do right then and there is absolutely critical. A successful insurance claim for property damage hinges on two things: stopping the damage from spreading and documenting everything before a single thing gets moved. The initial actions you take after discovering water or fire damage in your Los Angeles home can dramatically affect your final settlement.
Navigating a property damage claim can feel overwhelming. Call Onsite Pro at (818) 336-1800 for expert help with documentation and restoration, ensuring you get a fair settlement.
Your First Moves After Discovering Property Damage
Panic is normal when you find your kitchen flooding or soot coating the living room. But the actions you take in that first hour can make or break your insurance claim. Buried in your policy is a "duty to mitigate" clause. In plain English, that means you're required to take reasonable steps to prevent the damage from getting worse. If you don't, the insurance company could have grounds to reduce or even deny your claim.
Secure The Property And Mitigate Further Harm
Your first job is to stop the bleeding, so to speak. If it’s safe, you need to shut down the source of the damage. This isn’t about making repairs; it’s about damage control.
Think about a common scenario in a Sherman Oaks home: a leaking water heater. The very first thing you should do is find the water supply shut-off for the heater or, if needed, the main valve for the entire house. That one simple action prevents hundreds of more gallons from soaking into your floors, drywall, and framing. This is the core of what water mitigation is all about. Knowing the right steps to take after water damage occurs can save you from a much bigger headache and strengthen your claim.
Here are a few other real-world examples of immediate mitigation in Los Angeles:
- Fire Damage: After a kitchen fire in your Burbank condo, once the fire department gives the all-clear, cover any broken windows or holes in the roof with a tarp. This keeps the weather out and protects what’s left inside.
- Sewer Backup: A sewer line backs up into your Santa Monica ground-floor apartment. Immediately stop using all toilets, sinks, and showers. Get everyone out of the affected area to avoid exposure to dangerous contaminants.
- Burst Pipe: A pipe bursts in your Pasadena home. Shut off the main water valve. If the area is flooded, turn off the electricity to that part of the house at the breaker box to prevent a serious electrical hazard.
Crucial Takeaway: Mitigation is not cleanup. It’s the emergency first aid you perform to stabilize the scene. Don't throw away damaged belongings or start permanent repairs until your insurance adjuster has seen the property.
Document Everything Before It's Disturbed
Before you even think about moving a soaked rug or wiping up a puddle, grab your smartphone. You need to become a detective and create a detailed visual record of the damage exactly as you found it. This initial evidence is what adjusters rely on to understand the full scope of your loss.

Take way more photos and videos than you think you'll need. Start with wide shots of each affected room to establish the scene, then zoom in on the details—the high-water mark on the drywall, the warped cabinet door, the soot on the ceiling. Record a walk-through video where you narrate what happened, what you see, and when you discovered it. That personal context can be incredibly powerful later on.
To ensure you cover all your bases in those first critical moments, use this checklist as a guide.
Immediate Action Checklist After Property Damage
| Action Item | Why It's Critical for Your Claim |
|---|---|
| Ensure Safety First | Your well-being is paramount. Address immediate hazards like electrical risks or structural instability before doing anything else. |
| Stop the Source of Damage | This fulfills your "duty to mitigate" and prevents the insurer from arguing the damage worsened due to inaction. |
| Take Photos & Videos | This creates undeniable, time-stamped proof of the initial extent of the loss before anything is altered. |
| Move Undamaged Items | If safe, move unaffected valuables out of harm's way to protect them from secondary damage. |
| Contact a Professional | Calling a certified restoration company gets an expert on your side to perform mitigation and document technical details. |
| Notify Your Insurer | Promptly reporting the loss and getting a claim number officially starts the process. |
Following these steps methodically demonstrates to your insurer that you are a responsible homeowner, which can set a positive tone for the entire claims process.
Why This Matters For Your Los Angeles Claim
Here in Los Angeles, property values are no joke. What seems like a minor issue can quickly spiral into a very expensive repair. Your adjuster needs undeniable proof that the warped hardwood floors in your Glendale home were a direct result of that dishwasher leak, not a problem that already existed.
Your initial, time-stamped photos provide that proof. This meticulous documentation from the get-go shows your insurance company you’re serious, making it much harder for them to downplay the severity of the incident and building a rock-solid foundation for a fair settlement.
Building an Undeniable Record of Your Damages
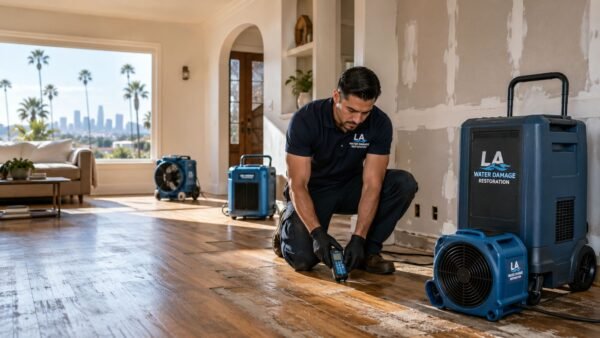
Once you've stopped the source and prevented more damage, your next job is to create a rock-solid record of the loss. A successful insurance claim for property damage isn't won with arguments; it's won with evidence. Your goal is to build a case so thorough and organized that it leaves no room for doubt or dispute. This is where you go beyond a few quick snapshots and create a detailed inventory of every single thing that was affected.

This step is more critical than ever. In 2022, global insured losses from natural catastrophes smashed $127 billion—a staggering figure that puts pressure on insurers to scrutinize every line item. Combine that with construction inflation soaring over 35% since 2020, and you can see why your detailed documentation is the best tool you have to justify the full value of your claim.
Master The Art of Visual Documentation
Your smartphone is your most powerful ally in this process. Adjusters see hundreds of claims, and clear, compelling visuals make yours stand out and are far easier to process.
- Go Beyond Wide Shots: Sure, start with wide-angle photos and videos of each room to set the scene. Then, zoom in. Get granular. Capture close-ups of serial numbers on appliances, brand names on fixtures, and the specific damage to materials.
- Show Scale and Severity: Put a ruler or tape measure in your photos to show the depth of standing water or the size of a crack in the ceiling. If your Glendale basement flooded, a photo of the high-water mark on the drywall next to a yardstick tells a powerful story.
- Narrate a Video Tour: A narrated walkthrough is incredibly effective. As you record, state the date, describe what you're seeing, and point out specific damages as you move through your home. This personal account adds a layer of authenticity that photos just can't match.
Create a Detailed Loss Inventory
A visual record is essential, but it needs a written inventory to back it up. This is your detailed spreadsheet or list of every single item that was damaged or destroyed. I know it's tedious, but this document is the backbone of your claim's valuation.
For each item, you need to list:
- Item Description: Be specific. Not just "TV," but "Samsung 55-inch 4K Smart TV."
- Location: Where was it? "Living Room," "Master Bedroom Closet."
- Manufacturer/Brand: Note the brand name if you know it.
- Age of Item: Give your best estimate of how old it was.
- Original Cost: Dig up receipts or credit card statements if you can. If not, a reasonable estimate will do.
- Replacement Cost: Research what it would cost to buy a new, comparable item today.
This inventory will be the main document your adjuster uses to calculate your personal property settlement. An incomplete list directly translates to a lower payout. Don't rush it.
Track Every Single Expense
Your policy likely covers "Additional Living Expenses" (ALE) if you have to move out, as well as the cost of any temporary repairs. Meticulously save every receipt related to the incident.
This includes things like:
- Hotel bills and meal receipts if you can't live at home.
- The cost of tarps, plywood, or other materials you bought to stop further damage.
- Receipts for any emergency services, like a 24/7 plumber or water extraction crew.
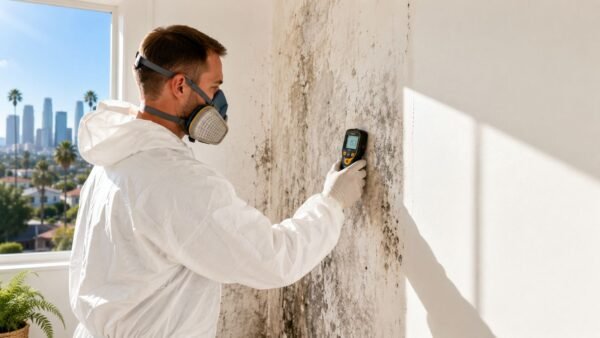
A professional restoration team can also provide invaluable documentation. We use specialized tools, like moisture meters, to find hidden water damage that isn't visible to the naked eye. To get a better sense of what we're looking for, check out our guide on how to read moisture meter readings. This kind of expert evidence adds serious weight to your insurance claim for property damage, ensuring hidden issues aren't missed by the adjuster.
Filing Your Claim and Working With the Insurance Adjuster
You've done the initial damage control and have your first round of photos and notes. Now, it's time to shift gears from crisis management to the official recovery process by filing your insurance claim for property damage. How you handle this next phase—from the first call to your insurer to your interactions with their adjuster—can make a huge difference in the outcome.

Opening Your Claim The Right Way
Don't wait. Contact your insurance agent or the company's claims hotline as soon as you can. When you make that call, be ready with your policy number, the date you discovered the loss, and a straightforward description of what happened. Something like, "The supply line to our upstairs toilet burst and flooded the second floor and the ceiling below."
Stick to the facts. This isn't the time to guess what caused the failure or accept any blame. Your only job right now is to report the what, where, and when.
The insurer will give you a claim number. Treat this number like gold—it's the key to every conversation you'll have from this point forward. A smart move is to follow up your call with a quick email confirming your conversation and that claim number. This creates a simple paper trail from day one.
Preparing for the Adjuster's Visit
Next, the insurance company will assign an adjuster to inspect the damage. Their visit is essentially an audit, and the documentation you've gathered is your evidence.
Before they show up:
- Don't Clean Up Too Much: Beyond stopping further damage, resist the urge to do a major cleanup. The adjuster needs to see the full, unfiltered scope of the loss.
- Get Your Evidence Organized: Have your photos, videos, and inventory of damaged items ready to go. A well-organized file shows you're on top of things.
- Be There and Be Your Own Advocate: Walk the property with the adjuster. You know your home best. Point out things they might miss, like the subtle swelling on the baseboards behind the couch or the faint smell of smoke that still lingers in the closets of your Burbank home.
This first meeting really sets the tone for the entire claim. Be polite and professional, but remember that the adjuster works for the insurance company. To get a fair settlement, you'll need to use effective insurance adjuster negotiation strategies to make sure nothing gets overlooked.
Understanding the Types of Adjusters
It’s important to know who you're dealing with, because not all adjusters are the same. Their role can influence the entire claims process.
| Adjuster Type | Who They Work For | Key Characteristic |
|---|---|---|
| Staff Adjuster | Your Insurance Company | A direct employee of your insurer. Their primary loyalty is to their employer. |
| Independent Adjuster | Hired by Your Insurer | A contractor hired by the insurance company, usually when they're swamped. They are still paid by and work for the insurer. |
| Public Adjuster | Hired by You | A licensed professional you hire to manage the claim on your behalf. They work for you and are typically paid a percentage of the final settlement. |
In most cases, you’ll be working with a staff or independent adjuster. Their job is to assess the damage, figure out what's covered by your policy, and write an estimate for the repairs.
Questions You Must Ask The Adjuster
Don't just be a spectator during the inspection. This is your chance to get crucial information and set expectations.
Key Takeaway: You have a right to understand how your claim will be handled. Asking direct questions helps you hold the insurer accountable and stay in control of the process.
Have a list of questions ready. Here are a few to get you started:
- What is your timeline for completing the investigation and sending me the initial report?
- Do you see any potential issues with coverage for this claim?
- Can you explain how my deductible will be applied to this loss?
- Will your estimate be prepared using a specific software, like Xactimate?
- What's the best way to communicate with you as we move forward?
Asking these questions shows you're engaged and helps you know what to expect next. It’s a core part of managing your claim well. For more in-depth advice, check out our guide with specific insurance claim tips for water damage—the principles apply to almost any type of property damage claim.
Decoding Repair Estimates and Choosing Your Contractor
After the adjuster’s inspection, you’ll get a document that can feel incredibly daunting: a detailed scope of work and an initial settlement offer. This isn't just a simple quote. It's a complex report, often spit out by software like Xactimate, that breaks down your repair into dozens, sometimes hundreds, of line items.
Your job is to make sure this document actually reflects what it will cost to put your property back to the way it was before the disaster.
This step is more critical than ever, especially here in California. Wildfires have surged as a top driver of property damage claims, skyrocketing from just 1% of global insured losses before 2015 to 7% over the last decade. Recent Los Angeles County fires alone have caused billions in damages.
Combine that trend with a post-2020 construction inflation of over 35%, and you can see why every line on that estimate matters. Rebuilds are more expensive than ever, so you have to scrutinize every detail.
Reading Between the Lines of the Adjuster’s Estimate
At first glance, the adjuster’s estimate can look like a foreign language. You’ll see line items for everything from "remove and replace drywall" to "apply one coat of primer." Don't just skim it—read every single line.
Look for omissions, because they happen all the time:
- Code Upgrades: Did the electrical short that started the fire also involve wiring that’s no longer up to Los Angeles city code? Your policy might cover the cost of bringing it up to current standards.
- Matching Materials: The adjuster might budget to replace just one section of your kitchen cabinets. But will the new ones perfectly match the old ones? If not, the insurer should be paying to replace the entire set for a consistent, pre-loss look.
- Hidden Damage: An initial inspection can easily miss moisture that seeped behind walls or soot that settled deep inside your HVAC system. This stuff often isn't discovered until demolition begins.
Actual Cash Value vs. Replacement Cost Value
You need to understand two key terms because they dramatically impact your payout. Your policy will specify whether you have an Actual Cash Value (ACV) or Replacement Cost Value (RCV) policy.
Key Insight: The difference between ACV and RCV can mean tens of thousands of dollars. RCV is always what you want—it provides the funds you actually need to rebuild without you having to cover the gap created by depreciation.
- Actual Cash Value (ACV): This is what your damaged property was worth, minus depreciation. If your 10-year-old roof is destroyed, ACV pays you for the value of a 10-year-old roof, not what it costs to install a brand new one.
- Replacement Cost Value (RCV): This is the good stuff. It pays the full cost to replace your damaged property with new materials of similar kind and quality, without deducting for depreciation. Insurers often pay the ACV first, then release the rest of the money (the depreciation) after you submit receipts proving you’ve completed the repairs.
Your Right to Choose Your Own Contractor
The most powerful tool you have at this stage is your right to choose your own contractor. Your insurance company might offer a list of their "preferred vendors," but let me be clear: you are never obligated to use them.
Get an independent estimate from a trusted, licensed restoration contractor. A professional firm like Onsite Pro will create its own detailed estimate using the same industry-standard software the insurer uses. This gives you a crucial apples-to-apples comparison.
When our estimate comes in higher, it’s because we’ve identified items the adjuster missed, making sure the repair is complete and done right. This independent scope of work becomes your single best piece of leverage for negotiating a fair and accurate settlement. To get a better sense of what to look for, you can explore our guide on finding qualified restoration and water damage companies near you.
Navigating Disputes and Finalizing Your Settlement
It would be nice if every insurance claim for property damage sailed smoothly to the finish line, but that's often not the case. Delays, lowball settlement offers, and even outright denials are frustratingly common, especially when insurers are swamped. This is where a little strategy and persistence really pay off.

The scale of modern disasters puts immense strain on the insurance system. Recently, global insured losses from natural disasters hit $127 billion, with the U.S. responsible for a staggering $103 billion of that. Here in California, recent wildfires alone racked up $41 billion in insured losses.
For LA homeowners, these numbers paint a clear picture: you have to know how to navigate a dispute when your insurer is juggling an unprecedented volume of claims. You can explore more about these global insured loss trends and see what they mean for policyholders.
What to Do When the Offer is Too Low
Think of the adjuster's first offer as a starting point for negotiation, not the final word. If the settlement amount won't even come close to covering the documented repairs, your first move is to respond professionally and in writing.
Draft a formal letter or email that clearly lays out the discrepancy. You'll want to reference specific line items from your independent contractor's estimate that the insurer’s scope of work either missed or undervalued. Keep it based on facts and evidence, not emotion.
Escalating a Stalled or Denied Claim
If a polite, evidence-backed appeal doesn't get you anywhere, you still have options.
- Invoke the Appraisal Clause: Buried in most policies is an "appraisal clause." This process lets you and your insurer each hire an independent appraiser. The two appraisers then work to agree on the value of the loss. It's a formal way to break a deadlock.
- Hire a Public Adjuster: A public adjuster is a licensed professional you hire to represent your interests. They take over all communication, handle the documentation, and negotiate on your behalf. They typically work for a percentage of the final payout.
- Consult an Attorney: If your claim is denied based on what feels like an unfair reading of your policy, or if the insurer is acting in "bad faith" (unreasonably delaying or denying a valid claim), it might be time to talk to an attorney who specializes in property insurance law.
Local Example: Imagine a slow, hidden pipe leak in a Beverly Hills home causes extensive mold. The insurer’s adjuster budgets only for basic drywall replacement, completely ignoring the professional mold remediation and containment needed. This is a classic dispute where hiring a public adjuster or invoking appraisal is essential to get the funds for a safe, proper repair.
Receiving Payment and Closing Your Claim
Once you finally agree on a settlement number, the final steps can begin. The payment process often involves your mortgage company, a detail that surprises many homeowners.
Because your lender has a financial stake in the property, the insurance check will likely be made out to both you and your mortgage company. You’ll have to endorse it and send it to them. They will then release the funds in stages as repairs are completed and inspected—it's their way of protecting their investment and ensuring the work actually gets done.
Don't sign a final release or "proof of loss" statement until you are 100% satisfied that every repair has been completed to pre-loss condition. Signing off too early can bar you from claiming additional, hidden damage that might be discovered later. Your final signature closes the book on your insurance claim for property damage, so make sure the story has the right ending.
FAQ: Los Angeles Property Damage Claims
An insurance claim for property damage can feel like a maze, full of confusing jargon and steps that are anything but clear. After years of helping Los Angeles homeowners navigate this process, we've found that most people run into the same worries and questions when disaster hits. This section provides direct answers to help you handle your claim with confidence.
Q: How long do I have to file a property damage claim in California?
A: This is tricky. While California law gives you three years to file a lawsuit, your insurance policy requires "prompt" notification. Waiting weeks or months to report damage can lead to a denial because it hinders the insurer's investigation. Your best bet is to call your insurance company immediately after ensuring your family's safety.
Q: Will filing one water damage claim make my insurance premium go up?
A: Not usually. A single claim for a sudden, accidental event like a burst pipe typically won't raise your rates. Insurers are more concerned with frequency. Multiple claims within a few years (e.g., three claims in three years) signal higher risk and are much more likely to cause a premium increase or non-renewal. If repair costs are only slightly above your deductible, consider paying out-of-pocket to protect your claims history.
Q: What should I do if my insurance claim is denied?
A: A denial isn't the final word. First, demand a written explanation citing the specific policy language used for the denial. If you believe the denial is unfair, file a formal appeal with supporting evidence, like an independent contractor's report. For disputes over the cost of repairs, invoke your policy's appraisal clause. For complex denials, consider hiring a public adjuster or an insurance attorney.
Q: Can I start repairs before the insurance adjuster inspects the damage?
A: You must start emergency repairs to mitigate further damage, as required by your policy. This includes calling a 24/7 restoration company for water extraction, boarding up windows, or tarping a roof. However, do not begin permanent repairs like tearing out drywall or replacing flooring. The adjuster needs to see the original, unaltered damage to create an accurate scope of work. Document any emergency work with photos and keep all receipts.
If you're dealing with property damage in the Los Angeles area and need a team that knows how to document a loss for your insurance claim and get repairs moving, Onsite Pro Restoration is on call 24/7. Contact us for a free assessment to secure your property and get the claims process started on the right foot. Visit us at https://onsitepro.org or call our emergency line at (818) 336-1800 now.