Discovering water damage in your home, whether from a burst pipe in Burbank or a roof leak after a storm in Sherman Oaks, is incredibly stressful. The immediate aftermath is overwhelming, but the insurance claim process that follows can feel even more daunting. Missteps can lead to delays, underpayments, or even outright claim denials, leaving you with significant out-of-pocket expenses. This guide is designed to prevent that. We've compiled a comprehensive list of actionable, IICRC-informed insurance claim tips for water damage to help Los Angeles homeowners navigate the entire process with confidence and clarity.
From meticulously documenting the initial loss to understanding your policy's fine print and effectively communicating with adjusters, each step matters. By following these proven strategies, you can protect your property, substantiate your losses effectively, and advocate for the full and fair settlement you are entitled to. This article provides the blueprint for turning a chaotic situation into a well-managed recovery.
1. Document Everything with Photographs and Videos
Before you move a single item or start any cleanup, your first and most critical action is to create a comprehensive visual record of the damage. This documentation is the single most powerful piece of evidence you will have for your insurance claim. It establishes the initial state of the disaster, proves the extent of the water's impact, and validates the necessity for specific repairs and replacements.

Think of yourself as a detective building a case. Your goal is to leave no doubt in the adjuster's mind about what was lost. For example, a homeowner in a Sherman Oaks condo who experienced a severe basement flood took over 200 photos. They captured water lines on the walls, submerged furniture, and close-ups of ruined personal belongings, leading to a smooth and complete claim approval. Another family in Santa Monica used video, walking through their entire home after a pipe burst to create an undeniable record. This turned the adjuster's site visit into a simple confirmation rather than a lengthy investigation. One of the most important insurance claim tips for water damage is to document first, act second.
How to Create Irrefutable Visual Evidence
To ensure your documentation is effective, follow a structured approach:
- Go Broad, Then Go Deep: Start with wide-angle photos and a continuous video walkthrough of every affected room to establish the overall scene. Then, capture detailed close-up shots of individual damaged items, structural materials (like warped baseboards or stained drywall), and any visible sources of the water intrusion.
- Show Scale and Detail: Place a ruler or a coin next to water lines on walls or damaged areas to provide a clear sense of scale. This helps the adjuster accurately assess the depth of the water and the scope of necessary repairs.
- Enable Timestamps: Turn on the date and time stamp feature on your camera or smartphone. This metadata provides a clear, unchangeable timeline of when the damage was recorded, which is crucial for your claim's credibility. Learn more about the initial steps you should take in our guide to First Onsite restoration.
- Backup Everything: Immediately create a dedicated folder on a cloud service like Google Drive or Dropbox and upload all your photos and videos. This protects your evidence from being lost if your phone is damaged.
2. Report the Claim Immediately
Once you have documented the initial scene, your next immediate action is to notify your insurance company. Time is of the essence, as most policies include a clause requiring prompt notification. Waiting even a few days can jeopardize your claim, especially if the delay allows secondary damage like mold growth to occur, which may have limited or no coverage. Prompt reporting starts the official claim process and gets an adjuster assigned to your case quickly.
Think of this first call as activating your support system. A homeowner in Encino who discovered a burst pipe at 2 a.m. called their insurer’s 24/7 hotline and had approval for emergency water extraction by sunrise, preventing extensive mold damage. Conversely, a property manager who waited five days to report a leak in a Beverly Hills building found their claim for mold remediation denied, as the insurer argued the delay directly caused the mold, violating the policy's timely reporting requirement. This initial step is one of the most critical insurance claim tips for water damage because it sets a positive and proactive tone for your entire claim.
How to Effectively Report Your Claim
To ensure a smooth start to the claims process, follow this checklist when you make the call:
- Call Immediately: Do not wait. Use your insurer's 24/7 claims hotline as soon as it is safe to do so. The faster you report, the faster you can get professional mitigation services started and prevent further damage.
- Have Information Ready: Before you dial, gather your policy number, a brief description of what happened, and the date and time you discovered the damage. Being prepared makes the call efficient and effective.
- Document the Conversation: Take detailed notes. Write down the date and time of your call, the full name of the representative you spoke with, and most importantly, your claim number. This number will be the primary identifier for all future communications.
- Follow Up in Writing: After your phone call, send a brief follow-up email to your insurer or assigned adjuster. Summarize your conversation, state the claim number, and reiterate the damage. This creates a written record of your prompt notification. Learn more about navigating the fine print in your homeowners insurance policy.
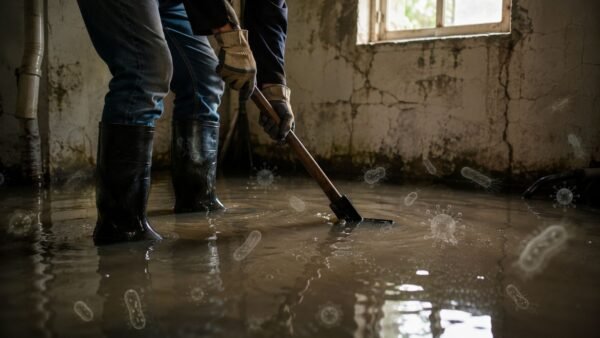
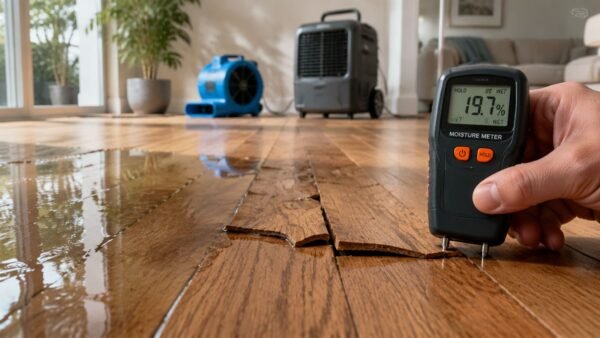
3. Take Immediate Mitigation Steps to Prevent Further Damage
Once you have documented the initial scene, your insurance policy requires you to take reasonable steps to prevent further harm. This is called "mitigation," and it's a critical part of your claim. Acting quickly to remove standing water, dry out the environment, and secure your property can significantly reduce the overall damage and cost, preventing secondary issues like mold growth and structural decay that could complicate or even jeopardize your claim.

Failing to mitigate can be seen as negligence by your insurer, potentially leading to a denied claim for any damage that occurred after the initial event. For example, a homeowner in Studio City who immediately rented industrial dehumidifiers after a leak prevented an estimated $50,000 in mold remediation costs. In contrast, another case saw repair costs double after a two-day delay allowed mold to colonize wet drywall. Proactive mitigation is one of the most essential insurance claim tips for water damage because it protects both your property and your claim's validity.
How to Effectively Mitigate Water Damage
To protect your home and satisfy your policy's requirements, follow these essential mitigation steps:
- Prioritize Safety: Before starting any cleanup, turn off the electricity and gas to all affected areas at the breaker box to prevent electrocution or gas leaks. Always wear personal protective equipment (PPE), including waterproof boots, gloves, and an N95 mask.
- Call a Certified Professional: Contact a water restoration company certified by the IICRC (Institute of Inspection, Cleaning and Restoration Certification). Their teams have the specialized equipment and training for safe and effective water removal and drying. Learn more about professional emergency water cleanup to understand what this process involves.
- Document Your Efforts: Keep detailed records of every action you take. This includes receipts for any equipment rentals, invoices from restoration companies, and photos of the mitigation work in progress. When planning your final repairs, it's wise to consider materials that will prevent future issues; you can consult this ultimate guide to buying waterproof flooring for long-term solutions.
- Remove Standing Water and Saturated Items: If it's safe, begin removing bulk water using a shop vac or buckets. Move wet rugs, furniture, and other belongings to a dry, well-ventilated area to salvage them and prevent moisture from wicking into other materials.
4. Gather and Organize All Relevant Documentation and Receipts
Beyond the initial visual evidence, your claim's strength depends on a meticulously organized paper trail. This documentation substantiates the value of your lost or damaged property and tracks every expense incurred during the restoration process. An adjuster's job is to verify losses, and providing them with a clear, complete, and organized file makes their work easier, which often leads to a faster and more favorable settlement.

Think of this as building the financial case for your claim. For instance, a property owner in Los Angeles who had digitized all receipts for a recent renovation was able to instantly prove the value of high-end fixtures destroyed by a supply line burst. In contrast, another homeowner with incomplete records for a similar flood struggled to justify their claimed amounts and ultimately received a significantly lower payout. Having organized proof is one of the most vital insurance claim tips for water damage because it shifts the conversation from estimation to reimbursement.
How to Create an Indisputable Document File
To ensure your claim is processed efficiently and fairly, follow a systematic approach to document management:
- Create a Master Claim Folder: Designate one physical folder and a corresponding digital folder (using Google Drive or Dropbox) for everything related to your claim. Label it clearly with your claim number and the date of the incident.
- Inventory Your Losses: Create a detailed spreadsheet listing every single item that was damaged. Include columns for the item description, original purchase date, purchase price, and links to replacement items online. This becomes your master list of losses.
- Compile Proof of Value: For significant items, find original purchase receipts, credit card statements, or even photos of the items before the damage occurred. This documentation is crucial for proving the "actual cash value" or "replacement cost value" of your belongings.
- Track All Related Expenses: Keep every single receipt for costs incurred due to the water damage. This includes temporary housing, meals if you are displaced, cleaning supplies, contractor invoices, and any other out-of-pocket expenses.
- Log All Communications: Maintain a running log of every conversation with your insurance company. Note the date, time, the name of the person you spoke with, and a summary of what was discussed. Save all email correspondence in your master digital folder.
5. Obtain Multiple Repair Estimates from Licensed Contractors
Once the immediate threat is neutralized, your focus shifts to the cost of recovery. Instead of accepting the first estimate or relying solely on the insurance company's preferred vendor, it is crucial to solicit multiple detailed bids for the restoration work. Obtaining at least two or three estimates from licensed and insured contractors establishes a fair market value for the repairs. This provides you with powerful leverage in negotiations and is one of the most effective insurance claim tips for water damage when ensuring your payout is sufficient.

Think of this process as doing your due diligence to protect your financial interests. For instance, a Los Angeles homeowner received an initial insurance offer of $5,500 after a dishwasher leak. By presenting three independent estimates that averaged $9,200, they successfully negotiated a claim increase that covered the full cost of repairs. In another case, a property manager in Pasadena saw estimates for the same commercial water damage range from $8,000 to $15,000. Choosing the lowest qualified bid saved the property owner thousands and demonstrated to the insurer that the chosen cost was reasonable and competitive.
How to Secure and Compare Effective Estimates
To use this strategy to your advantage, approach it methodically to ensure all bids are accurate and comparable:
- Verify Credentials First: Before a contractor even steps on your property, confirm they are licensed, bonded, and insured. Check their status with the California Contractors State License Board (CSLB) and ask for proof of their liability and workers' compensation insurance. You can find more details on how to select certified professionals by researching restoration water damage companies near you.
- Insist on Itemized Bids: A lump-sum quote is not enough. Request a detailed, line-item estimate that breaks down costs for labor, materials, equipment rentals, and permits. This allows you to compare bids on an "apples-to-apples" basis and spot any potential overcharges.
- Standardize the Assessment: Provide every contractor with the same documentation, including your photos, videos, and any initial assessment reports. Try to schedule their site visits close together so they are all evaluating the same conditions.
- Negotiate from a Position of Strength: Once you have gathered your repair estimates, knowing efficient strategies for your water damage restoration can be beneficial. Learn how to negotiate with contractors to ensure you receive fair pricing and clear terms before any work begins.
6. Understand Your Insurance Policy Coverage and Exclusions
Before you even file a claim, it's vital to know exactly what your homeowners insurance policy covers and, more importantly, what it excludes. Policies are not one-size-fits-all; they are complex legal documents with specific definitions for different types of water damage. Understanding these nuances is a critical insurance claim tip for water damage that can prevent a surprise denial and save you from significant out-of-pocket expenses.
Many homeowners mistakenly believe all water damage is covered. For instance, a family in Van Nuys learned their policy only covered "sudden and accidental" damage after discovering a slow, long-term leak from their dishwasher had rotted the subfloor. Because the damage was gradual, their claim was denied. Another homeowner in a coastal Santa Monica home found their standard policy did not cover damage from a sewer backup, an event that required a special endorsement they hadn't purchased. Knowing your policy's limits, deductibles, and exclusions is your first line of defense.
How to Demystify Your Insurance Policy
To avoid claim rejection, take a proactive approach to understanding your coverage:
- Review Your Declarations Page: This one-page summary is the most important part of your policy. It clearly lists your coverage types (like dwelling, personal property), the monetary limits for each, and your deductible amount. Keep a digital and physical copy readily accessible.
- Identify the Source of Water: Insurance policies treat water damage differently based on its origin. A burst pipe (a clean water source) is typically covered, while damage from a sump pump failure or sewer backup often requires a specific add-on or "endorsement."
- Distinguish Between "Flood" and "Water" Damage: Standard homeowners policies almost never cover damage from external flooding (e.g., rising rivers, storm surges). This requires a separate policy from the National Flood Insurance Program (NFIP) or a private insurer.
- Consult Your Agent: Don't hesitate to call your insurance agent and ask them to walk you through specific scenarios. Ask them directly, "What specific water damage events are excluded from my current policy?" and request an explanation of any confusing terminology.
7. Cooperate Fully with the Insurance Adjuster's Investigation
After you've documented the damage and contacted your insurer, the next crucial phase is working with the insurance adjuster. Your full cooperation and transparency are essential. The adjuster's role is to investigate the claim's validity, assess the scope of the damage, and determine the settlement amount based on your policy. By being helpful, organized, and honest, you build credibility and significantly streamline the path to a fair and prompt resolution.
Think of the adjuster as a fact-finder, not an adversary. Your job is to provide them with all the necessary facts to approve your claim. For instance, a homeowner in Burbank who experienced an appliance leak had all their photos, videos, and a detailed inventory list ready for the adjuster's visit. They walked the adjuster through the home, answered every question directly, and provided receipts for damaged big-ticket items. This preparation resulted in a full claim approval in less than two weeks. Conversely, an uncooperative claimant who restricts access or withholds information can create suspicion, leading to delays or even a denial.
How to Build a Productive Relationship with Your Adjuster
To ensure a smooth investigation process, approach the interaction with professionalism and preparation:
- Be Present and Prepared: Schedule the adjuster's visit for a time when you can be fully present and distraction-free. Have all your documentation (photos, videos, inventory lists, receipts) organized and readily available for their review.
- Conduct a Guided Tour: Walk through the damaged areas with the adjuster. Point out specific issues they might otherwise miss, such as moisture behind a cabinet or subtle warping in a hardwood floor. Explain the timeline of events clearly and factually.
- Document the Inspection: Take notes during the adjuster's visit. Record their comments, the measurements they take, and any initial assessments they share. If you feel overwhelmed, having a trusted friend or family member present to act as a second set of ears can be very helpful.
- Communicate Professionally: Maintain a calm and professional demeanor, even if you disagree with the adjuster's initial findings. Ask clarifying questions about their assessment process and request a written summary of their inspection. Follow up in writing with any new information or corrections after the visit.
8. Know When to Hire a Public Adjuster or Insurance Attorney
While you can navigate most minor claims on your own, there are situations where the complexity and scale of the damage demand professional advocacy. Bringing in a public adjuster or an insurance attorney is a strategic move when your claim becomes contentious, is exceptionally large, or involves nuanced policy language. These professionals work for you, not the insurance company, leveraging their expertise to level the playing field and ensure you receive the maximum settlement you are entitled to.
This step is one of the most crucial insurance claim tips for water damage when facing a significant loss. For instance, a Los Angeles homeowner with over $150,000 in damages from a slab leak was initially offered just $80,000. By hiring a public adjuster, they successfully negotiated a final settlement of $128,000. In another case, an attorney identified a policy ambiguity regarding mold remediation, resulting in the insurance company reversing its denial and approving a $200,000 payout. These experts advocate for your best interests when the stakes are high.
How to Know When You Need a Professional Advocate
Recognizing the right time to seek help can dramatically alter your claim's outcome. Consider hiring a professional if you encounter any of these scenarios:
- The Claim is Large or Complex: If your estimated damages exceed $25,000 or involve extensive structural repairs, a professional can manage the intricate documentation and negotiation process.
- The Insurer Denies or Undervalues Your Claim: A lowball offer or an outright denial is a clear signal that you need an expert to challenge the insurer's assessment. Don't accept an unfair decision without a fight.
- You Feel Overwhelmed: The claims process is time-consuming and stressful. If you lack the time or expertise to manage it effectively, delegating to a professional ensures nothing is overlooked.
- There Are Policy Disputes: When the insurance company interprets your policy coverage in a way that limits your payout, an attorney can provide a legal counter-argument to enforce the terms in your favor.
Frequently Asked Questions (FAQ) About Water Damage Claims
Q: How long do I have to file a water damage claim in California?
A: In California, the statute of limitations for property damage claims is generally three years from the date the damage occurred. However, your insurance policy likely requires "prompt notification," so you should report the damage to your insurer immediately, ideally within 24-48 hours, to avoid any potential claim complications.
Q: Will my insurance rates go up after a water damage claim?
A: It's possible. Filing a claim, especially for a significant amount, can lead to an increase in your premium at renewal time. The specific increase depends on your insurer, your claims history, and the cause of the damage. However, not filing a claim for major damage will leave you with much higher out-of-pocket costs than any potential premium increase.
Q: What is the difference between "sudden" water damage and "gradual" water damage?
A: "Sudden and accidental" damage, like a burst pipe or washing machine hose failure, is typically covered by standard policies. "Gradual" damage, which occurs over time from issues like a slow roof leak in a Sherman Oaks home or unsealed grout, is often considered a maintenance issue and is usually excluded from coverage.
Q: Should I accept the check the insurance company first offers me?
A: Not necessarily. The first offer is often a starting point for negotiation. Do not sign a final release or cash a check marked "full and final payment" until you are certain the amount covers all your repair costs, including any hidden damage found later. It's wise to get independent repair estimates to verify the offer is fair.
Q: Can I hire my own contractor, or do I have to use the one recommended by the insurance company?
A: You have the right to choose your own licensed and insured contractor. While an insurer's preferred vendor may streamline the process, you are not obligated to use them. Getting your own bids ensures you are comfortable with the quality of the work and that the costs are competitive.
Take Control of Your Water Damage Claim Today
Navigating a water damage insurance claim can feel like an overwhelming battle, especially when you are already dealing with the stress of a flooded home. However, you are far from powerless. By applying these detailed insurance claim tips for water damage, you transform from a victim of circumstance into an empowered advocate for your own recovery. The journey from initial discovery to a final, fair settlement is a marathon, not a sprint, and your proactive involvement at every stage is the key to a successful outcome.
Remember, the strength of your claim lies in the details. Meticulous documentation, immediate mitigation, and organized expense tracking are not just suggestions; they are the foundational pillars of a successful claim. From the moment you notice a leak from a faulty pipe in your Sherman Oaks condo to the aftermath of a major storm flooding your Santa Monica business, the principles remain the same. Capturing every angle on video, keeping every receipt, and understanding the fine print of your policy are your most powerful tools.
Key Takeaways for a Stronger Claim
To recap, the most critical actions you can take include:
- Document Everything: Create an undeniable visual record with photos and videos before anything is moved or repaired.
- Act Immediately: Promptly report the claim to your insurer and take decisive mitigation steps to prevent secondary damage like mold growth.
- Stay Organized: Maintain a dedicated folder for all communications, receipts, contractor estimates, and policy documents.
- Know Your Allies: Understand the roles of your insurance adjuster, licensed contractors, and potentially, a public adjuster. Do not hesitate to seek professional help if your claim becomes complex.
Ultimately, mastering these insurance claim tips for water damage is about more than just recovering costs; it's about reclaiming your property and your peace of mind. By being diligent, informed, and persistent, you ensure that your insurance provider fulfills its promise to make you whole again.